Primary Series

Urdhva Mukha Paschimottanasana

Urdhva Mukha Paschimottanasana

  • Urdhva: Upward
  • Mukha: Facing / Looking
  • Paschim: West / Behind (Referring to the dorsal or back surface of the body)
  • Uttana: Stretched
  • Asana: Pose

Urdhva Mukha Paschimottanasana is the twenty-ninth pose of the primary series, and the twenty-fifth seated pose. It prepares the practitioner for Sarvangasana-family poses and helps to build strength and finesse in the musculature of the low belly.

FOCUS ON…

This asana is very similar to Supta Konasana and Ubhaya Padangusthasana.

Study both of its predecessors closely and develop competence before introducing this movement. All the same actions apply. This asana is the most challenging of the three by far.

Once balanced in the state of the asana, the position of the body is an uprooted version of Paschimottanasana. Fold in closely, but keep the gaze upwards. Don’t try to balance delicately; use the strength of the limbs to find and hold the position.

Vinyasa of the Pose

The vinyasa count is the same as Ubhaya Padangusthasana.

The breath is a major ally here. It is important to use the breath and the bandha, and even to exaggerate them. Shyness with the breath makes this vinyasa more challenging than necessary.

From Sat, jump through and land in Dandasana.

Exhaling, keep the hands pressing into the floor by your hips and lay down slowly.

tadagi mudra

Inhale, reach the arms up overhead.

supta-lift

As the next exhalation leaves the body, lift straight legs off the ground, lift the hips, and place the feet in the hands smoothly.

Inhale, straighten the spine.


Urdhvamukha-Paschimottanasana-Reclined

Exhale strongly, curl in, and rock forward to balance. Inhale as you find your balance point. Gaze upwards.

Exhale, fold the torso to the legs as in Paschimottanasana. Five breaths here; this is the state of the asana.

Urdhvamukha-Paschimottanasana

Exhale, keep the legs where they are but place the hands on the floor beside the hips. Lift up; take vinyasa.

COMMON MISTAKES

Do not be satisfied with bending the knees or releasing the grip on the toes to rock up. If compromised in that way, the asana becomes largely worthless.

If you’re unable to follow the vinyasa and are tempted to roll into and out of the posture with momentum, place this asana aside for the moment and study previous asana in the primary series more.

Ubhaya Padangusthasana

Ubhaya Padangusthasana

  • Ubhaya: Both sides
  • Pada: Foot
  • Angusta: Big Toe
  • Asana: Pose

Ubhaya Padangusthasana is the twenty-eight pose of the primary series, and the twenty-fourth seated pose. This posture, as with Supta Konasana, prepares the practitioner for Sarvangasana-family poses. It also serves to create strength and coordination in the low belly and hips.

FOCUS ON…

This asana is very similar to Supta Konasana. The exit is the only major difference.

Study Supta Konasana closely and have competence with it before introducing this movement. All the same actions apply.

Once balanced in the state of the asana, press away with the legs and resist with the arms. Use this dialogue of opposition to create lift in the spine and heart, as if you could lift your heart up through the space between your arms. The sensation in the torso should be of attempting to backbend, as the low belly curls in around the point of the Bandha to create balance and stability.

Vinyasa of the Pose

The breath is a major ally here. It is important to use the breath and the bandha, and even to exaggerate them. Shyness with the breath makes this vinyasa more challenging than necessary.

From Sat, jump through and land in Dandasana.

Exhaling, keep the hands pressing into the floor by your hips and lay down slowly.

tadagi mudra

Inhale, reach the arms up overhead.

supta-lift

As the next exhalation leaves the body, lift straight legs off the ground, lift the hips, and place the feet in the hands smoothly.

Inhale, straighten the spine.

reclined-ubhaya-padangusthasana

Exhale strongly, curl in, and rock forward to balance. Inhale as you find your balance point. Gaze upwards. Five breaths here; this is the state of the asana.

ubhaya-padangusthasana

Exhale, keep the legs where they are but place the hands on the floor beside the hips. Lift up; take vinyasa.

COMMON MISTAKES

Do not be satisfied with bending the knees or releasing the grip on the toes to rock up. If compromised in that way, the asana becomes largely worthless.

If you’re unable to follow the vinyasa as described and are tempted to roll into or out of the posture with momentum, place this asana aside for the moment and study previous asana in the primary series more.

Chakrasana

Chakrasana

  • Chakra: Wheel / Circular
  • Asana: Posture

Chakrasana is the method of taking Vinyasa from postures that end in a supine position.

This transition is performed entirely on one exhalation:

First, place your hands by your ears. Towards the end of the exhalation, lift both legs, keeping them straight. Press your head and hands into the floor and flip over, keeping the legs straight to land in Adho Mukha Svanasana (Downward Facing Dog) or Chaturanga.  Traditionally, landing in Chaturanga is preferred, to keep the vinyasa count intact. However, it is more challenging, and so if you’re just beginning, transition from  Adho Mukha Svanasana to Chaturanga to complete the vinyasa.

Chakrasana

A video posted by Ashtanga Yoga Room (@yogawithgriffinamelia) on

Rather than trying to tuck the head towards the sternum or “hide” it from the floor, press the head firmly into the ground to help flip over. This asana should be performed smoothly all on one exhalation, not over several breaths.

If this pose is challenging, try placing a couple blankets beneath the shoulders (the hands still go on the floor, not the blankets).

Precautions & Common Mistakes

Performing this asana carelessly or before you’re ready for it is likely to result in aches & pains in the shoulders and neck. It’s always okay to substitute the normal vinyasa for Chakrasana.

  • Do not do this if you have a neck or shoulder injury.
  • Do not rely on momentum rather than strength to flip over. Your neck will suffer.
  • Do not roll to one side or other of your head. This is asana directly along the centerline of the body, not over one shoulder.


Supta Padangusthasana

Supta Padangusthasana

  • Supta: Sleeping
  • Pada: Foot
  • Angusta: Big Toe
  • Asana: Pose

Supta Padangusthasana is the twenty-seventh pose of the primary series, and the twenty-third seated pose. It has A and B variations. Though it may appear to be a “flexibility” pose, this is a very strength-based asana. It is one of the few hamstring-strengthening poses in the primary series. Practicing it generates stability in the hamstrings, hips, and low belly.

FOCUS ON…

In ‘A’ Variation

The point of this pose is not to put the right foot on the ground overhead. Even if you possess the requisite flexibility, that is a completely different pattern of movement than is used here. Find the strength of the leg to help lift your torso. The action of the leg is as if attempting to bend the knee, or taking the foot away from the head. That way, your arm can pull against a solid resistance in order to lift; if your leg is “stretching” or floppy, you will have no leverage to lift up.

The straight left leg should press firmly into the ground with the toes pointing straight upwards (rather than rolling to point off to the side).

In ‘B’ Variation

The leg spirals slightly in order to transition to B variation. The toes turn slightly to point towards the ground (external rotation of the femur). Were the foot to touch the ground, the toes would touch first. At that point, should it occur, a counter-twist can be introduced to bring the heel to the ground as well. The right leg should only travel as far as it can without the hips turning: the left hip stays on the ground for the entire movement.

The head turns to face left, away from the foot. Move the head slightly (2-3 inches) to the right before turning so that the spine stays aligned. If you simply roll the head without moving it, the head will travel slightly along the floor (2-3 inches) bringing it out of alignment with the neck and generating unhelpful strain.

Vinyasa of the Pose

From Sat, jump through and land in Dandasana.

Exhaling, keep the hands pressing into the floor by your hips and lay down slowly.

Inhale, lift your right arm until it is perpendicular to the floor. Press your left hand into your left hip. Keeping it straightened, lift your right leg until it reaches your hand.

Exhale, curl in and reach the chin to the shin. Five breaths here, this is the state of ‘A’ variation.

Supta Padangusthasana

Exhale, put the head back on the floor. Bring the right leg and arm to the side. Turn your head to the left. Five breaths. This is ‘B’ variation.

supta-padangusthasana-b

Inhale, turn the head back to center. Lift the right leg back up to center and curl the spine to bring the head in to touch the shin again; only one breath this time.

Exhale, lay down flat.

Inhale, repeat both variations on left side.

Exhale, take chakrasana to exit.*

*If you’re unfamiliar with chakrasana, or have a neck/shoulder injury, rock up to seated and then jump back to vinyasa.

Supta Konasana

Supta Konasana

  • Supta: Sleeping
  • Kona: Angle
  • Asana: Pose

Supta Konasana is the twenty-sixth pose of the primary series, and the twenty-second seated pose. It is the first introduction to the sarvangasana (“shoulderstand”) pattern of postures.

FOCUS ON…

Follow the vinyasa: the method of entering this asana is important. Many practitioners are tempted to roll into Supta Konasana with momentum rather than strength. Not only does this bypass one of the major purposes of this movement, it exposes the neck to greater risk of injury. This asana must be done correctly; if correct alignment and vinyasa is impossible, further preparation in earlier asana is necessary.

The weight of the body ought to be balanced on the shoulder blades, not on the vertebrae or skull. For this to happen, the shoulder blades must be elevated. (Elevation is the action of shrugging the shoulders towards the ears.)

To ensure this action, the arms should be lifted overhead before rolling back. The arms lengthen and reach back to ensure full elevation of the scapula.

If this is not done sufficiently, the weight of the body and pressure will be placed on the spine, especially the C7 vertebrae, and the posture is deleterious for the health of the spine.

Once balanced, with the hands holding the feet, the balls of the feet and toes should be pressing into the floor. The hips anteriorly rotate to straighten (move towards extension) the spine. This is the action of the sitting bones turning towards the ceiling; the feet come closer to the head. The spine should be in a relatively neutral alignment (except the neck), not deeply flexed.

Press the back of the skull gently into the floor to encourage the natural arch of the cervical spine. This action will lift the chin slightly away from the chest; there ought to be a slight gap between the chin and sternum. The traditional gazing point for this asana is nāsāgre (at the navel). However, spinal alignment is typically improved by gazing towards the eyebrows (bhrūmadhye) for the first few months of practicing this asana.

After five breaths, rock forward while exhaling firmly. Flex the spine, press off with the toes, and use the strength of the hamstrings & legs to rock smoothly. Balance just forward of the coccyx (between the tailbone and sitting bones) for one breath. As you come to the balance point, inhale and lift your chest and straighten your spine to stop your forward movement.

When exhaling to set down, be sure to land on your calves not your heels. If you’re unable to control your landing and bang your heels, instead release your grip on your feet and lower your legs slowly.

Vinyasa of the Pose

The breath is a major ally here. It is important to use the breath and the bandha, and even to exaggerate them. Shyness with the breath makes this vinyasa more challenging than necessary.

From Sat, jump through and land in Dandasana.

Exhaling, keep the hands pressing into the floor by your hips and lay down slowly.

tadagi mudra

Inhale, reach the arms up overhead, angled approximately 60°.

supta-lift

As the next exhalation leaves the body, lift straight legs off the ground, lift the hips, and place the feet in the hands smoothly. Five breaths here; this is the state of the asana.

Supta Konasana

Exhale strongly, curl in, and rock forward to balance. Inhale as you find your balance point. Gaze upwards.

urdhva-konasana

Exhale, set down and fold forward.

Upavistha Konasana

Inhale, sit up.

Exhale, take vinyasa.

ALTERNATIVES & SOLUTIONS

If you’re unable to follow the vinyasa as described, don’t try “workarounds” here. Neck injury is likely for unprepared practitioners; at the very least, if not injurious, the asana will be dull and pointless.

Work instead on preceding asana, especially: Surya Namaskara, lifting for the connective vinyasa, Navasana, Bhujapidasana, Garbha Pindasana.

Upavistha Konasana B

Upavistha Konasana B

  • Upavistha: Seated
  • Kona: Angle
  • Asana: Pose

Upavistha Konasana B is the twenty-sixth pose of the primary series, and the twenty-first seated pose. It focuses more on balance than flexibility, and on integration of the limbs. Most of the effort is concentrated in the hip flexors and low belly.

FOCUS ON…

This asana takes Upavistha Konasana A and adds the element of balance, requiring additional muscular stability. This is an excellent counterpoint to ‘A’ variation as it teaches the proper action of the legs and spine. That feeling of work should be brought into ‘A’ variation rather than simply ‘stretching’ or sagging forward.

The arms are straight, pulling on the feet. The feet are pressing away from the hands vigorously. This interplay between the limbs creates lift and space in the torso, allowing the spine to be straight and the point of balance to be between the sitting bones and tailbone. The head is back and gaze is down the length of the nose.

Some practitioners have relatively short limbs, allowing them to lift directly into the posture without letting go of the feet. Those with average/longer limbs will need to release their hold on the feet before lifting up.

Vinyasa of the Pose

This pose is entered directly from Upavistha Konasana A.

Inhale, release the grip on the feet, sit upright, and raise the hands to shoulder height. Bring the feet to the hands, and balance. This is the state of the asana; five breaths.

urdhva-konasana

Exhale, maintaining your grip on the feet rock forward and land lightly on your calves. Fold forward fully.

Inhale and sit upright.

Exhale, take vinyasa.

ALTERNATIVES & SOLUTIONS

This asana should feel upright, open, and poised. Do not let the back be deeply rounded. If you feel as though you’re sinking or struggling to sit upright, this is usually due to short or disengaged muscles.

Ineffective alignment

If stiffness is the problem: spend more time in the previous postures. If you’re in a led class environment, try bending the knees.

If you’re simply slouching through this pose: wake up! Cultivate the strength of your limbs, bandha, and breath.

Upavistha Konasana A

Upavistha Konasana A

  • Upavistha: Seated
  • Kona: Angle
  • Asana: Pose

Upavistha Konasana A is the twenty-fifth pose of the primary series, and the twentieth seated pose.

While both this pose and Baddha Konasana focus on the area of the groin/inner thigh, the position of the legs emphasizes the length of the hamstrings, unlike Baddha Konasana. Specifically, semimembranosus, one of the three hamstring muscles, is lengthened, unlike a forward fold such as Paschimottanasana which is more likely to involve the other hamstring muscles.

FOCUS ON…

This pose largely follows the same pattern as other forward folding asana. The main difference in action is that both legs externally rotate. There can be a tendency as you fold forward for the feet to turn, too, so that the medial side of the feet comes towards or touches the ground and the foot becomes parallel to the ground. Instead, externally rotate enough that the toes point straight up to the ceiling, perpendicular to the floor.

As the fold deepens, the first part of the upper body that touches the floor would be the ribs. Secondly, the chin can lightly touch down. If the head touches down first, but there is space between the chest and the floor, the spine is in too much flexion.

The angle of the legs is between 90-120° as feels best to you. The point is not to bring your legs as wide as you can. Indeed, if you take the feet too wide you will be unable to reach the feet.

Principles of Forward Folding:

Vinyasa of the Pose

From Sat, jump through and land in Dandasana.

Inhaling, bring the legs to a 90-120° angle.

Exhale, fold forward enough to grasp the big toes or the outer edges of the feet.

Inhale, lengthen and reset, reaching the heart through the arms. Spread the toes wide and press the feet into the hands.

Exhale, fold forward fully. Gaze down the length of the nose. Try to lengthen the spine and fold crisply, so that the belly and ribs come to the floor before the head.  Spend 5 cycles of breath here; this is the state of the asana.

Upavistha Konasana

Inhale, transition to Upavistha Konasana B.*

*Typically one lifts straight up into this next asana without an intervening vinyasa.

ALTERNATIVES & SOLUTIONS

Struggle is not necessary; find the comfortable point of leverage to work from. If your back is rounded, or you feel as if you’re falling or rolling backwards rather than folding forward, take your hands a small distance behind you. Press your palms into the ground firmly and lean back slightly; lift the heart towards the ceiling. Focus on lengthening the belly and pressing the sitting bones firmly down into the ground.

You will be much better served by starting to find how the pelvis moves, and creating length in the low belly and groin, than in slumping forward. Not only is struggling to fold forward with very tight muscles likely to feel uncomfortable or restrictive, it only serves to reinforce negative patterns of posture and alignment. Back off to the point at which you feel like you feel upright and comfortable. As you gain mobility, only fold forward to the point that you can maintain this sense of length in the front mid-line of the body.

Practice rolling the hips forward and back (anterior and posterior tilt) so that you can feel the difference; after a few times, tilt the hips as far forward as you can, coming into a gentle backbend.

Baddha Konasana

Baddha Konasana

  • Baddha: Bound
  • Kona: Angle
  • Asana: Pose

Baddha Konasana is the twenty-fourth pose of the primary series, and the nineteenth seated pose. It has three forms: upright, folded, and flexed.

In this asana, the feet press together and the knees press towards or into the ground.

FOCUS ON…

The prime focus as you begin working in this pose is to anteriorly tilt the pelvis. This action can be overdone if you’re hypermobile, but the vast majority of practitioners experience a posteriorly tilted pelvis in this asana. (For more on pelvic tilt, read: Understanding Pelvic Tilt.The movement of the knees towards the ground—the lengthening of the adductors and groin musculature—ought to be secondary to establishing a firm, upright position. ‘A’ Variation is the place to work on bringing the knees towards the ground; ‘B’ & ‘C’ emphasize the the full range of motion of the pelvis, and the knees reaching the earth is of lesser concern.

In the first form of this pose, the spine should be in a neutral position. In the second form, the spine is in slight flexion. In the third form, the spine is in deep flexion and the pelvis posteriorly rotated.

Even if, especially if, you’re very stiff, kyphotic, and posteriorly rotated, be sure that you’re making the effort of anterior tilt, even though actual movement may be slight.

In all variations, the prime action of the legs is one of external rotation, rather than simply pressing straight down. The sensation is that of rolling the thighs back, towards the sacrum. You can use your hands to help at first, if that action is hard to find. Between variations, allow the hips to move freely; the legs will naturally alternate between the actions of internal and external rotation as you move.

‘A’ Variation

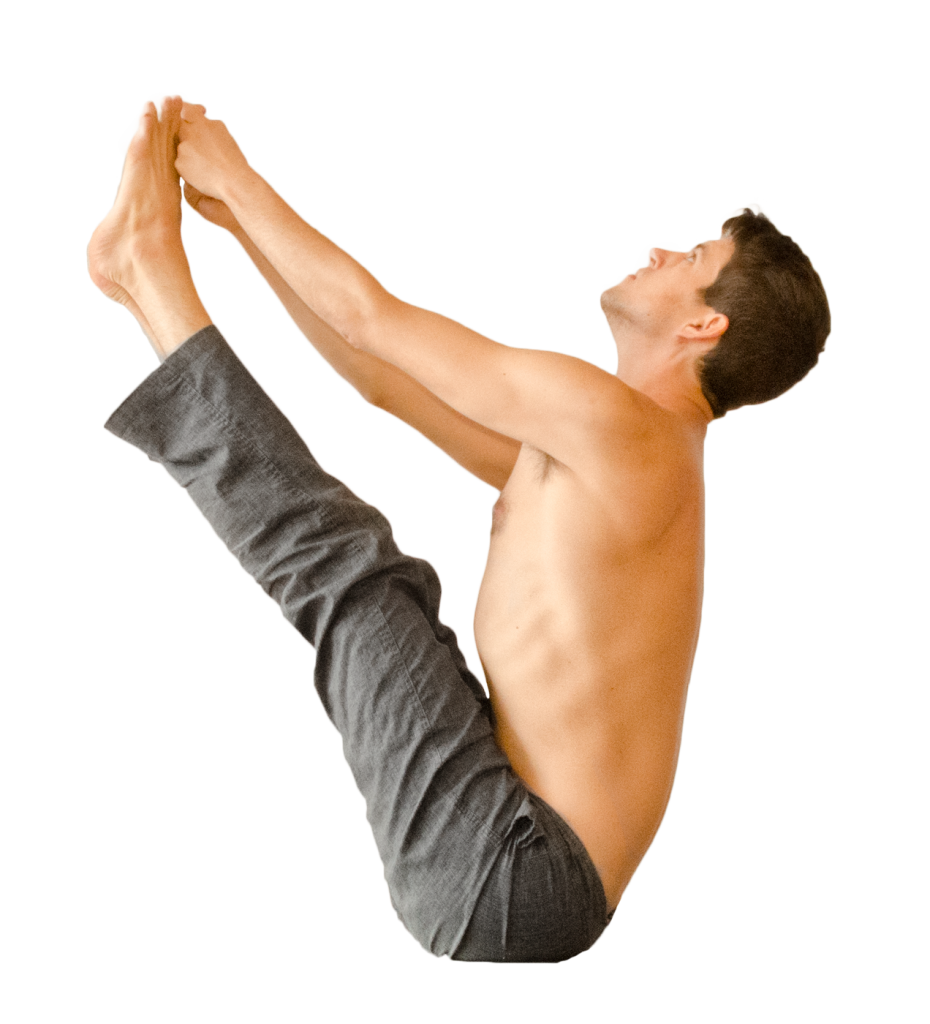
In the first form, Baddha Konasana A, the knees close fully, the feet come to touch, and the hands grasp the feet. Bring the heels as close to the hips as possible. For the knees to come to the ground, the heels will need to be no more than a couple of inches from the pelvis. Do not try and push your knees to the ground, or have someone else push your knees to the ground, if the feet are farther away. That will generate a twisting force in the knee, which is asking for injury.

Therefore, if your feet do not touch your pelvis: focus just as much on, over time, bringing the feet closer to the body as you do on moving the knees towards the ground.

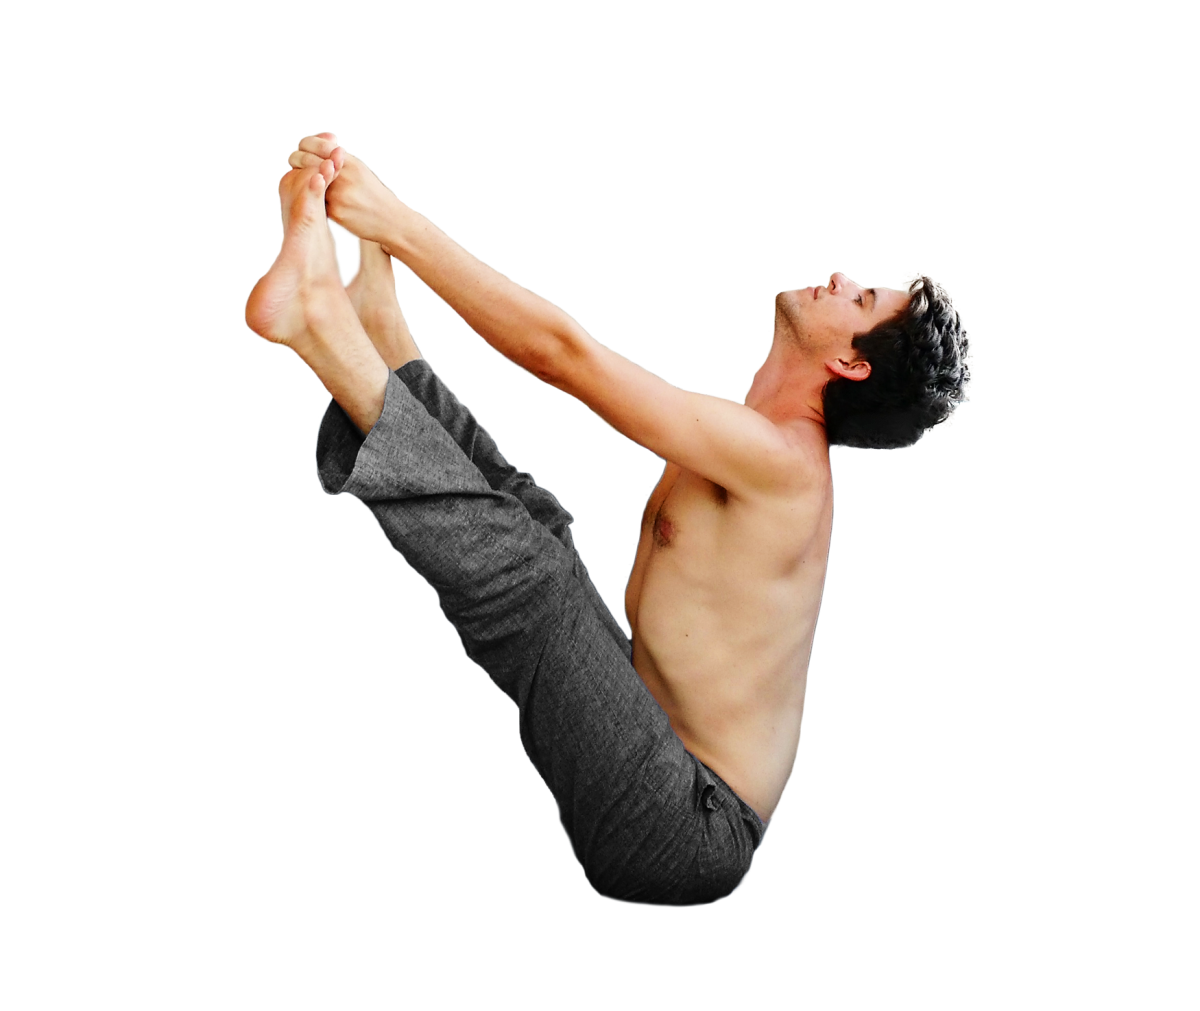
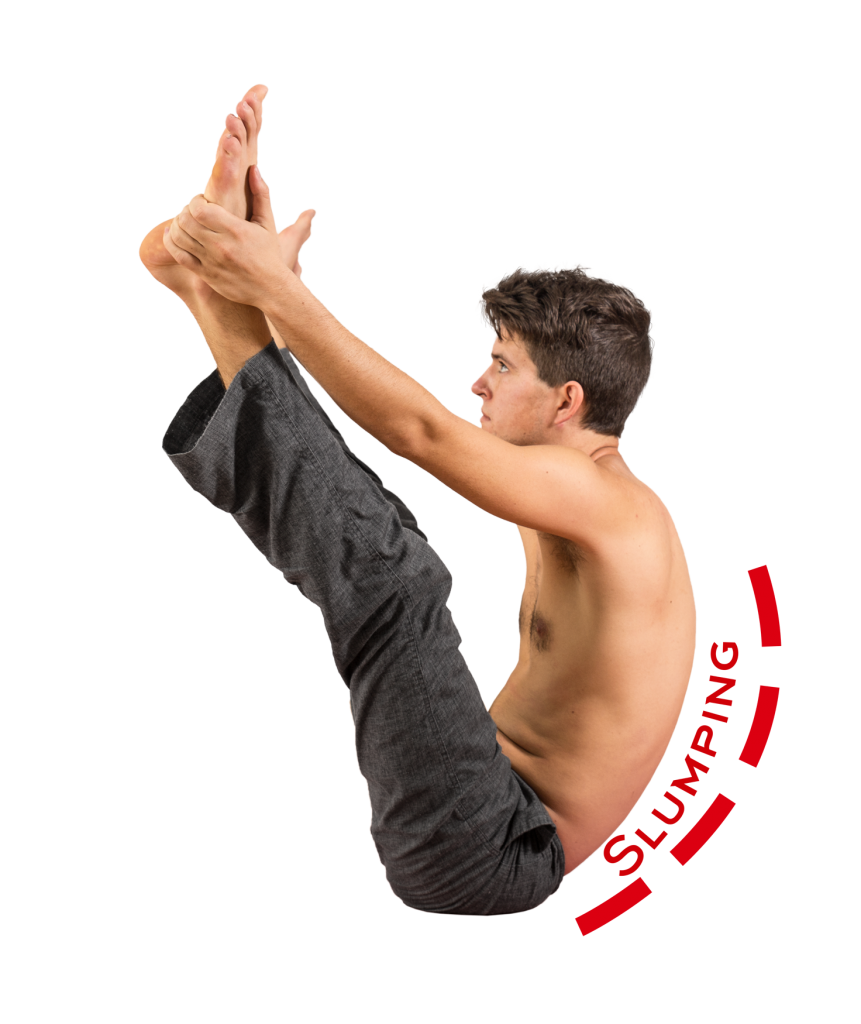
The hands turn the soles of the feet upwards. This is done in order to (1) activate the lateral hip muscles, which will help bring the knees towards the earth, and (2) further isolate and lengthen the inner thigh muscles. This action is done in all 3 forms. The hands and arms also tug gently on the feet, pulling the heart through the arms; in this way, encouraging the heart to lift upright and the practitioner to retain an upright and noble carriage rather than slouching or slumping.

As in other forward folds, the line of the collarbones should be lengthened, and the shoulders back (until they reach a neutral position: no pinching the shoulder blades together).

‘B’ Variation

Following from the A variation, maintain all actions except:

  • Space the feet 4-6 inches from the pelvis (allow the knees to come off the floor, if they were touching). If the feet aren’t distanced in this way, the sitting bones can lift off the ground when you fold forward.
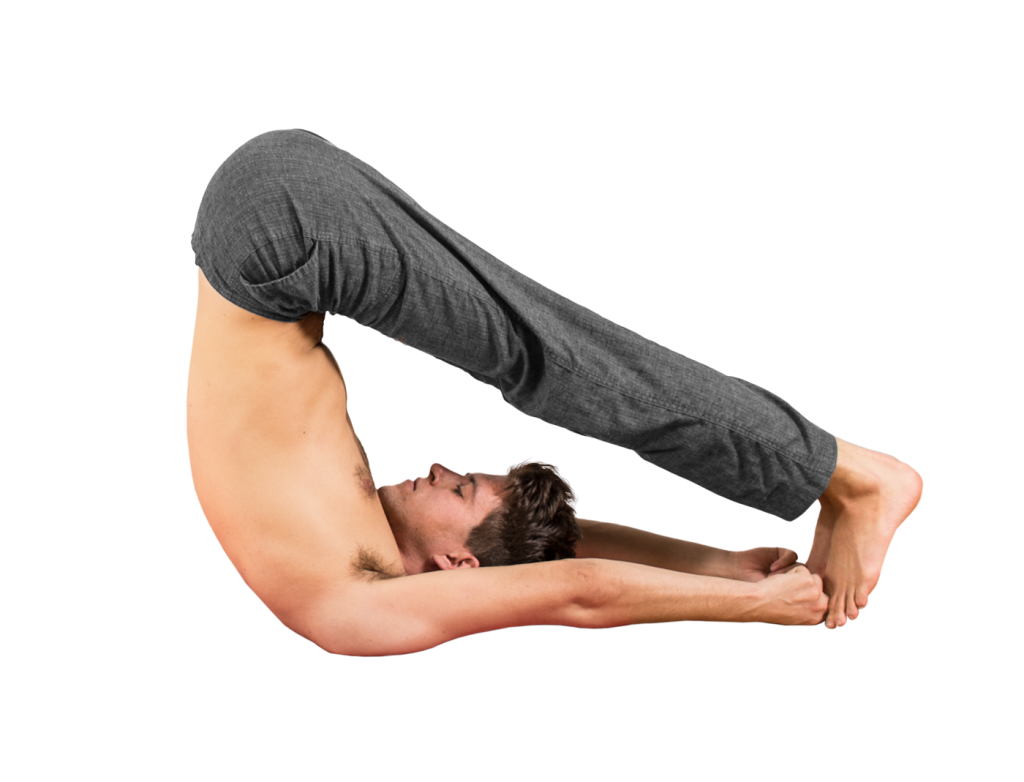
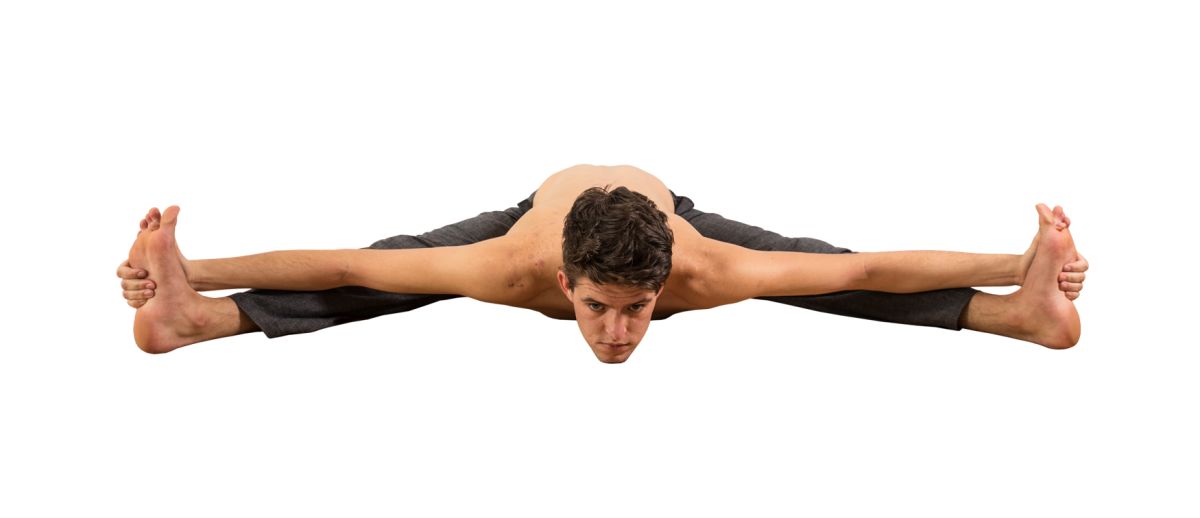
  • Fold forward as much as the body allows without slumping. That may be only a slight movement of several inches, or to such a degree as the ribs touch the feet. Do not strive beyond your flexibility; aggressively trying to reach your head to the ground and sacrificing the necessary alignments of the spine and hips will work to your disadvantage. If you’re quite flexible, the chin touches the ground.
  • Rather than focusing on head-to-ground, focus on bringing the heart forward so that the sternum touches the knees.
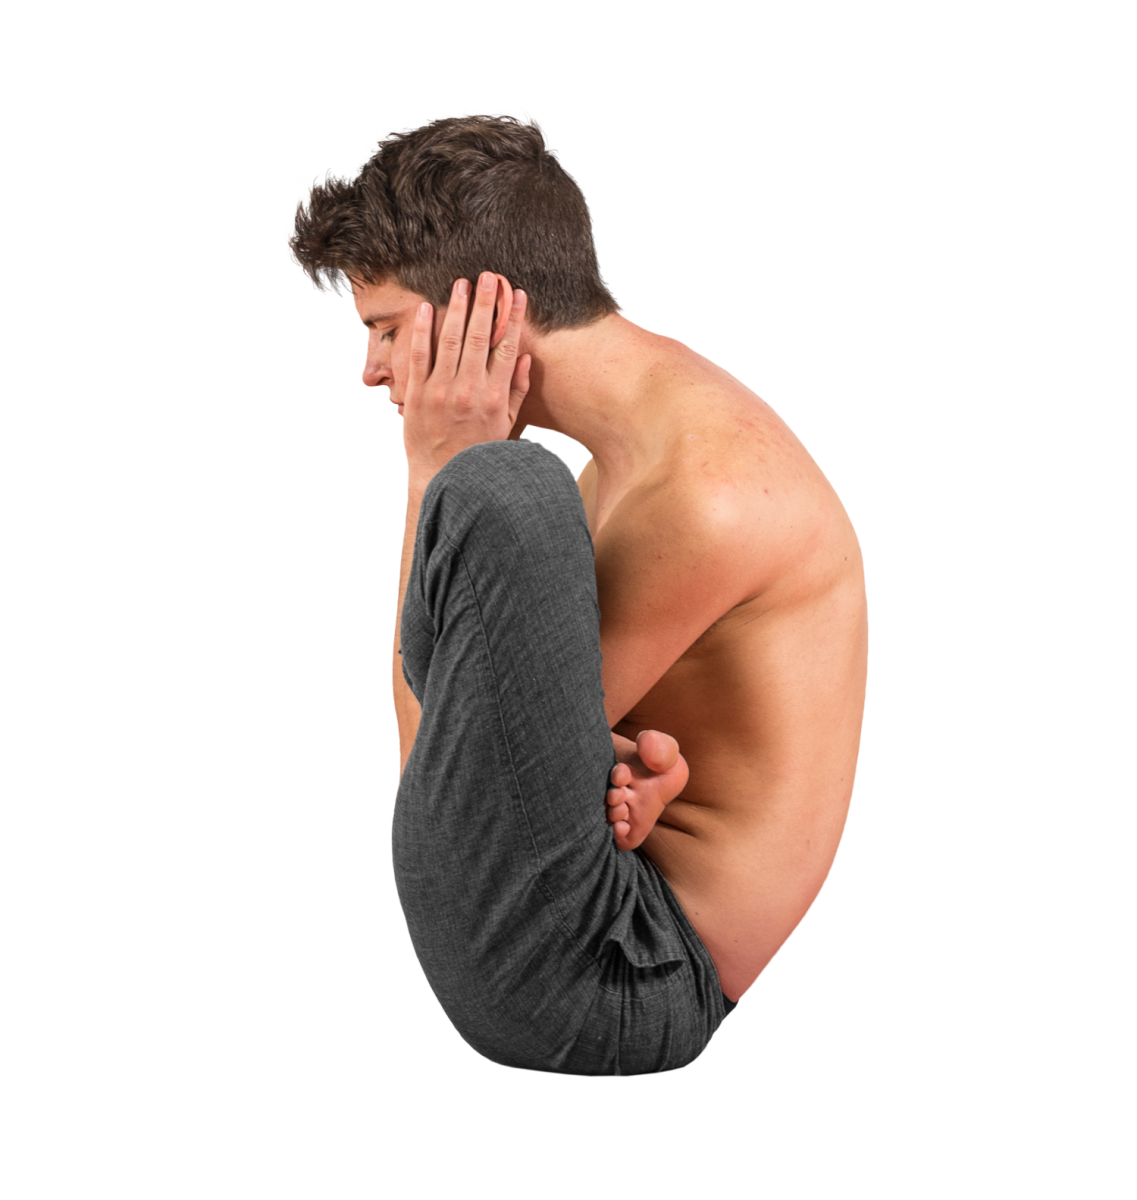
‘C’ Variation

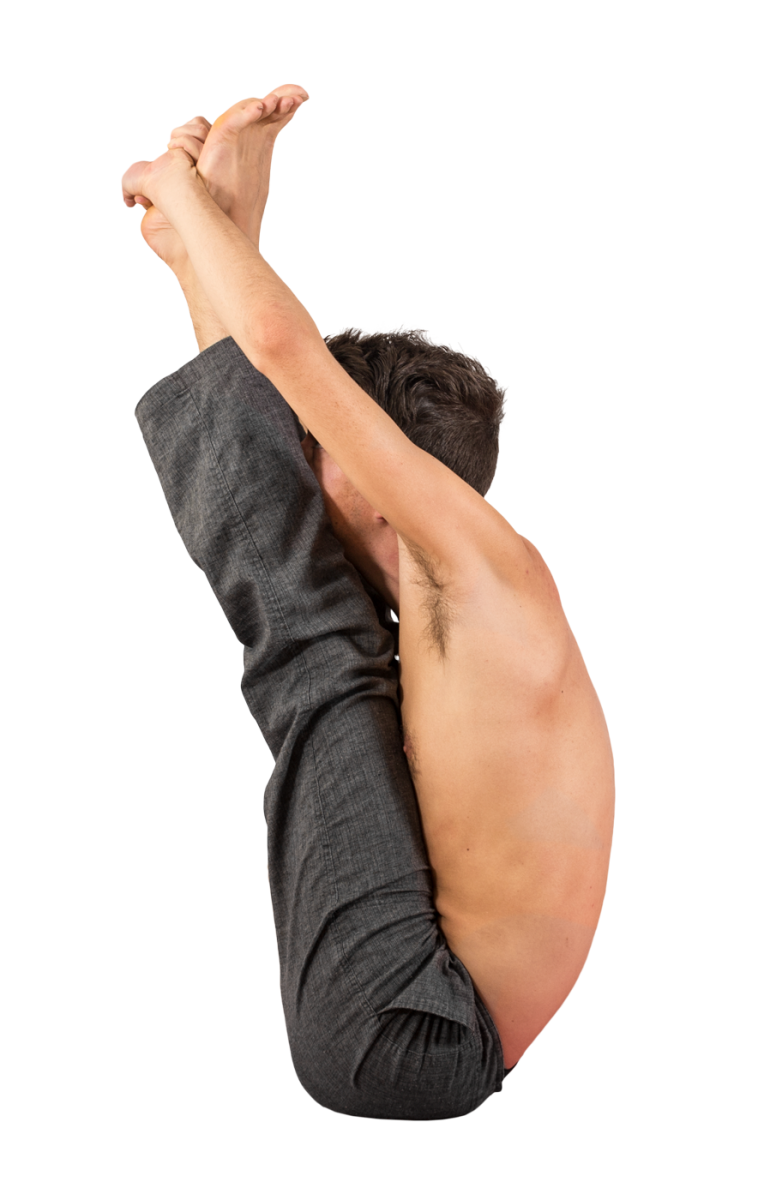
Following from the B variation, sit upright, rock the pelvis into a posterior tilt, round the back deeply, and tug on the feet: fold the forehead towards or to touch the toes.

Vinyasa of the Pose

From Sat, jump through and land in Dandasana.

Inhale, bend the knees into the chest, press the feet together and open the knees wide. Press the pinky edges of the feet together; sit upright; gaze down the length of the nose. Stay here for five breaths; this is the state of Baddha Konasana ‘A.’

Baddha Konasana A Side View Baddha Konasana A

Exhale, nudge the feet out a few inches if they’re quite close the pelvis, then fold forward. Only fold as much as you can with a straight spine. Stay here for five breaths; this is the state of Baddha Konasana ‘B.’ Maintain the intelligent action of the legs in external rotation.

Baddha-Konasana-B

Inhale and sit upright. Round your back, starting at the pelvis. Take the time to flex each part of the spine fully.

Exhale, fold forward and reach your head towards your toes. Stay here for five breaths; this is the state of Baddha Konasana ‘c.’

Baddha Konasana C

Inhale, sit upright. Hug the knees into the chest.  

Exhale, take vinyasa.

ALTERNATIVES & SOLUTIONS

If you’re feeling stiff, and/or the pelvis will not tip forward while you’re sitting on the ground, seat yourself on a blanket, block, or bolster, in order to elevate the hips. This will help you bring your feet in closer. Be sure that you sit towards the front edge of your chosen support, such that you’re able to cultivate a sense of tipping forward rather than rolling back. Over time, take this sense, and the forward direction of movement, to a seat on the floor.

If sitting upright in ‘A’ variation is challenging, do not practice ‘B’ until it seems both comfortable and necessary to do so. ‘C’ variation is still appropriate.

If you have had knee injury or surgery, and/or feel a pinching sensation when the knee is closed fully in this way, place a rolled up washcloth or piece of fabric behind the knee. When you squeeze the cloth with your knee, the bones of the femur and tibia will be held slightly apart. In the majority of cases, this alleviates or eliminates any pinching sensation or pain. The more severe the injury, the greater amount of cloth should be used. The support can be reduced over time as the joint heals. It’s also helpful when recovering from a knee injury to sit up higher using blankets.

If your knees don’t touch the ground, you might find it helpful to place a block beneath each leg so you can find the sensation of pressing down through the legs and the activation of the outer hip muscles. This is neuro-educational only; do not become reliant.

COMMON MISTAKES

Avoid slouching or hunching forward.

Do not press your knees to the ground if the feet are not within 2-3 inches of the pelvis.

Kukkutasana

Kukkutasana

  • Kukkuta: Rooster
  • Asana: Pose

Kukkutasana is the twenty-third pose of the primary series, and the eighteenth seated pose. This is the final pose of what is often called the “apex” of the Primary series—five challenging asana in the middle of the sequence.

Kukkutasana, an arm balance, is entered directly from Garbha Pindasana. It can only be performed in Lotus. (If attempted with the legs not in lotus, it becomes Bhujapidasana.)

FOCUS ON…

Maintain as much flexion of the spine as possible, especially rounding the back and lifting between the shoulder blades. Keep the shoulder blades as wide as possible, wrapping around to the sides of the ribs.

Exiting the posture by jumping back from lotus requires a great deal of strength of the sort derived from the practice of ordinary jump backs and uthplitihi.

Vinyasa of the Pose

On the ninth rock forward from Garbha Pindasana, come onto your hands and balance for five breaths. This is the state of the pose.

kukkutasana

Exhaling, slide the lotus down the arms until you’re seated.

Inhale, lift the lotus (or come onto the knees; described below).

Exhale, jump back.

ALTERNATIVES & SOLUTIONS

Jumping back in lotus is quite challenging. A way to build up to it is to rock forward from seated lotus onto your knees, place the arms shoulder width apart so the elbows are just under the body, then attempt to balance on the elbows. From there, straighten the legs and come down into chatvari.

lotus-jumpback-prep

Once you’re ready to try something more challenging, try “hooking” one lotus foot behind an arm before you lift up. That way, you’ll have additional leverage.

Then, one day, you’ll simply be able to lift up and jump back:

Lotus jump-back

A video posted by Ashtanga Yoga Room (@yogawithgriffinamelia) on

COMMON MISTAKES

Do not allow the shoulder blades to pinch together or the arms to go dead. Press firmly through the hands, round the back, and lift as high from the ground as possible.

Garbha Pindasana

Garbha Pindasana

  • Garbha: Womb
  • Pinda: Embryo
  • Asana: Pose

Garbha Pindasana is the twenty-second pose of the primary series, and the seventeenth seated pose. This is the fourth pose of what is often called the “apex” of the Primary series—five challenging asana in the middle of the sequence.

Garbha Pindasana is a dynamic asana, still for five breaths and nine breaths while moving. The practitioner rolls the length of the spine nine times, said to symbolize the nine months of gestation.

It requires a very specific strength of the deep low belly, and helps to massage and align the spine. Like all of the apex postures of the primary series, it is a deep spinal flexion.

FOCUS ON…

This asana can be performed either in lotus or unbound, with crossed legs. In either case, it’s important to keep the spine deeply rounded, in full flexion. Endeavor to bring the hands and the head together, and to keep the hands touching the head while you roll. This will not only make the movement smoother, preventing flailing and throwing oneself about, but also encourage deeper flexion (better roll), and most importantly, force the deep abdominal muscles below the navel to work. If the hands and the head are apart, it’s easier to use momentum, or to roll upright by jerking the limbs.

Unbound Form

From seated, cross the legs at the ankle. Flex the feet fully, “locking” them together, then create stability and strength by trying to actively abduct the legs/pull the feet apart. This helps to make up for the stability that would be gained from binding in lotus.

Next, reach between the legs and either (a) lace the fingers together around the feet or (b) grasp the ears or hair with your fingers.

Lotus Form

From seated, place the legs into lotus. Squeeze the knees together, tightening the lotus. Reach the arms through the legs until they have passed through the lotus just beyond the elbows. Then, rest the chin in the hands or grasp the ears or hair.

The initial position is to balance on the sacrum for five breaths, as close to the tailbone as possible. After five breaths, rock nine times, turning clockwise each time. Rock all the way to balance on your shoulders. Turn the pelvis slightly, twisting the spine, while on the shoulders in order to turn. If you’re grasping the ears or hair while upright, continue to hold while you rock. The hands should not be allowed to come away from the head as you rock. You will likely find this requires an additional, or different, strength.

Each rock should be a controlled alternation between being balanced on the sacrum and on the shoulders, rather than shallow rocks on the torso or overzealous, unbalanced attempts. Use the breath intelligently, exhaling fully and quickly as you rock forward, inhaling as you roll backward. “Control” means that you should be able to stop and balance at any time on either the shoulders or pelvis, and not to rely on momentum to complete the movement.

Vinyasa of the Pose

From Sat, jump through and land in Dandasanainhale.

Exhale, place the limbs in either unbound or lotus form. Lift the legs and balance on the pelvis, as near to the tailbone as possible. Five breaths here.

Garbha-pindasana-side Garbha-pindasana

Inhale to rock back, exhale to rock forward. Repeat nine times, turning clockwise in a circle.

Garbha-pindasana-roll

Exhale rock forward; release the hands and transition to Kukkutasana.

ALTERNATIVES & SOLUTIONS

If you’re just beginning, and it’s challenging to coordinate turning in a circle while rocking, just rock forward and back without turning. After becoming familiar with the motion, try to incorporate the turn. It’s easy to get “stuck” on your back, or, in lotus, to accidentally roll over onto your side and get stuck. After practicing just forward-and-back for a couple weeks, you’ll be able to add the turn in. If you do find yourself getting stuck, try focusing more on moving with the flow of the breath and coordinating a strong exhalation with the rock forward.

It’s common when beginning this posture to have difficulty putting the arms through the lotus. You can do one side at a time by, from seated, placing the right arm in the crook of the right knee, then placing the right leg in lotus. Place the left arm in the left knee, then wriggle the left foot into lotus behind the right arm. I don’t recommend doing this for a long period of time, but it can help create additional space in the lotus.

Garbha-pindasana-prep

Traditionally, the turn is performed clockwise only. However, you may wish to experiment with turning counterclockwise, as well.

While turning, you will likely roll off of your mat. If the ground hurts your spine, try placing two mats side-by-side for additional padding.

COMMON MISTAKES

Avoid rocking part-way up and down, rolling only on the mid-back.

If you’re prone to excessive lumbar lordosis, or anterior pelvic tilt, you might find that you’re “smacking” down rather than rolling. Try to emphasize posterior pelvic tilt; you can also try tucking the chin to the chest and grasping the top of the skull rather than the sides, which helps to flex the spine further.

Garbha-pindasana-extra-flexion

1 of 4
1234