
Marichyasana A
- Marichi: “Ray of Light.” Marichi, as one of the aspects of the sun, is the master of illusions, the one who awakens us from dreams or delusions. Also, the name of a sage, one of the Seven Rishis of the Vedas.
- Asana: Pose
Marichyasana A is the fourteenth pose of the primary series, and the ninth seated pose. There are four variations of Marichyasana (A, B, C, D). A & B are forward folds (straight leg / lotus leg), and C & D are twists (straight leg / lotus leg).
The common thread of the Marichyasana poses is (1) the loosening of the Sacroiliac (SI) joint—as such, it is an essential posture for aspirants to deep backbending and lotus postures—and (2) enhancing the mobility of the shoulder girdle by binding the hands together behind the back.
The following is a discussion of the position on the right side, as pictured. As an asymmetrical posture, it must be repeated on the left side.
FOCUS ON…
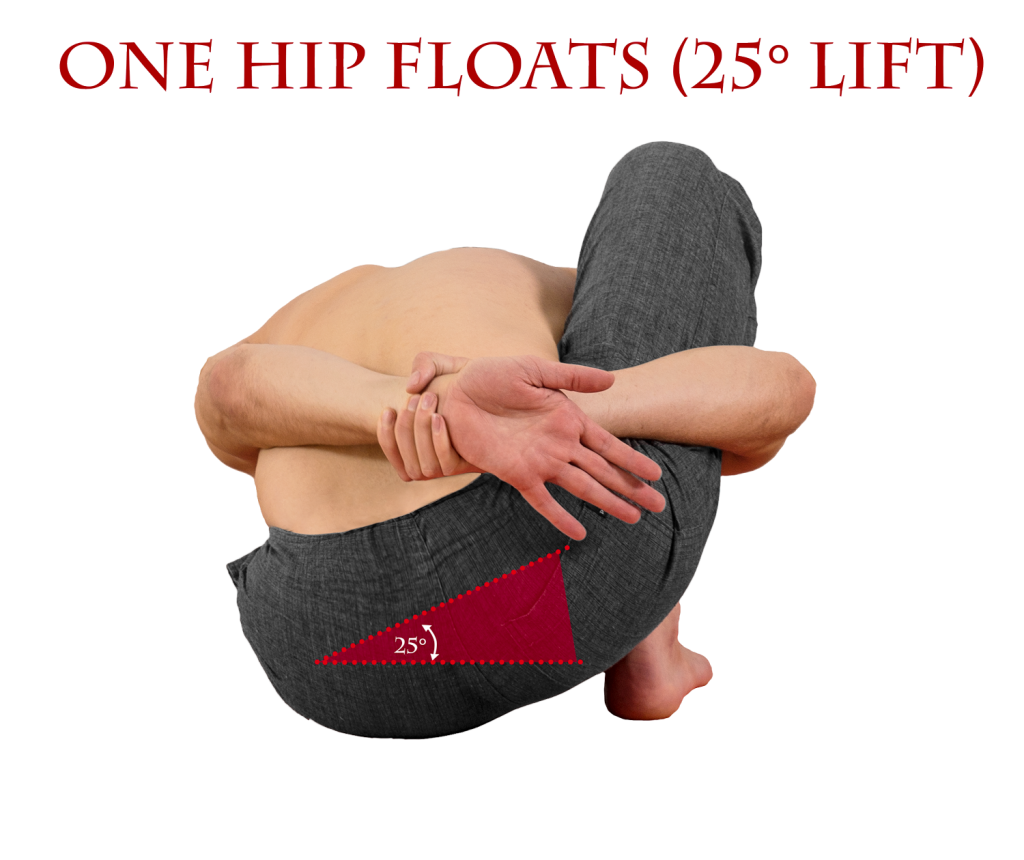
The left leg is straight, in the action of Paschimottanasana. The right leg is bent, into a squatting position. It is important that the right leg is in a true squat, supporting the weight of the body. The ‘default’ position is typically for the hips to be on the ground, supporting the body’s weight. You must shift your weight forward so the right sitting bone lifts slightly off the ground, and the weight comes into the right foot. The left hip stays on the ground. In this way, the force of movement is directed through the SI joint, using gravity to your advantage to create mobility. If your weight remains on both sitting bones, relatively little will happen in this posture. It is essential for there to be a sense of power and weight in the legs. All too often I see students leaning—or falling—backward, heavy on their sitting bones. Think of this family of positions as being similar to squatting rather than similar to sitting.
The SI joint is the connection between the two halves of the hips (ilia) and the base of the spine (sacrum), and serves as the connection between the lower body and the torso. In many Western body this joint is fused or immobile from our sitting and exercise patterns. That immobility contributes to back pain, “humpback” (kyphosis), etc. In backbending, healthful movement of the SI joint is essential to avoid overuse injury of the lumbar spine.
Once your pelvis is aligned, the next hurdle is to bind the arms (around the bent leg). This requires that the line of the collarbones lengthen, the sternum lift, and the shoulders to draw back: essential actions in any forward fold, but highlighted here. Once bound, the arms attempt to straighten backwards, hugging the bent knee in tightly. (Check the Solutions section below for suggestions on how to work towards a full bind.)
There is a slight twisting action in the torso: wrap the length of the spine from root to crown to address the straight leg fully. There can be a tendency for the torso to twist in order to help bind the arms. That twist is a part of the entrance, but straighten out once the arms have been bound. This is not a posture dedicated to twisting; a ‘counter-twist’ is simply needed to keep facing straight forward.
The gaze is down the length of the nose; often in the direction of the big toe. If you’re very deeply folded forward, with the head touching the shin, gaze to the shin. Craning your neck to keep looking at the big toe is not beneficial.
Principles of Forward Folding:
Vinyasa of the Pose
From Sat, jump through and land in Dandasana.
Still exhaling, bend the right knee into the chest. Close the joint fully. Measure a hand-length distance between that foot and the left thigh. Folding forward, sweep the arms wide in an action like swimming, and binding the right leg, grasp the left wrist with the right hand behind the back.*


These photos show pulling against the ground with the hands in order to fold more deeply. If you have long hamstrings, bind in a smooth motion without putting the hands on the floor.
Inhale and reset, tugging with the strength of the shoulders to lengthen the sternum & straighten the spine.
Exhale, fold forward fully. This is the state of Marichyasana A; hold for five breaths.

Inhale, sit up and release both hands, placing them to the sides of the hips. Practitioner’s choice to straighten the right leg or not; vinyasa can be performed with the right shin pressing into the right upper arm. (This may be easier if you have relatively mobile hips, since with the arm supporting the right shin, you will have to lift less weight to jump back.)
Exhale, jump back and take vinyasa.**
Repeat for the second side.
*Binding the wrist is the preferred method. Alternatives are listed below; if you can hold the wrist, straighten the elbows more and more as you gain flexibility to help the torso lengthen.
**Traditionally, vinyasa is taken between sides of asymmetrical postures. If you’re just starting out and building stamina, or have time constraints and require a faster practice, the vinyasa between sides may be omitted.
ALTERNATIVES & SOLUTIONS
If you want to try it but can’t get all the way into the position, you might find it helpful to stop at the first vinyasa, with the hands pressing into the floor for leverage:

This will allow the hips to start responding to the position. Additionally, you might try spending time throughout the day squatting rather than sitting when appropriate, for example, to read or eat.
If the hamstrings feel quite tight, or if you’re unable to sit up straight (the spine is rounding), or if your right sitting bone feels stuck on the ground (rolling back): place a blanket or block beneath the hips. Add additional support if necessary until both the leg and spine can be straightened. Also try spending more time in B variation. Since both legs are bent in Marichyasana B, the hamstrings have less influence.
If you have had knee injury or surgery, and/or feel a pinching sensation when the knee is closed fully in this way, place a rolled up washcloth or piece of fabric behind the knee. When you squeeze the cloth with your knee, the bones of the femur and tibia will be held slightly apart. In the majority of cases, this alleviates or eliminates any pinching sensation or pain. The more severe the injury, the greater amount of cloth should be used. The support can be reduced over time as the joint heals. It’s also helpful when recovering from a knee injury to sit up higher using blankets.
If you can wrap the arms around behind the back, but cannot bind the hands, use a strap or towel to bridge the distance. Over time, walk the hands closer and closer, then bind fingertips, then clasp hands, and finally the wrist.
COMMON MISTAKES
Be sure that you have the necessary amount of space between the foot and thigh. If they are too close, or touching, it is impossible to create the proper actions that define this pose. If your foot slides in when you’re in the pose, use a block as a spacer.
One of the most common errors is for the right leg to be “dead” or listing off to the side. This shows that the hip and inner thigh musculature is not participating effectively in the movement. Notice the distance between the head and foot in these two photographs.
 Take the necessary steps to make the leg fully vertical, which, depending on the situation, might include:
- Hug the knee in tight to the chest (Using the leg muscles)
- Encourage by squeezing with the arms
- Lean further forward, sitting up on a block if needed
- Push the right foot and left heel firmly into the ground
- Spend 5 breaths easing into the posture and getting the legs and hips into position before binding.
Wow, really nice article. I never thought about how this can affect the si joint. For myself I tend to teach reaching with the arm marichyasana-side arm prior to binding to create length. So more of a protraction. I think it can also be helpful to play with both retraction and protraction (if you have the room) while actually bound.
Hi, thanks Neil. Scapular protraction is definitely part of reaching the arm forward in any circumstance. What’s your goal with playing with protraction while bound? I think protraction of the binding arm’s shoulderblade is called for in twisting versions, like C and D, but in A or B it seems as though it would contribute to spinal flexion and jam up the AC joint for most people.
Hi Griffin, more to just play around. I try to teach my students to experiment and try different things to notice how it feels and to see for themselves if there is any particular benefit. With the arms fixed in a bind, protracting the shoulder blades can be used to push the ribcage up, while retracting can push it down. Sort of like when you protract in cat pose the ribcage moves up away from the floor. If you retract, the ribcage moves towards the floor.
Good morning Neil. We are in agreement about the effect that it has on the kinesthetic chain. Retraction will tend to translate the sternum towards the toes of the straightened leg, while protraction will translate it posteriorly. In terms of creating the experience I would like most people to have in this posture—coming into a squat on the bent leg, drawing the heart forward, and finding strength in the arms while bound—protraction of the scapula tends to undermine that experience by increasing the trend of posterior pelvic tilt and thoracic spine flexion. So I tend to emphasize retraction + reaching the arms backwards, because the scapula are usually in a relatively protracted position by ‘default’ here.
However, if your goal is to encourage students to explore contrasting sensations and relative effectiveness of various actions, then of course any variable making up the pose is fair game to mess and play with. There is a lot of value in teaching students how to be independent and feel the most effective alignment via the sharpening of their own internal sense!
Griffin Hi
I am so happy to have found this site. Your instruction is brilliant!
I suffer from the lower back pain you discuss.
I stretching of the SI is very relevant to me as someone who can do too much with the hips. Flexing my lower back now is really tough.
Lili
I’m glad that you found it helpful, Lili!
I would think only in rare circumstances that the lower back needs to be ‘more flexible.’
In most scenarios, though not all, the main thing I would seek to work on in postures like this one and many others is coordination. How are the legs giving input to the hips giving input to the spine? Ultimately femur-pelvis-spine is one of the most basic, irreducible relationships in the moving body, and yet is frequently overlooked and dysfunctional.
That’s one of the reasons I insist on leg strength in this pose—it’s archetypal of many basic movements, yet it is frequently challenging for people to find sufficient strength in the legs to bring this into a ‘half-squat’ position (which gives the SI and spine glorious expression), rather than the all-too-common sad slump most often observed in Marichyasana A.
I’m glad you’re seeing it from a new perspective! Happy practicing!