Posts by: Griffin

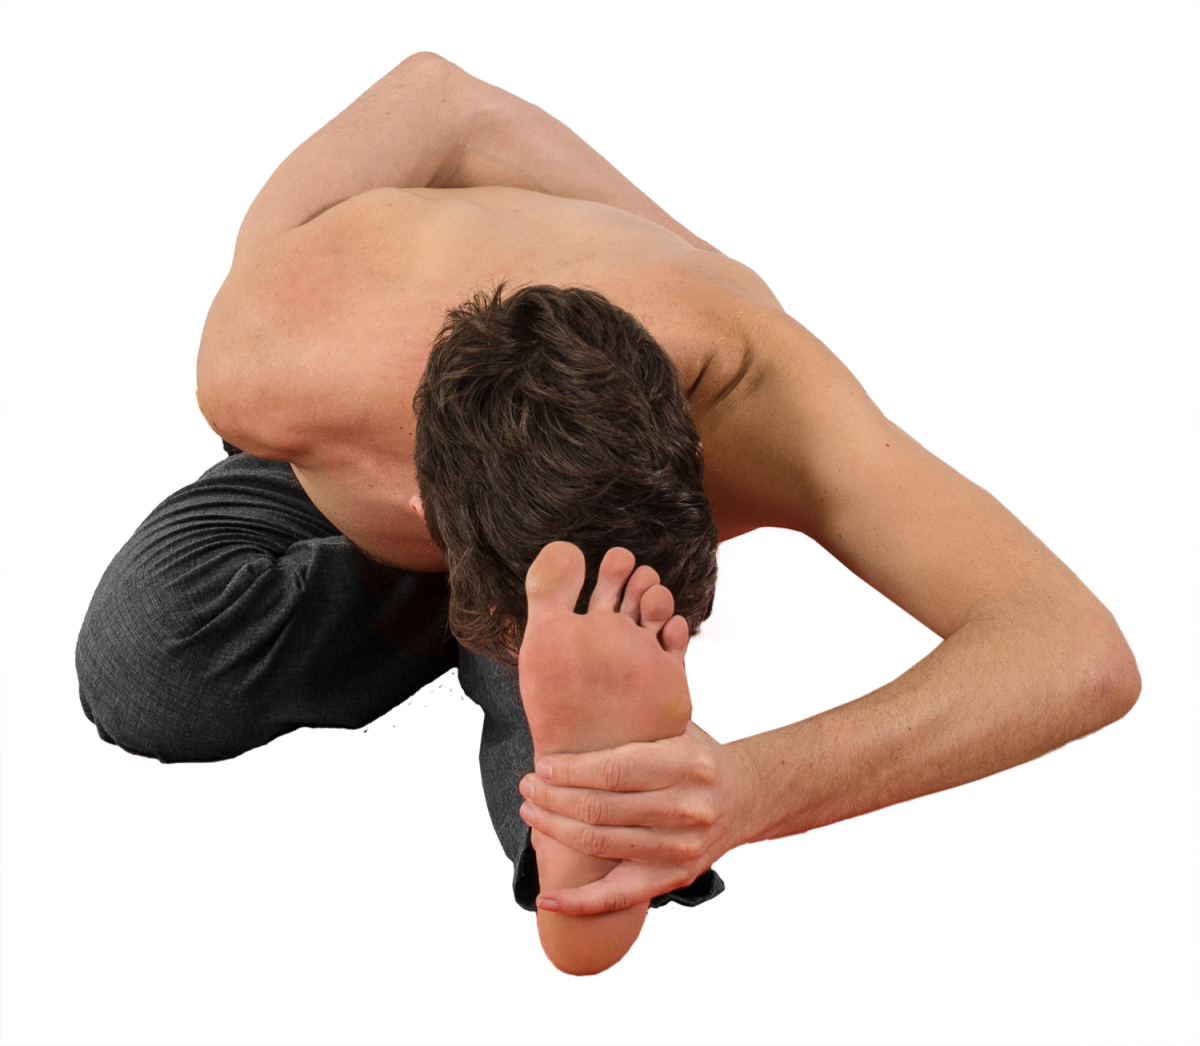
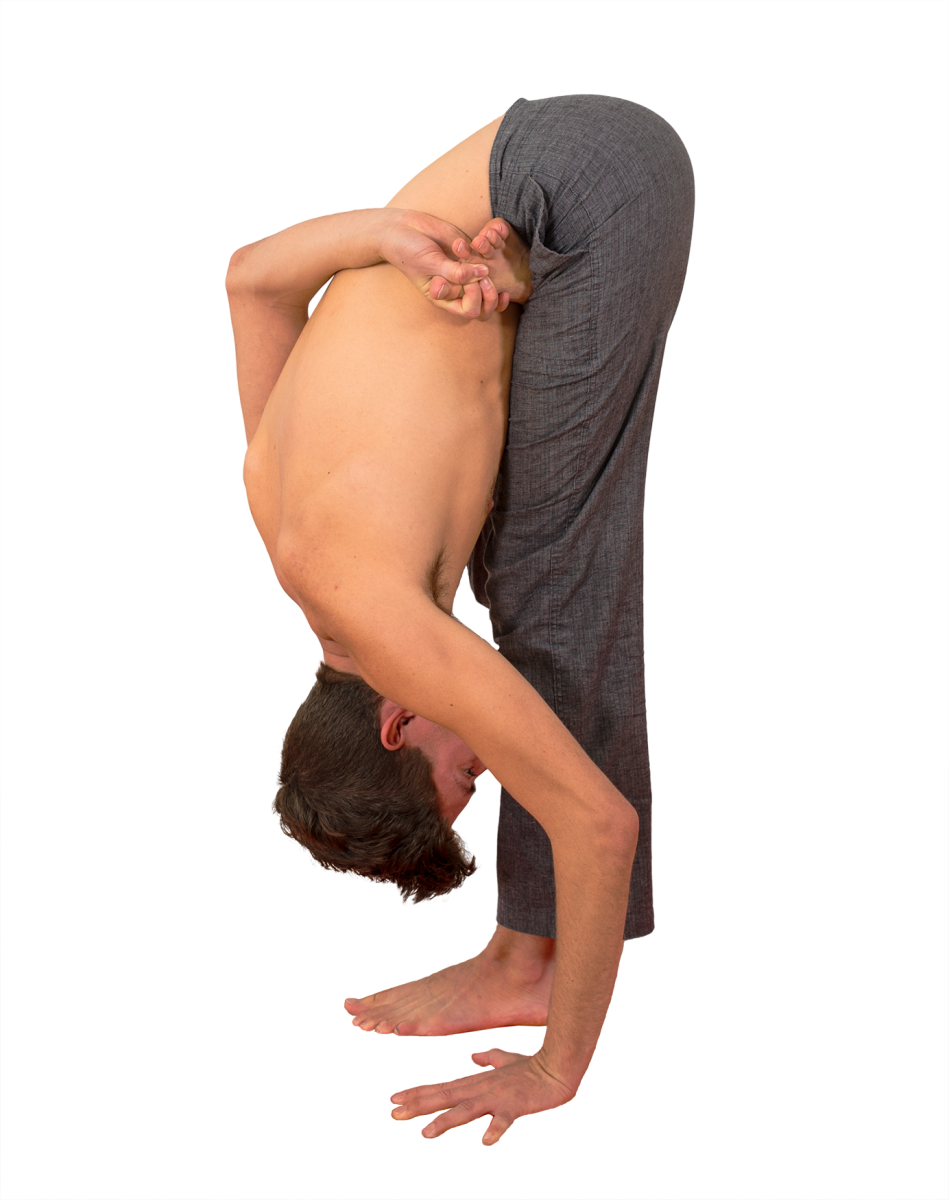
Ardha Baddha Padma Paschimottanasana

Ardha Baddha Padma Paschimottanasana

  • Ardha: Half
  • Baddha: Bound
  • Padma: Lotus
  • Paschim: West / Behind (Referring to the dorsal or back surface of the body
  • Uttana: Stretched
  • Asana: Pose

Ardha Baddha Padma Paschimottanasana is the ninth pose of the primary series, and the fourth seated pose. It is essentially the same as Ardha Baddha Padmottanasana, simply seated.

The following is a discussion of the position on the right side, as pictured. As an asymmetrical posture, it must be repeated on the left side.

This posture requires the leg to be placed in Lotus posture. If your leg can’t be comfortably placed in Lotus, don’t add this posture until you have given more time to and had the benefit of the Marichyasana and Padmasana positions. Binding the foot requires significant shoulder flexibility, and the practice of this posture serves to lengthen the Pectoralis muscles and bring the shoulders into a more healthful alignment. The position of the foot—pressing into the lower belly—also teaches the release of the rectus abdominis muscle during forward folding.

As in any of the Lotus family, be sure to keep the foot and ankle strong and contiguous with the leg. Allowing the ankle to “cave in” (inversion of the foot/ankle) will lead to ankle strain or a sprain.

FOCUS ON…

Principles of Forward Folding:

It is helpful to use the entire torso to your advantage. Let your torso follow your arm in the twist as you reach back to bind your big toe. Once you’ve taken hold, try and leave your arm and shoulder where they are in space and twist the torso back to center, effectively lengthening the muscles of the collarbone and the chest.

Be sure you don’t allow the binding arm and bound leg to become dormant. Pull with the hand and resist with the foot; this interplay will contribute to the strength, lift, and integrity of the posture.

Vinyasa of the Pose

From Sat, jump through and land in Dandasana.

Inhale, place the right leg in half lotus.* Reach back and bind with the first two fingers of your right hand. Reach the left hand up and lengthen the abdomen and torso.

Exhale, fold forward and talk hold of the outer edge of the left foot with the left hand.

Ardha-Baddha-Padma-Paschimottanasana-Prep

Inhale and reset, tugging with the strength of the shoulders to pull the chest through the arms, straightening the spine.

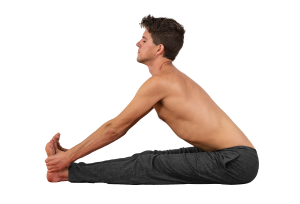
Exhale, fold forward fully. This is the state of the pose; hold for five breaths.

Ardha-Baddha-Padma-Paschimottanasana

Inhale, sit up and release both hands, placing them to the sides of the hips.

Exhale, jump back and take vinyasa.**

Repeat for the second side.

*Some practitioners require additional time to get the leg properly placed in Lotus. This is okay; take your time. After you have gained some experience, try and maintain the count and move with the breath as described.

**Traditionally, vinyasa is taken between sides of asymmetrical postures. If you’re just starting out and building stamina, or have time constraints and require a faster practice, the vinyasa between sides may be omitted.

ALTERNATIVES & SOLUTIONS

If the hamstrings feel quite tight, or if you’re unable to sit up straight (the spine is rounding), place a blanket or block beneath the hips. Add additional support if necessary until both the legs and spine can be straightened.

If you have had knee injury or surgery, and/or feel a pinching sensation when the knee is closed fully in this way, place a rolled up washcloth or piece of fabric behind the knee. When you squeeze the cloth with your knee, the bones of the femur and tibia will be held slightly apart. In the majority of cases, this alleviates or eliminates any pinching sensation or pain. The more severe the injury, the greater amount of cloth should be used. The support can be reduced over time as the joint heals.

COMMON MISTAKES

I do not recommend trying to learn to do lotus in this posture. I see practitioners trying to do this with the foot halfway up the thigh instead of at the hip crease. This alignment places a great deal of shearing pressure in the knee and I do not think it gives much benefit. In the meantime, Janu Sirsasana A is a suitable alternative. Save your effort for Marichyasana or other poses that are more effective and less risky.

Purvottanasana

Purvottanasana

  • Purva: East
  • Uttana: Stretched
  • Asana: Pose

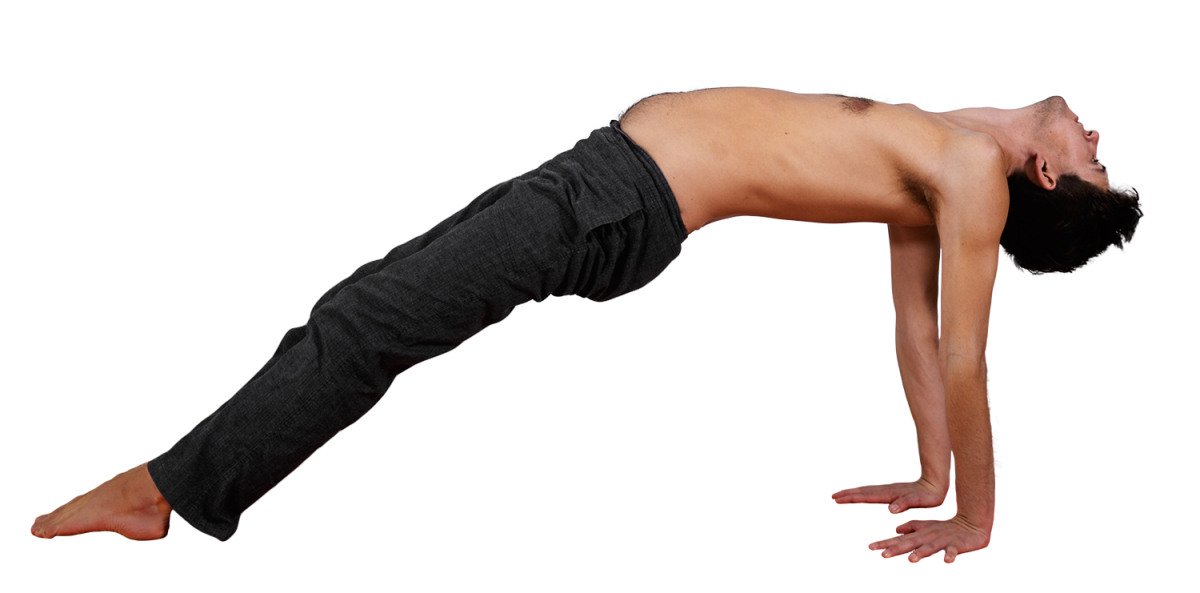
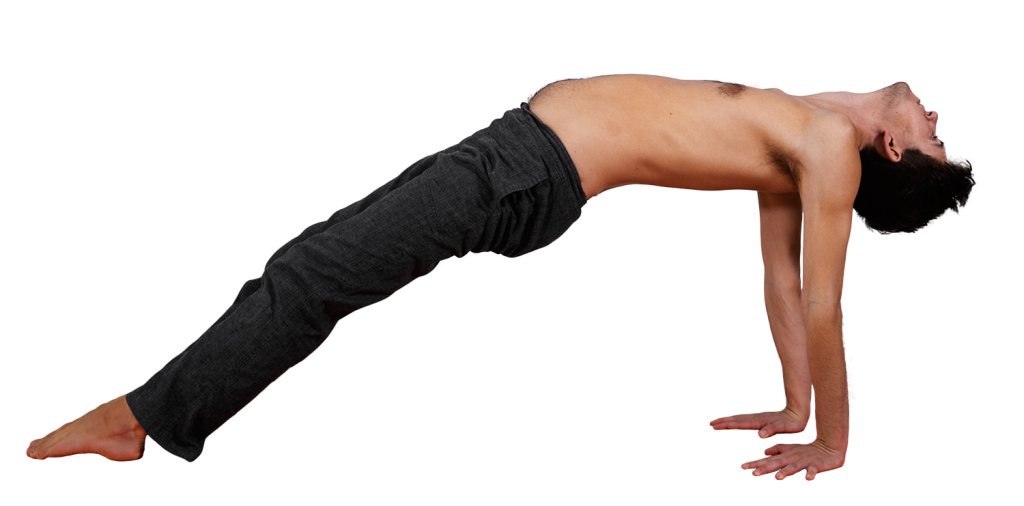
Purvottanasana is the eighth pose of the primary series, and the third seated pose. It is one of the best postures in the seated primary series to develop hamstring and backbending strength.

FOCUS ON…

This posture is a backbend, albeit a mild one. The focal point of Purvottanasana is to lift the hips as high as possible. As a result, a gentle backbend forms, mostly in the lumbar spine.

The hands are placed beneath the shoulders, with the fingers pointed forward. The palms of the hands and the soles of the feet are to be fully in contact with the mat.

Use the legs to full effect, especially recruiting the hamstrings and gluteal muscles to help lift.

The gaze is down the length of the nose, which is in the direction of the ceiling with the head back. Be sure to actively extend the neck—simply surrendering the weight of the head to gravity can create a feeling of pinching or discomfort in the neck.

Vinyasa of the Pose

From Sat, jump through and land in Dandasana.

Still exhaling, place your hands roughly 8 inches behind your hips, shoulder width apart.

Inhale, lift the hips high and arch the back. Five breaths; this is the state of the pose.

purvottanasana

Exhale, set down. Take Vinyasa.

ALTERNATIVES & SOLUTIONS

If you’re unable to lift enough that the soles of the feet touch the ground, bend one knee slightly. The extra power from that leg will help you lift much higher. Without the feet on the ground, you’ll be working much harder without seeing significant benefit. Switch which leg you bend, either five breaths on each side, or right leg one day and left the next day. After some practice, you’ll be able to have the feet on the ground with the legs straight.

purvottanasana with one knee bent

If you have shoulder injury, for example a torn bicep tendon, lift only as much as you can without pain. Keep one or both knees bent. Experiment with turning the hands so the fingers point backwards, or placing the hands on blocks. Don’t push too hard or too quickly—Purvottanasana is not especially forgiving to injured shoulders.

If there is neck pain with the head back, take the chin to the chest and gaze towards the navel.

COMMON MISTAKES

There is relatively little technique, here. The most common errors are errors of omission: hyperextension of the elbows, letting the hips sag, or not fully activating the legs and feet.

If you are having trouble finding height in this posture, place your feet against a wall so that your toes are up the wall but the ball of the foot is on the floor. This will allow you to push and get the feeling of lift and activation of the legs.

Paschimottanasana

Paschimottanasana

  • Paschim: West / Behind (Referring to the dorsal or back surface of the body)
  • Uttana: Stretched
  • Asana: Pose

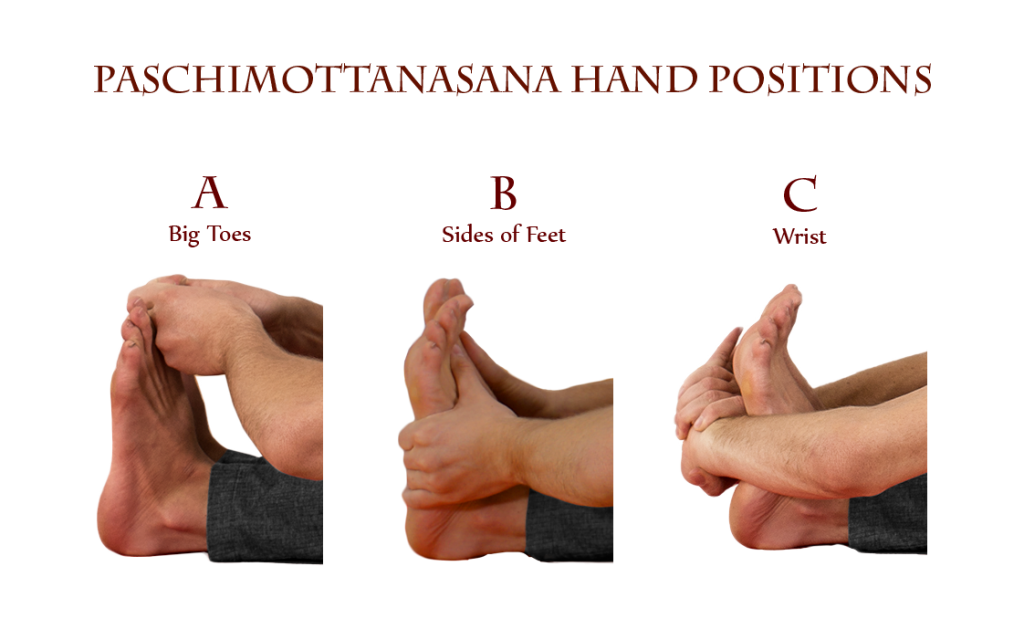
Paschimottanasana is the seventh pose of the primary series, and the second seated pose. Paschimottanasana has 3 progressively deeper variations: A, B, and C, distinguished by the position of the hands.

Hand positions

FOCUS ON…

Principles of Forward Folding:

Vinyasa of the Pose

From Dandasanainhale and reach upwards with the arms, using that movement to lengthen the belly and torso even further. Make sure that the legs are still participating.

Paschimottanasa-Prep

Exhale, and take hold of the big toes with the first two fingers of each hand.

Inhale and reset, tugging with the strength of the shoulders to pull the chest through the arms, straightening the spine.

Inhale and lift

Exhale and fold fully, still pulling with the arms. Resist with the feet, pressing the balls of the feet forward and spreading the toes. This is the state of Paschimottanasana A; hold here for five breaths.

Paschimottanasa-A

After five breaths, inhale and sit upright until the arms are straight.

Exhaling, grasp the outer edges of the feet with the fingers such that the ring fingers are just above the heels. Place the thumbs on the base of the big toes.

Inhale, pull with the fingers and pressing with the thumbs, wrapping the outer edges of the feet back and pressing the roots of the big toes forward as you lift the heart through the arms.

Paschimottanasa-B-Prep

Exhaling, fold forward. This is the state of Paschimottanasana B; hold here for five breaths. Continue pulling with the fingers and pressing with the thumbs to wrap the outer edges of the feet back and press the roots of the big toes forward.

Paschimottanasa-B Variation

After five breaths, inhale and sit upright until the arms are straight.

Exhaling, grasp either wrist with the opposite hand.

Inhale and reset, tugging with the strength of the shoulders to pull the chest through the arms, straightening the spine.

Inhale and Reset (C)

Exhale, and fold forward. This is the state of Paschimottanasana C; hold here for five breaths.

Paschimottanasana C Variation

Inhaling, sit upright.

Exhaling, release the arms, placing the hands just forward of the hips. Take Vinyasa.

ALTERNATIVES & SOLUTIONS

If the hamstrings feel quite tight, or if you’re unable to sit up straight (the spine is rounding), place a blanket or block beneath the hips. Add additional support if necessary until both the legs and spine can be straightened.

If reaching the toes is challenging or makes you feel crunched, use a strap or towel. Pull the strap with your arms, resist with your feet. This will allow you to feel the interplay between the actions of the arms and the legs that allows the spine to lengthen and the chest to remain full. Otherwise, if you strain yourself to reach the toes, you will likely not be able to find or appreciate the subtleties of the posture.

Add the variations only as they become necessary; if you’re using the strap, only one variation is possible. Stay for additional breaths. Only add B variation after A (with no strap) is comfortable. Only add C variation after B is comfortable.

COMMON MISTAKES

It challenges coordination to move from the hips rather than the upper body in this pose. Many simply struggle to reach their toes, or to touch their head to the legs. That is not the goal. Discover and master the fundamental actions of the forward fold.

Do not tuck the pelvis & do not slump. Gravity will not do your work for you.

Dandasana

Dandasana

  • Danda: Staff / Stick
  • Asana: Pose

Dandasana is the sixth pose of the primary series, and the first seated pose.

Dandasana is performed before each seated posture as part of the vinyasa to seated. As part of the vinyasa to Paschimottanasana, it is performed for five breaths. As part of the vinyasa to other seated poses, it is not held.

Focus On…

This pose establishes the blueprint for all forward folds and teaches the principles of forward folding that will be revisited frequently during the primary series. For those well established in the method of forward fold alignment, it provides a moment of introspection and an opportunity to commune with the bandha.

Principles of Forward Folding:

  • Fold, don’t curl. Ideally, a forward fold is a very shallow flexion, rather than a deep rounding of the spine. Forward folding is like folding a piece of paper: rather than head-to-knees, the belly comes down first, the ribs follow, then the head last.
  • The movement of forward folds comes from the hips. Specifically, from an anterior tilt of the pelvis. The hips move first, and the ribs and head follow along, similar to the movement of a whip. If you slump into a forward fold, or move from the upper body, you are wasting your time.
  • Keep strong, active hamstrings: dig/drag the heels down into the mat so there’s a sense of strength and depth at the backs of the knees.Draw the sitting bones together. Spread the toes and press through the root of the big toe. Flaccid legs and pelvic floor greatly increase risk of injury.
  • Internally rotate the thighbones. If only one leg is straight, as in the asymmetrical postures, internally rotate that leg.
  • Do not clench the abdominal muscles. The belly ought to be long and soft, with a sense of hollowing, or the belly falling back against the spine. Engaging the rectus abdominus shortens the torso, restricts movement, and places potentially harmful pressure on the spine.
  • Pull the shoulders back, and broaden the chest. Keep the collarbones long and the shoulders back for the entire duration of the asana.

These principles are common to all forward folds. Each forward fold also has its own distinguishing actions and characteristics.

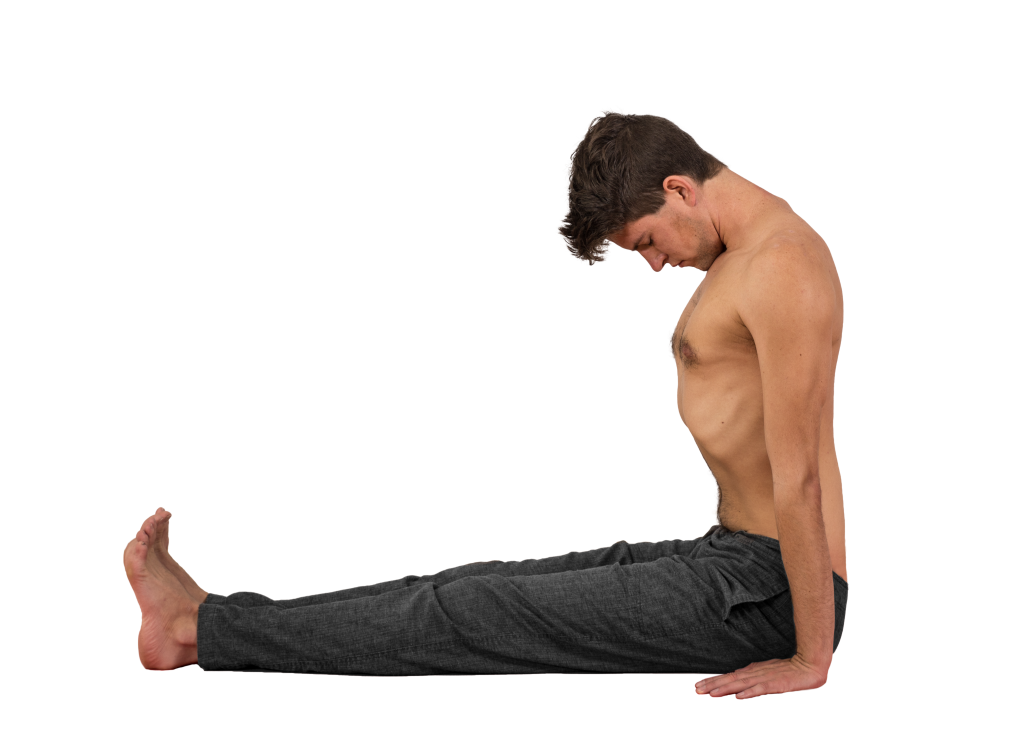
In Dandasana, the arms are straight and the hands press into the floor alongside the hips. The spine is fully vertical, and the chin comes to rest on the manubrium, between the collarbones. If your neck doesn’t allow for this much movement, don’t open your mouth to try and touch chin and chest, just be patient.

This pose, though simple in appearance, is not a chance to relax. Every part of the body is effortful.

Vinyasa of the Pose

Transition to seated, exhaling.

Inhale, and press the hands into the floor, sitting fully upright and working the actions of forward folding as described above. This is the state of the pose; spend five breaths here.

Dandasana

Exhale, and release. Transition directly to Paschimottanasana.

Alternatives & Solutions

If the hamstrings feel quite tight, or if you’re unable to sit up straight (the spine is rounding), place a blanket or block beneath the hips. Add additional support if necessary until both the legs and spine can be straightened.

Common Mistakes

Do not allow yourself to slump, or the pelvis to rotate posteriorly. Do not be hasty here; be sure you take the time to figure out the workings of this pose before you move on to other forward folds.

Virabhadrasana B

Virabhadrasana B

  • Virabhadra – Distinguished Hero
  • Asana – Pose

Virabhadrasana B is the fifth pose of the primary series.

FOCUS ON…

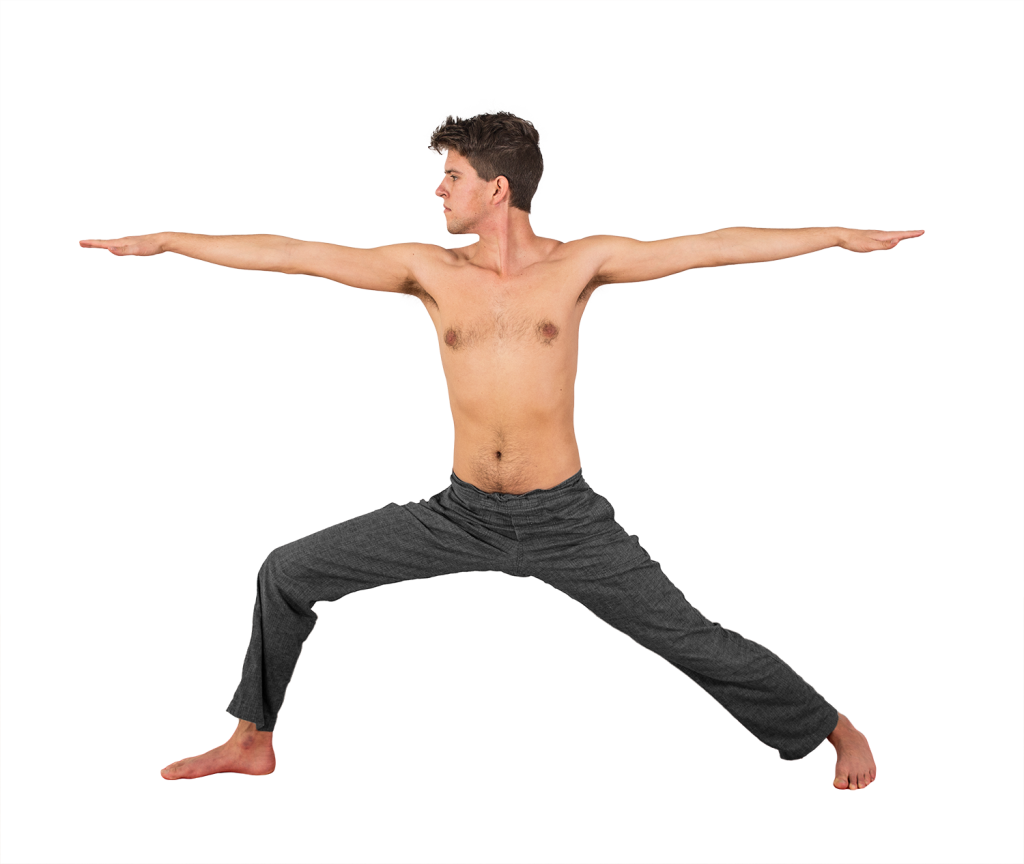
The work of this posture is very similar to that of Virabhadrasana A. The primary difference is that now the legs rotate externally, rather than internally, and the arms find a new position parallel to the floor.

The front knee is bent to approximately 70-90 degrees, such that the tibia is perpendicular to the ground in every dimension. The back leg is fully straightened, while the back foot is at a 90 degree angle to the front foot.

footprints


The upper body is not only vertical, but lifting. Rather than leaning back at the level of the chest or shoulders to create the illusion of verticality, draw upwards from the deep low belly and the waistline.

Keep the pelvis relatively neutral. Avoid excessive anterior or posterior tilting. Neutral does not mean passive or relaxed, however. A strong anterior tilt is typical while learning the pose, especially if the inner thigh muscles (adductors) are short. This means you’ll need to make the action of posterior rotation until the pelvis comes to an active neutral, which will be quite effortful.

In order for the pelvis and legs to form a stable and powerful foundation, both thighs must be rotated externally. Be sure to press the center of the heel and the outer edge (pinky edge) of the back foot firmly into the mat, otherwise the foot and ankle might ‘crumple’ inwards, leaving only the big toe side in contact with the mat.

With an air of nobility, gaze over the spread fingertips.

Vinyasa of the Pose

Exhaling, transition from Virabhadrasana A: Turn the back foot from 45 to 90 degrees, turn the hips and torso to the side, and spread the arms wide. You may need to widen your stance slightly. Hold here for five breaths; this is the state of the pose.

virabhadrasana-b

Inhaling, press firmly through the left heel and straighten the left leg. Move directly to the second side by pivoting on the heels. Do not move the arms and torso during the transition.

Exhaling, bend the right knee. Five breaths here; this is the state of the pose.

Inhaling, straighten the right knee by pressing firmly into the heel. Sweep the arms up overhead and turn to face the front of the mat, allowing the back heel to rise.

Exhaling, place the hands down to either side of the right foot and step or float back to Catvari.

Continuing the Surya Namaskara form, inhale to Panca.

Exhale, Sat. Still exhaling, transition to Dandasana.

Alternatives & Solutions

In the case of shoulder or neck injury, place the hands on the hips. If there is pain in the hips or knees, shorten the stance as necessary until recovery.

Common Mistakes

  • It can be difficult to tell exactly where your arms are in space. Often, the back arms is dropping and the front arm is lifted high. The arms ought to be on a level with the shoulders; check the position of the arms visually as you move into the pose, or ask your teacher or a friend to help make your arms level.
  • It can also be tempting to lean forward, over the bent leg. Instead, stay upright so the spine is fully vertical.
  • The back foot easily becomes ungrounded. Even though the front leg is the natural focal point, bring your attention into the back leg and the back heel, making it as strong and energetic as possible, pressing down into the earth.
Virabhadrasana A

Virabhadrasana A

  • Virabhadra – Distinguished Hero
  • Asana – Pose

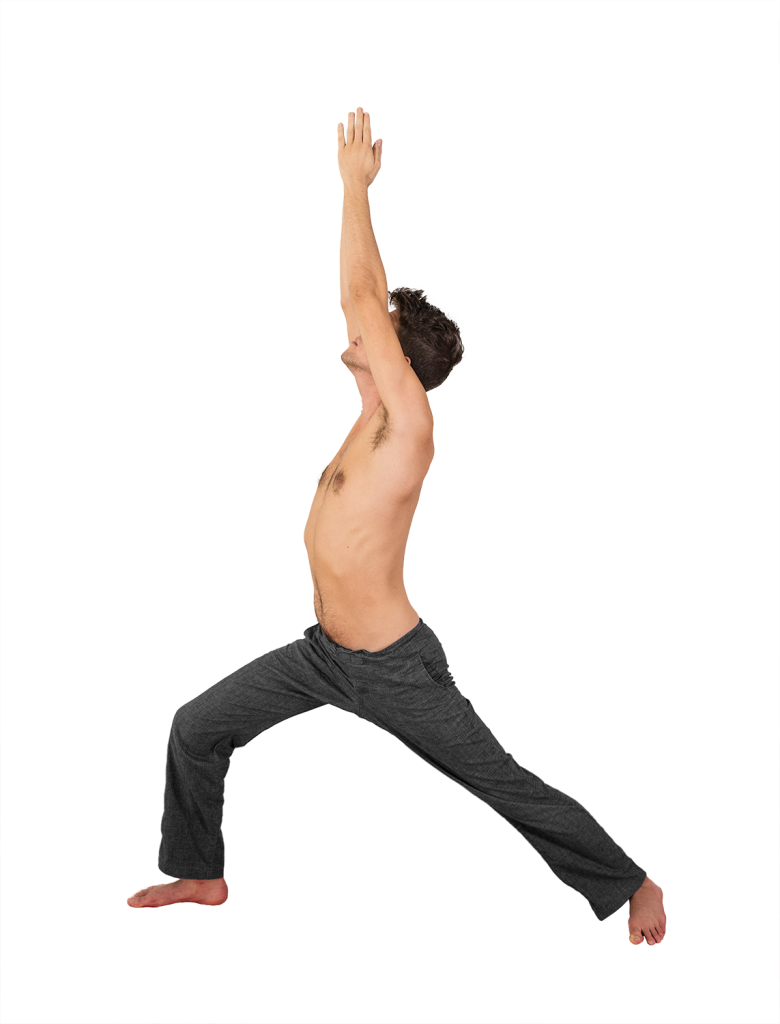
Virabhadrasana A is the fourth pose of the primary series.

Focus On…

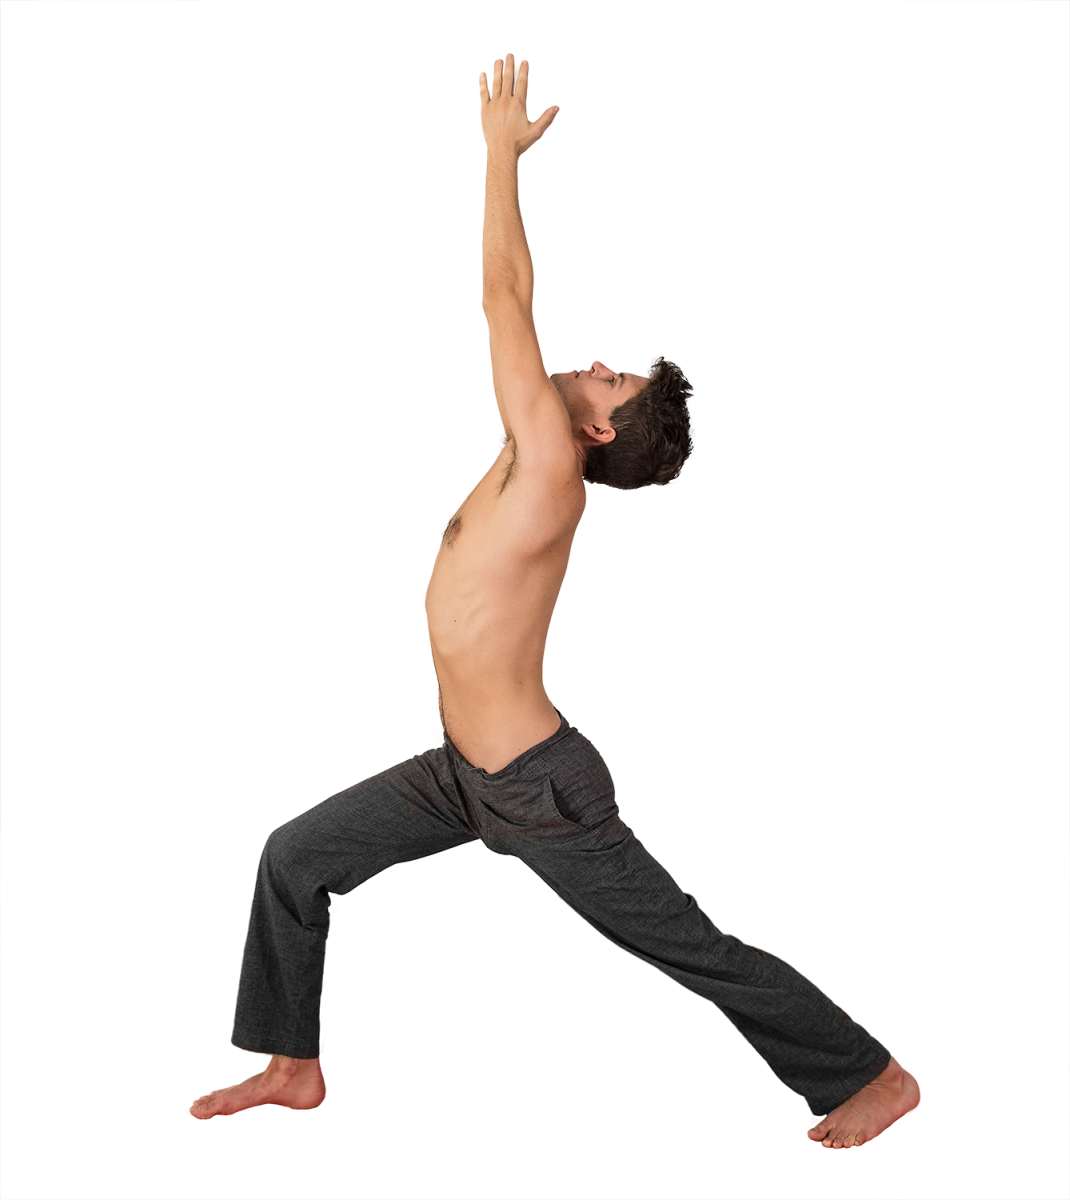
The front knee is bent to approximately 70-90 degrees, such that the tibia is perpendicular to the ground in every dimension. The back leg is fully straightened. The upper body is not only vertical, but lifting. Rather than leaning back at the level of the chest or shoulders to create the illusion of verticality, draw upwards from the deep low belly and the waistline.

Keep the pelvis relatively neutral. Avoid excessive anterior or posterior tilting. Neutral does not mean passive or relaxed, however. A strong anterior tilt is typical while learning the pose, due to the position of the back leg and limited quadricep length. This means you’ll need to make the action of posterior rotation until the pelvis comes to an active neutral, which will be quite effortful.

In order for the pelvis and legs to form a stable and powerful foundation, both thighs must be rotated internally. This can seem paradoxical on the back leg, as an interior rotation can put too much weight on the big toe or peel the sole of the foot off the ground. To address this, be sure to press the center of the heel and the outer edge (pinky edge) of the back foot firmly into the mat while you rotate the thigh internally.

Stance Footprints

Press the palms together firmly, and take the head behind the line of the arms. Avoid lacing the fingers together, or letting the shoulders grip around the neck. Reach upwards as much as you can, using the motion of the arms to cultivate length of the torso. Pressing the hands together will allow you to access the side rib musculature (namely, the latissimus dorsi & serratus anterior muscles. This is the area below the armpits). Creating strength in the side ribs is important in a variety of postures, essential to arm balances, and necessary in establishing healthy alignment in the shoulder girdle and neck.

Keep the musculature of the neck supportive by reaching the nose towards the ceiling.

Vinyasa of the pose

Virabhadrasana A follows from the last vinyasa of Utkatasana. From Sat, keep exhaling and step the right foot between your hands.

Inhale and join the palms overhead. Gaze up to the thumbs. This is the state of Virabhadrasana A – Spend five breaths here.

Virabhadrasana A - Warrior I

Without lowering the hands or gaze, exhale, pivot 180 degrees to come into the left side of the pose. Spend five breaths here.

Exhale, transition to Virabhadrasana B.

Alternatives & Solutions

If you have a neck injury, or limited mobility in your shoulders, spread the hands shoulder width apart. Keep the neck upright rather than tilting the head back to gaze upwards. Over time, however, work towards the proper head position. It is important to return the neck to a fully functional range of motion.

If the heel of the back foot doesn’t reach the ground, or there is pain in the achilles tendon or knee, place a block beneath the heel while maintaining the 45 degree angle. Over time, reduce the height of the support.

Common Mistakes

Avoid letting the knee wander from its proper place directly over the ankle. If it has gone from side to side, work the rotation of the thigh until it comes back into place. If it has strayed over the toes or beyond, increase the length of your stance. If it has not reached the ankle, bend the knee more. The tibia ought be perpendicular to the floor. 

The pelvis will typically rotate towards the open side — to the left with the left leg back, right with the right leg back. The result is a twisted conglomeration of Virabhadrasana variations A and B. Use the hands to find the hips, and wrap the the pelvis towards the front leg. Use the inner thigh muscles. If the back heel lifts from the ground, place a block beneath the heel until flexibility increases.

In the photo below, observe that the back foot is perpendicular to the front, rather than 45 degrees. This could be due to inattention or a tight Achilles Tendon/Calf musculature. As a result, the entire trunk (hips, ribs, shoulders) is distorted, twisting towards the camera. The head is also crunched between the arms, disallowing full shoulder extension. In whole, the posture is lacking in integrity and lift.


virabhadrasana-a-mistake

An example of ineffective alignment

Utkatasana

Utkatasana

  • Utkata: Fierce / Furious / Awkward
  • Asana: Pose

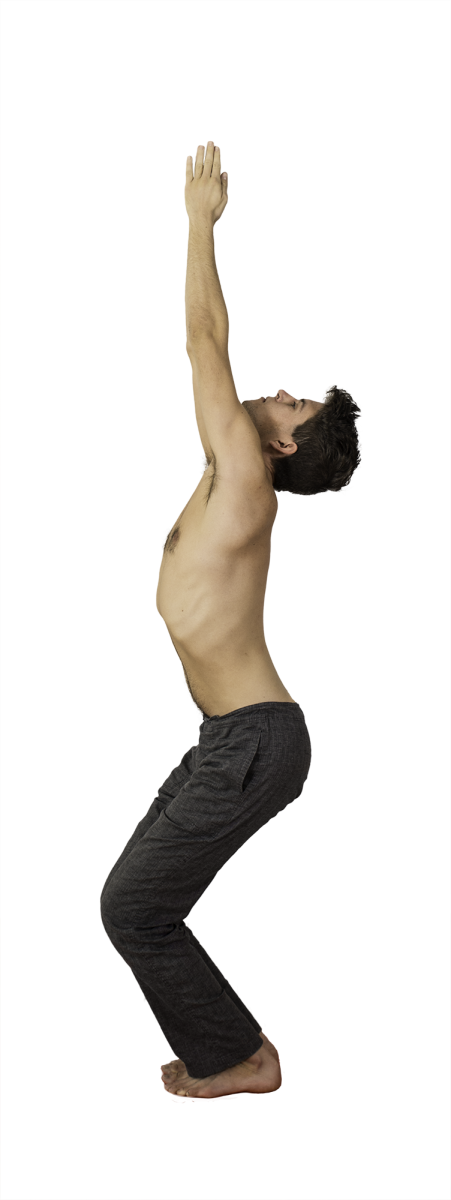
Utkatasana is the third pose of the primary series of Ashtanga Vinyasa.

This pose builds strength of the legs and shoulders, and demands flexibility of the shoulders.

Focus on…

Squeeze the knees together, and bend the knees as much as possible while maintaining the verticality of the pose. Bending the knees too much will make the torso and arms lean forward in order to counterbalance, undermining the integrity of the position.

Keep the pelvis relatively neutral. Avoid excessive anterior or posterior tilting.

Press the palms together firmly, and take the head behind the line of the arms. Avoid lacing the fingers together, or letting the shoulders grip around the neck. Reach upwards as much as you can, using the motion of the arms to cultivate length of the torso. Pressing the hands together will allow you to access the side rib musculature (namely, the latissimus dorsi & serratus anterior muscles. This is the area below the armpits). Cultivating strength in the side ribs is important in a variety of postures, essential to arm balances, and necessary in establishing healthy alignment in the shoulder girdle and neck.

Keep the musculature of the neck supportive by reaching the nose towards the ceiling.

Vinyasa of the Pose

This pose is entered through the Surya Namaskara form. (Review these positions here)

From Samasthitiinhale and reach the arms overhead.

Exhale, and fold forward.

Inhale, look forward and lengthen.

Exhale, jump back to Chaturanga.

Inhale, Urdhva Mukha Svanasana 

Exhale, Adho Mukha Svanasana. While still exhaling, jump or step forward and land with the feet between the hands and the knees bent.

Inhale, join the hands overhead, keeping the knees bent. This is the state of Utkatasana. Take five breaths here.

Utkatasana

Exhale, fold forward and press the hands on the floor.

Inhale, look forward and lengthen.

Exhale, jump back.

Inhale, Urdhva Mukha Svanasana 

Exhale, Adho Mukha Svanasana. From here, step forward into Virabhadrasana A.

Alternatives & Solutions

If you have a neck injury, or limited mobility in your shoulders, spread the hands shoulder width apart. Keep the neck upright rather than tilting the head back to gaze upwards. Over time, however, work towards the proper head position. It is important to return the neck to a fully functional range of motion.

If your hands are shoulder width apart, hold a block lengthwise. Press your palms firmly into the block to activate the side rib muscles (latissimus dorsi & serratus anterior). After several sessions with the block, leave it aside and find the same muscle engagement. Imagine an invisible block between your hands and ‘press’ into it if that is a helpful visualization.

Common Mistakes

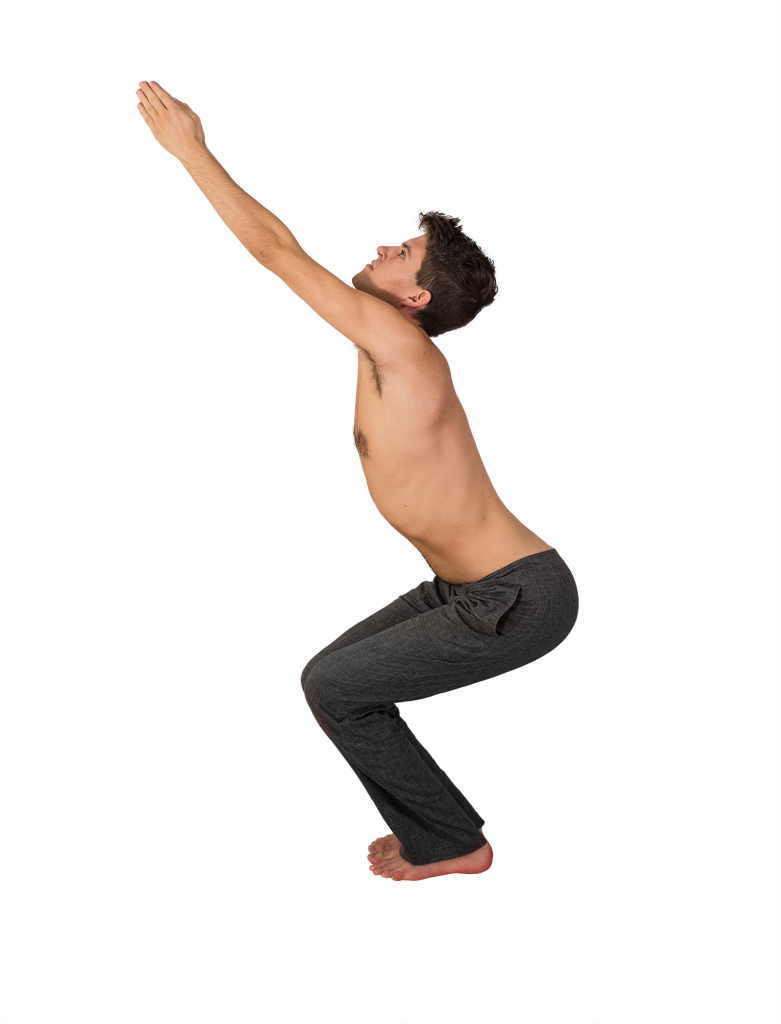
Bending the knees excessively can make the body lean forward too much. In the below photo, there is too much hip and knee flexion. Instead, the knees should be straightened until the arms are vertical.

Utkatasana mistake

Don’t place the head between the arms, which prevents elongation of the shoulder joint. Instead, place the head behind the line of the arms.

Don’t allow the arms or legs to do the bare minimum. Instead, squeeze the knees & thighs together, and press the palms together firmly as you spread the fingers and toes.

Ardha Baddha Padmottanasana

Ardha Baddha Padmottanasana

  • Ardha: Half
  • Baddha: Bound
  • Padmottana: Upright Lotus
  • Asana: Pose

This is the second pose of the primary series.

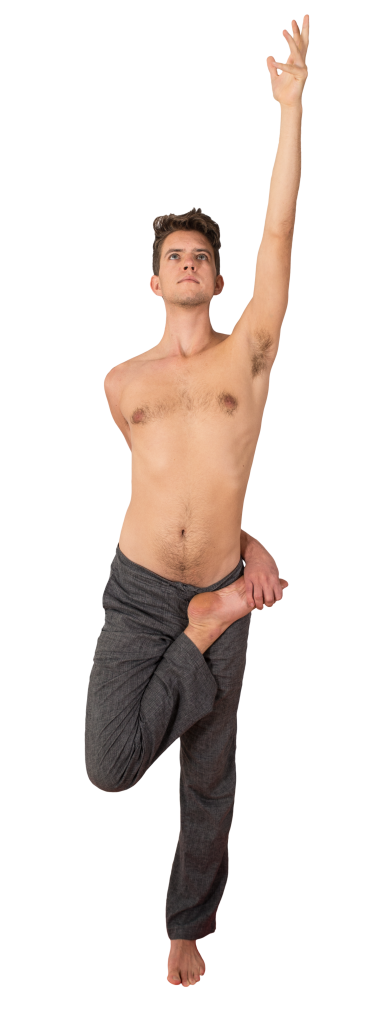
The following is a discussion of the position on the right side, as pictured. As an asymmetrical posture, it must be repeated on the left side.

This posture requires the leg to be placed in Lotus posture. If your leg can’t be comfortably  placed in Lotus, don’t add this posture until you have given more time to and had the benefit of the Marichyasana and Padmasana positions.

Ardha Baddha Padmottanasana primarily challenges and builds balance, focus, and coordination. Binding the foot requires significant shoulder flexibility, and the practice of this posture serves to lengthen the Pectoralis muscles and bring the shoulders into a more healthful alignment. It also teaches the release of the rectus abdominis muscle during forward folding.

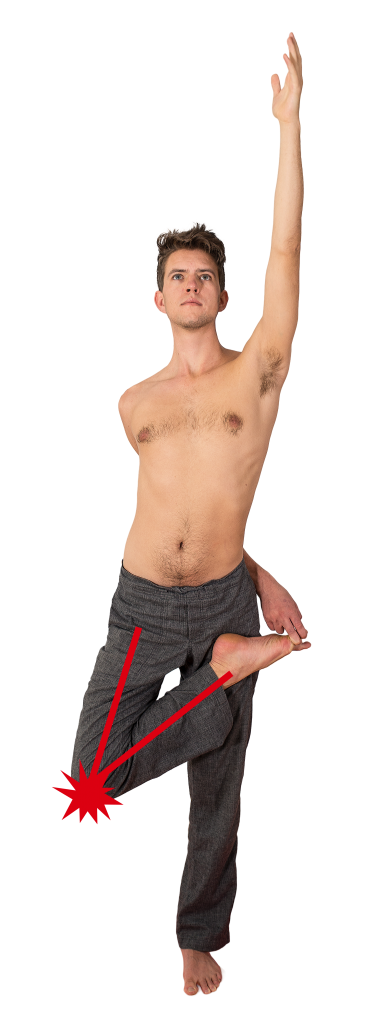
As in any of the Lotus family, be sure to keep the foot and ankle strong and contiguous with the leg. Allowing the ankle to “cave in” (inversion of the foot/ankle) will lead to ankle strain or a sprain.

Vinyasa of the Pose

From Samasthiti, inhale raise your right leg and place it in lotus. Reaching behind your back, bind the right big toe. Make the big toe strong in order to serve as a hook for your fingers. Reach your left hand upwards.

ardha badha padmottanasana prep

Exhale, and fold forward. Place your left hand on the ground alongside the left foot. Gaze at the tip of the nose (with the head down; the shin or wall behind you in the line of sight). This is the state of the pose; hold for five ujjayi breaths.


ardha baddha padmottanasana

Inhale, look forward and lift halfway, coming onto the fingertips.

Exhale and hold.

Inhale, stand upright and reach the left hand upwards (as in first vinyasa)

Exhale, return to Samasthiti smoothly, remaining balanced.

Solutions & Alternatives

If the leg can be placed in lotus, but you have a shoulder injury or tightness that prevents binding the foot, use a strap or cloth to bind. Alternatively, place both hands on the ground.

Common Mistakes

If the knee cannot be fully closed in Lotus, with the foot at the hip crease, do not fold forward. If, due to lack of mobility at the hip, the foot is partway down the thigh, you risk torsion injury to the knee.

ardha badha padmottanasana incorrect

If you do not feel stable standing on one leg, give more time to the other standing postures before attempting this. Popping out of lotus as you lose your balance can injure the knee.

Discovery and Experience of the Bandha

Discovery and Experience of the Bandha

One of the concepts very central to Ashtanga-Vinyasa practice is the Bandha*. It’s a word with a connotation of bridging, fastening, binding, connecting, or locking. There are three Bandha discussed in historical texts and modern practices: Mula Bandha, Uddiyana Bandha, and Jalandhara Bandha.

Much allure surrounds the Bandha, though they tend to be poorly understood and under-explained. This is my experience of the Bandha, an account of a living practice rather than a technical or philosophical perspective. The Bandha are not something to be understood solely by reading Hatha Yoga texts or the commentaries surrounding them. To be effective, they must be applied in an intelligent way to the body, allowed and felt rather than grasped at or created. I will describe two exercises you can practice any time to develop your own awareness, and then I share my own experience with the Bandha.

Each Bandha has a specific location, a space inside the body, yet do not refer to any specific physical tissue. They may involve certain muscles or muscular movements, but are not defined by those movements. Instead, think of them as a type of awareness, a space in which various sensations, movements, or perceptions may take place.

*Technical Note: In Sanskrit the word Bandha can be either singular or plural, similar to “deer” in English. Many people nonetheless add an “s” to pluralize Bandha, which tends to be clearer and habitual to English speakers. You will encounter both methods–there is no difference.

Discovery

Intellectual understanding is of limited use, yet a helpful first step. You must practice awareness of the Bandha yourself. Otherwise, my words will be gibberish when it comes to your Yoga practice – disconnected and meaningless.

Why practice the Bandha?

  1. They are effective in creating effects in the physical body: stability, balance, length, expansion, strength, as necessary. (read more in the account of my experience)
  2. The process of trying to increase your awareness is important, regardless of the result. You may experience something different from what I describe. You may spend some months feeling nothing at all before it clicks. Yet the process itself is what is important – it develops the power of concentration (dharana) and has powerful effects on the brain and mind.

While you can (and it would be helpful for you to) be aware of the Bandha in any situation, whether during your Yoga movement practice on the mat or while sitting or driving or falling asleep at night, I recommend two specific exercises to focus more completely on the Bandha without any other distracting elements as part of the discovery process.

Three Bandha

There are three main Bandha:


  1. Mula Bandha. Mula means “root” or “foundation.” It is located at the pelvic floor, inside the tailbone
  2. Uddiyana Bandha. Uddiyana means “flying upwards.” It is located in the lower belly.
  3. Jalandhara Bandha. Jalandhara means “net in the stream,” an evocative image of filtering or straining.  It is located at the hollow of the throat.


Mahabandha Practice


Maha means “great,” + “bridging, fastening, binding, connecting, or locking.” Mahabandha refers to the conscious awareness or practice of all three Bandha at once.

This practice is an easy way to discover the location and sensation of the Bandha, and to keep refocusing yourself during the movement practice of Ashtanga.


Comfortable Sitting

This is a seated, introspective practice that encourages the development of proprioception (sensitivity to the space and relationships inside your body) and concentration. I recommend doing this exercise after trying the Mahabandha practice described above.

Sit comfortably. Padmasana (“lotus”), cross legged, sitting on a pillow or block, or in a chair are equally acceptable. Keep your spine straight and upright — avoid squishy chairs or laying down.

Focus on your breath. Let it grow in your awareness, letting the sensations of breathing magnify.

Start to notice your spine. Now imagine or visualize the Bandha as three rings in the body: at the throat, lower belly, and pelvic floor. Being very precise with the location is not very important right now. You may notice that one spot in the lower belly is easier to focus on than the surrounding area. Keep your awareness there. This applies to the other two Bandha as well.

Exhale fully. On the inhalation, imagine moving or threading your breath through the Bandha, one by one, extending the breath from the tip of the nose all the way down along the inside edge of the spine to the tailbone. On your inhalation, reverse the process, moving the breath back through the three rings until it has completely left your body.

bandha breath

Repeat this process, staying as focused as you can, for 3-5 minutes.

When starting this process, expect to spend most of your effort holding the image or feeling of the three rings in the body. You may notice that sensation or focus is isolated to one ring/Bandha at a time. It may take a great deal of concentration to maintain this exercise; the amount of focus required might even obscure any sensations. This phase may last for a week to several weeks, don’t be concerned that it’s not working.

With consistent practice, you will need to expend less effort to maintain focus, and you will be able to expand your awareness to focus on or notice sensations in two or three Bandha simultaneously. Soon you will be able to have a “diffuse” awareness of the three Bandha, the thread of the breath, and the spine concurrently. At this point you will be able to be more focused on the sensations arising from the exercise rather than on concentrating your mind effortfully.

It is not very important what exactly you feel during this exercise. Just notice whatever comes. Do not become ensnared in the sensation — you may notice that the novelty of sensation distracts you from the movement of the breath. Just remind yourself to refocus on the breath.

It is not necessary to attempt any kind of physical movement or muscular contractions during this exercise other than sitting upright. However, the breath is created by and follows muscular movement. Noticing those movements – the contraction of the lower belly to exhale, the lift and contraction of the neck/chest muscles to inhale can help to direct your awareness appropriately, since these sensations are more tangible and noticeable.

It is not at all important if you wonder if you’re imagining it or actually feeling something. In fact, if you don’t feel anything, use your imagination more. Sensitivity (proprioception) is a skill to be developed, and it has a manifest structure (the nervous system) which may need to be rebuilt or “reprogrammed.” Imagine what you think it might feel like, and you will be working towards developing that sensitivity.

It is appropriate to start and/or end an asana (movement) practice with this exercise. You should also practice this during Dandasana and Padmasana in the Ashtanga series. In any pose that feels unstable, unbalanced, tight, restricted, or uncomfortable, practice this exercise for a few breaths (no need to do it for 5 minutes).

Additionally, any time that you have to sit is useful. Consistency is much more valuable than duration. For example, I would recommend sitting daily for 3 minutes rather than waiting for days where you feel like you have more time and sitting once or twice a week for 15 minutes.


My Experience


In this account, I will describe the more tangible movements of the physical body, plus the subtler sensations of the energetic body. As you read my words evoking radiance, energy, warmth, and energetic movement, conceptualize it as a refined perception of the nervous system, or in Yogic terminology, as an experience of pranamayakosha, the “energy body” composed of vital energy (pranas). Whichever concept is more appealing and closer to your experience will serve you well.

My experience has changed greatly over the course of my practice. This account does not reflect what I felt towards the beginning of my practice (mostly nothing) and what I might feel in the future. Please keep that in mind as you read this and practice yourself that you should not expect it to develop overnight.

Mula Bandha

Physically, I feel a sensation of lift through the tissue of the pelvic floor. It is not a tightness or hardening but rather a tautness and stability, restraining downward movement of the pelvic and abdominal organs. My coccyx and surrounding soft tissue draws in towards my pubic bone (a noticeable physical movement). This is not a “tuck” of the pelvis; there’s no movement in my sacrum or other bones of my pelvis besides the tailbone.

I do not always notice a physical component to Mula Bandha, but it is apparent in positions that put pressure on the abdominal cavity (Chaturanga Dandasana, twists, Utthita Trikonasana, etc), during which Mula Bandha provides a lift and stability.

I also feel this as a pulsation that radiates from the space directly in front of the tailbone and sacrum. A glowing, perhaps. It has a suggestion of rising upwards in the way that waves of heat rise from a flame. This occurs in definite pulses of about 2 per second; it is not a continuous stream. The feeling of upward radiation can be distinguished for perhaps the distance of one palm-length, diffusing into the lower belly. There is a pleasant warmth and a feeling of gathering in the way that drops of dew might roll down a leafy bowl to coalesce in the center.

During poses that require a focused strength through the legs, such as Parivrtta Trikonasana (Revolved Triangle), I feel as though the breath can be extended through Mula Bandha down the lengths of the legs. Although I had not been aware of my legs as being“disconnected” from the rest of my body previously, this application of Mula Bandha creates a strong sensation of the body becoming unified – that the legs are becoming integrated with the spine. This is a main sense of the word bandha – the “bridging” of a gap. I have a similar experience in other positions that challenge leg integration, such as Adho Mukha Vrksasana (handstand) or Utthita Hasta Padangusthasana.

Uddiyana Bandha

Physically, I often feel Uddiyana Bandha as a lifting of my diaphragm, drawing the organs upwards into the bottom of my rib cage. My ribs expand in circumference by about 7-8” and my waistline narrows and pulls in and lengthens circumferentially. My total height increases. This is accompanied by a sensation of being pulled tight in the way that fabric or Serran wrap could be pulled taut by tugging on its edges. The effort of such a movement lies not in my abdomen but rather with the diaphragm and perhaps the muscles in the ribs and shoulders. Under the pressure of my hands, my abdomen is soft and yielding, offering no resistance (quite contrary to a common interpretation of Uddiyana Bandha as a hardening or contraction of the abdominal muscles).The breath creates little movement in my abdomen.

This effect is created as the organs (“abdominal viscera”) actually lift upwards, drawn into the rib cage with a vacuum-like sensation. This lift of the organs decreases the volume of the abdomen, creating a narrowing, while expanding the volume of the rib cage, creating an expansion. The kinematic pressure (think pneumatic pressure but with solids) of this lift is also a decompressive force for the spine, creating additional height and space between vertebrae.

More subtly, I feel a sensation of electric dynamism, in the general shape of a sphere. Its center is located below and behind the navel. During the application of Uddiyana Bandha, it feels squished in against the spine, becoming less spherical in shape. Imagine squeezing a bag partially filled with water in your hand. With the application of Mula Bandha, it squishes upwards (one hand squishing at the very bottom, the other at the middle — the water can only move upwards). Without, it radiates both upwards and downwards (just one hand squeezing in the middle — the water moves in both directions).

bandha


There is a pulsing here as well, as I described with Mula Bandha. It moves the rhythm of rising heat from below further up in my body, but it also feels much more expansive, radiating omnidirectionally to a perimeter beyond the level of my skin. The sensation of energy rising continues through my ribs to the level of the throat and shoulders.

Jalandhara Bandha

I experience this as a feeling of drawing inwards at the hollow of the throat. The sensation is strong and denser than the other 2 bandha, though more similar to Mula Bandha. It is in the same area that Ujjaii breath resides, but the two can coexist or be performed separately. The feeling of restraint or tightening from the bandha is very similar to that of the Ujjaii breath. The rising sensation is slower and more like that of an ocean wave or current of water, rather than the more delicate, fine electric vibrations of the lower bandha. It is strongly linked to a sensation of ‘gathering’ at the roof of the mouth, though I can feel it throughout my head.

Physically, my neck and head draw back in space (relative to my torso), almost magnetically – without a feeling of conscious muscular effort. This is opposition to the common position of the head and neck being forward of the torso, often created by our habits of using computers, desks, driving, and other similar activities.

Remember

If you think you have the Bandha pinned down and defined, chances are you’re wrong. There are many conflicting opinions.

Being right about it is not very helpful to your practice.

Being open to exploring and redefining and experiencing is.

Just observe. You might not notice anything. You might notice something. What you notice might change over time. That’s all fine.

Stay attentive.


Utthita Hasta Padangusthasana

Utthita Hasta Padangusthasana

  • Utthita: Extended
  • Hasta: Hand
  • Pada: Foot
  • Angusta: Big Toe

The following is a discussion of the position on the right side, as pictured. As an asymmetrical posture, it must be repeated on the left side.
This is the first pose of the Primary Series, performed after all the Standing (Foundational) Poses.
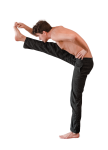
This posture has three variations, which are performed in sequence.

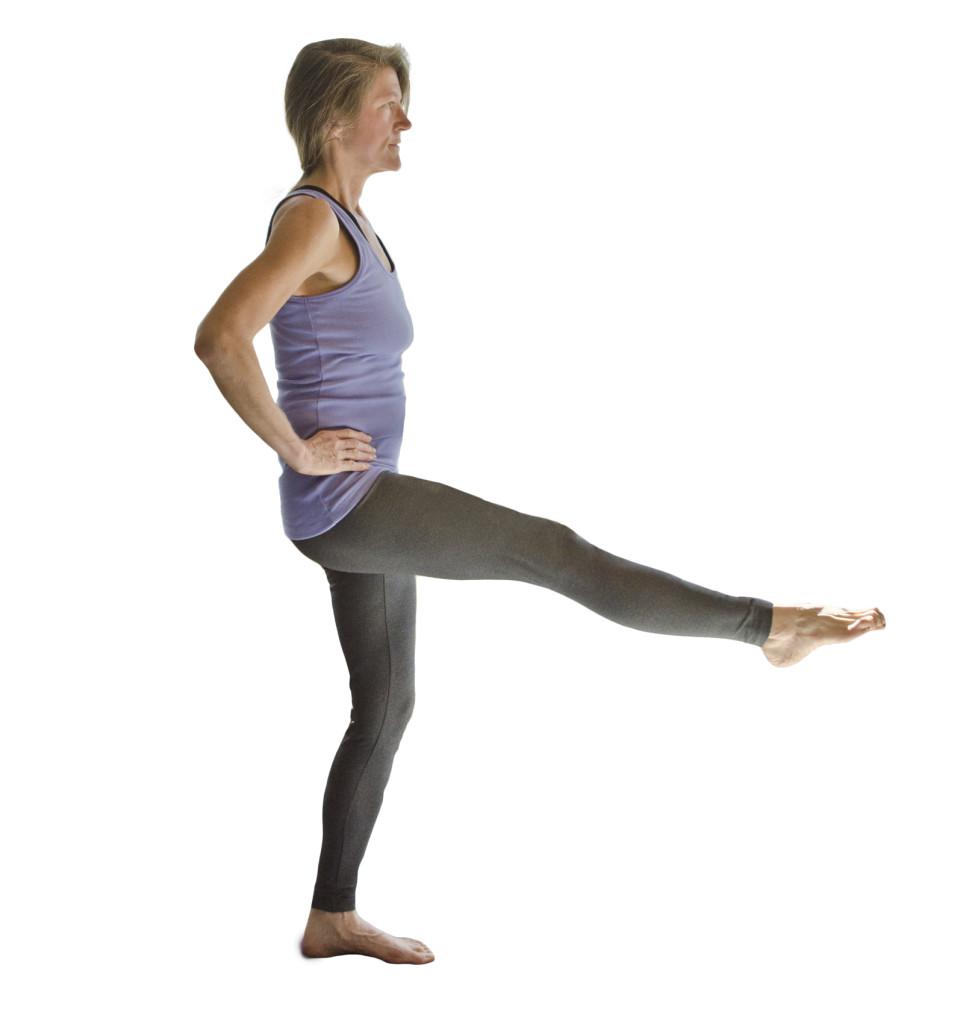
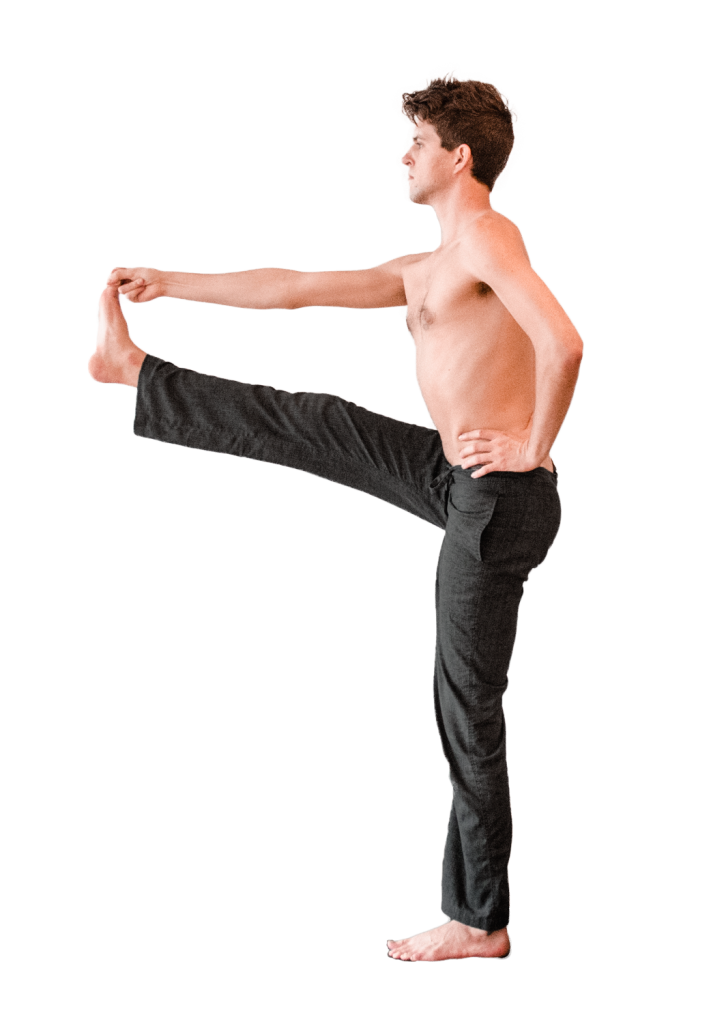
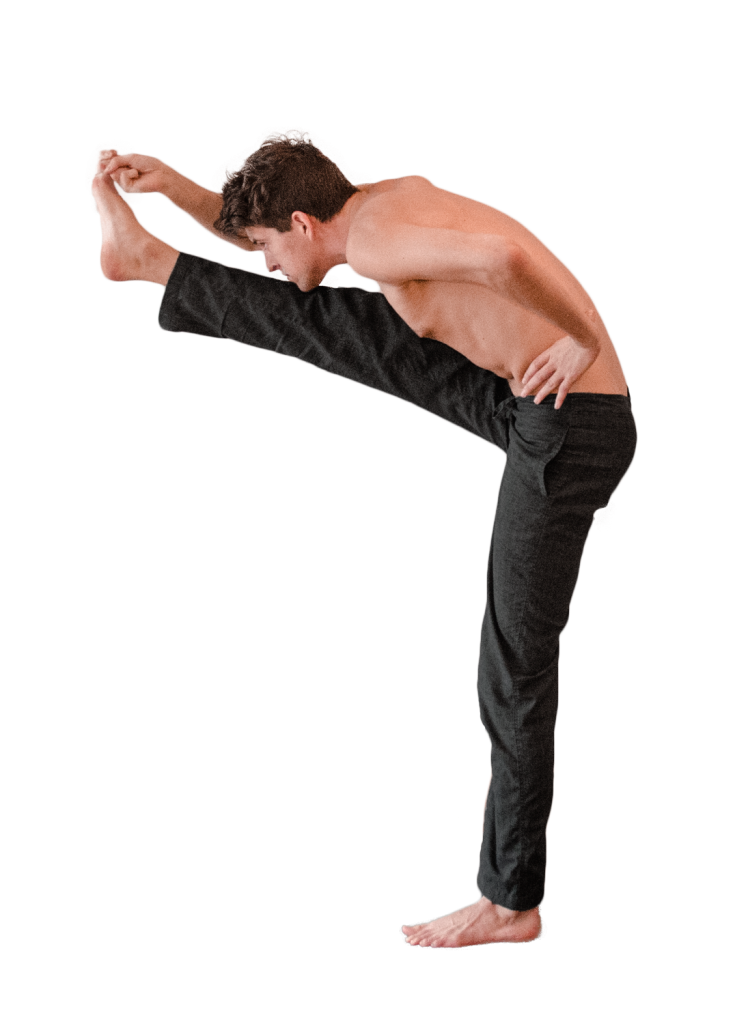
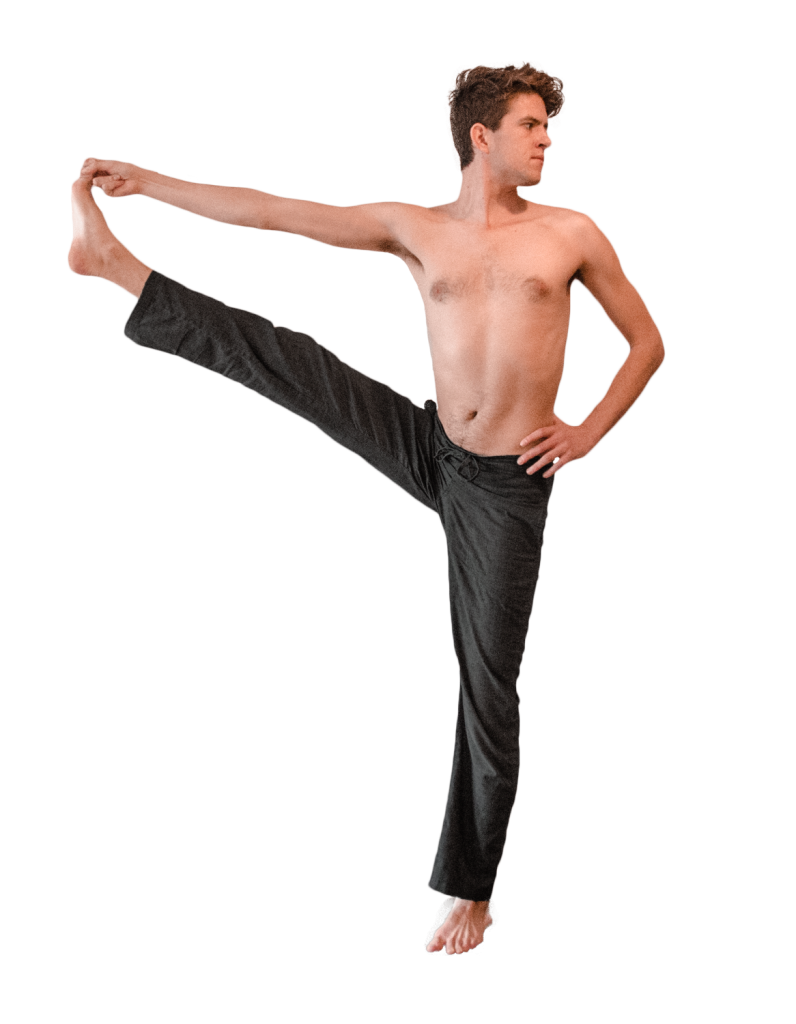
Utthita-Hasta-Padangusthasana-CUtthita-Hasta-Padangusthasana-B Utthita-Hasta-Padangusthasana-A

All three postures challenge your balance, thereby strengthening the left foot and leg (the supporting side) and the abdominal muscles.

In the right (uplifted) leg, activity is focused around the psoas, pectineus, and quadricepsIts effects on these muscles translate to increased stability and ease around the lower back and through the pelvis.

The first position strengthens the psoas, pectineus, and quadriceps in a very shortened position while also challenging the balance by shifting the weight forward over the leg. 

The second position then stretches these same muscles by bringing the leg out to the side.

The third position isolates the right hip/leg/abdominal muscles for strengthening.

Utthita Hasta Padangusthasana is one of the best positions for strengthening the legs and internal abdominal muscles, due to the fact that it is very challenging to both strength and balance. The muscles connecting to the pelvis are closely related to lower back health – and so practice of this posture can be very beneficial for cases of discomfort or pain in the lumbar spine. The strengthening of the psoas major is of particular import, as it attaches each lumbar vertebrae to the tops of the inner thigh. In many people, the psoas major is chronically hypertoned, tight and weak. It exerts an unhealthful influence on the position of the lower back, bringing it too deep into the body (lordotic curvature, also known as sway back). This position can correct that influence.

Start with Stage 1, or if you’re already experienced with this posture, skip on down to the advanced variation.

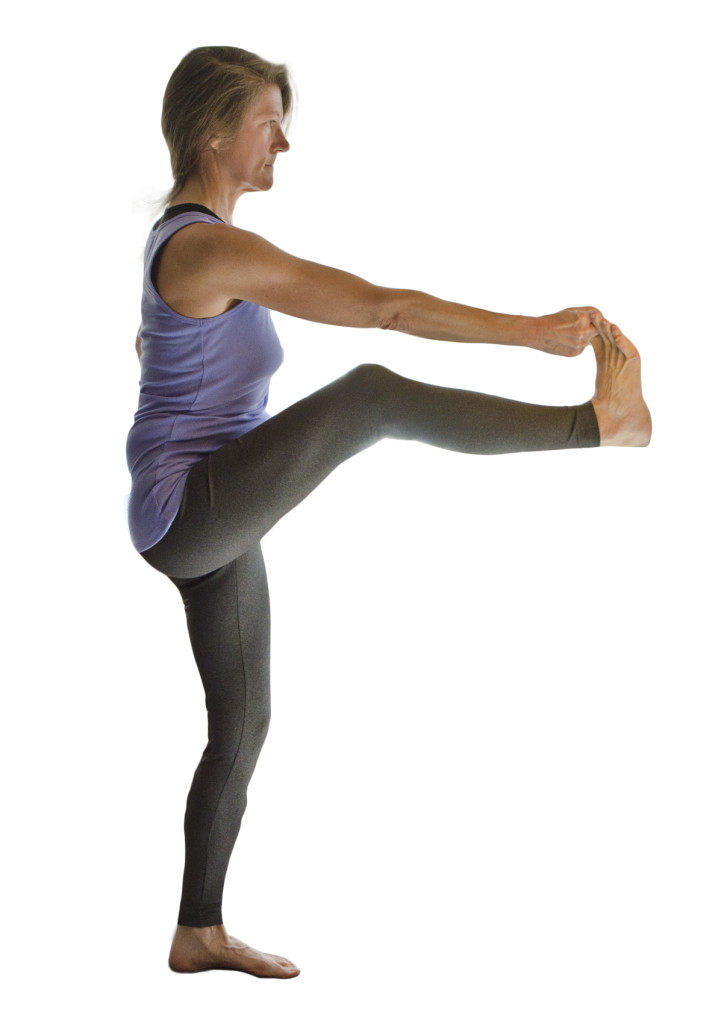
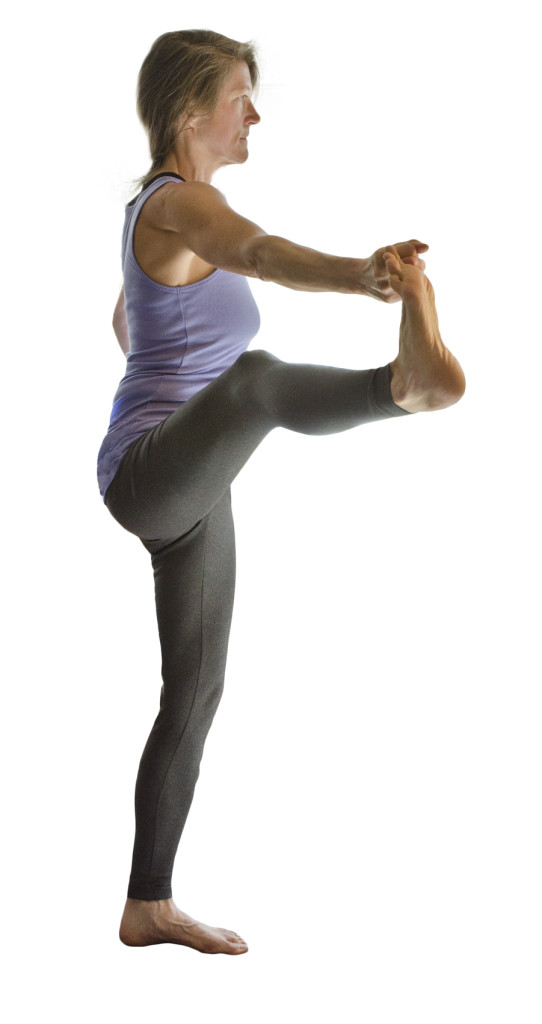
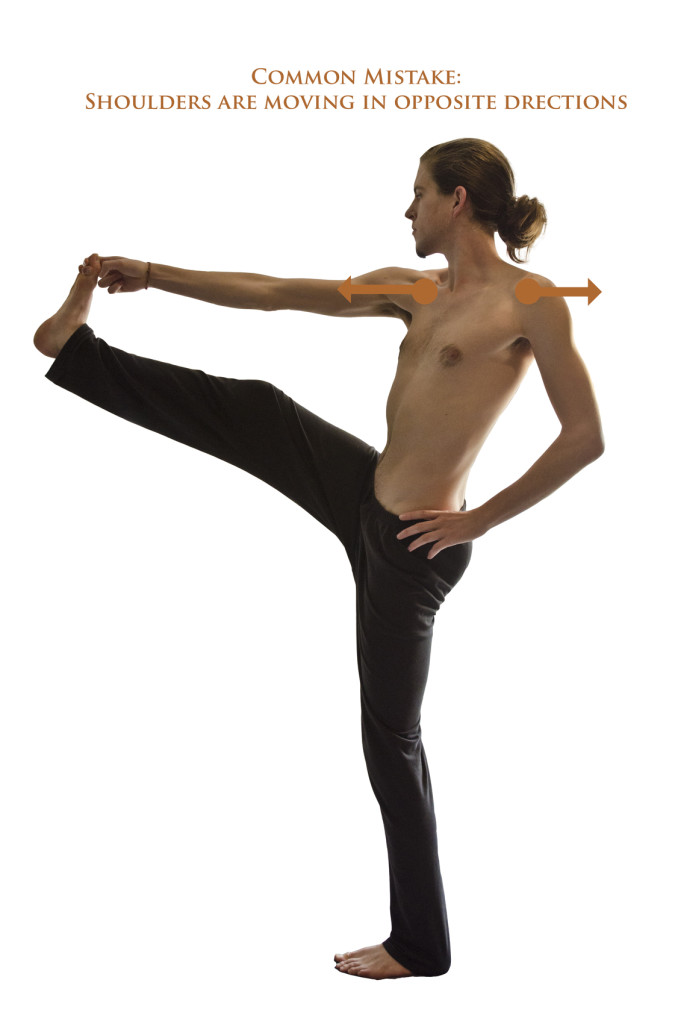
This position effectively teaches one of the most important lessons of the Primary Series: of how to use opposing forces to create stability and lift. Beginners attempt to straighten their uplifted leg by moving it forward in space. This creates distortion of the whole posture, as the hips and shoulders shear to try and maintain balance (see common mistake photos).  This is balancing in the way that a spoon balances on the edge of a bowl – a slow back-and-forth movement that feels very shifting and unstable. The opportunity given by this posture is to instead create balance through lift. By wrapping the lifted big toe with the first two fingers of the hand and pulling back, you offer the leg some resistance; then extend forward through the root of the big toe. Since the hand and foot are anchored together in space and relatively immobile, the lifted hip will move back in space (towards center of gravity) and the muscles of the hip – the external rotators – and shoulder will be able to fully activate, creating a feeling of solidity and sturdiness. The right shoulder will move back in space and the left shoulder will move forward. In this way, the body will more closely conform to Samasthiti.  Instead of wobbling back and forth and struggling to maintain balance, this effort will allow the practitioner to focus on the bandhas & breath, grow taller, extend the standing leg fully and lift the crown of the head upwards.

Stage 1 Positioning

Note: If you’re feeling very unstable here and unable to maintain any of these postures for 5 breaths, use a wall for support. Face along the length of the wall, then bring your left hand to press into the wall. Practice with the wall until you strengthen sufficiently.

From Samasthiti, inhale and press the left hand into the left hip as you bend the right knee and draw it up towards the chest.  Reach to grasp the right big toe with the first two fingers of the right hand. Attempt to pull your foot to meet your chest, pulling the right shoulder back into its socket and strengthening the right arm. Without relaxing the effort of the arm, press through the through the right and left big toe mounds simultaneously to straighten the right leg as much as possible.

UHP J A

Take care that the weight of the right leg does not pull the right shoulder forward: draw the right shoulder back and the left shoulder forward to square the torso (see also Common Mistakes)

Hold this position for 5 breaths.

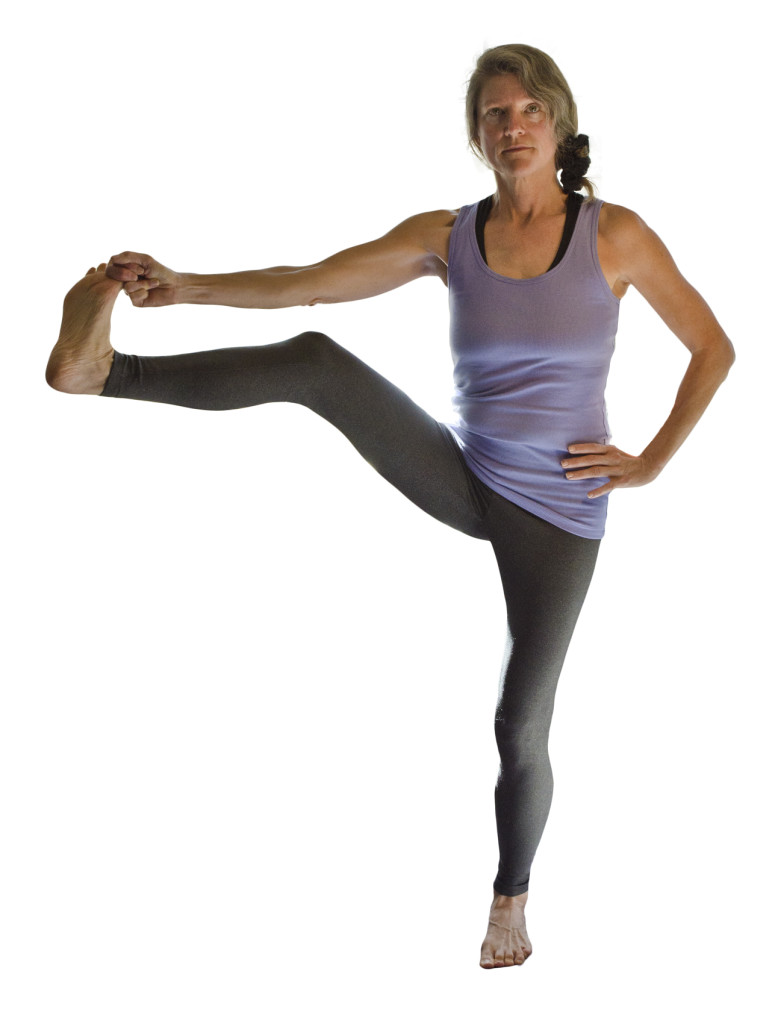
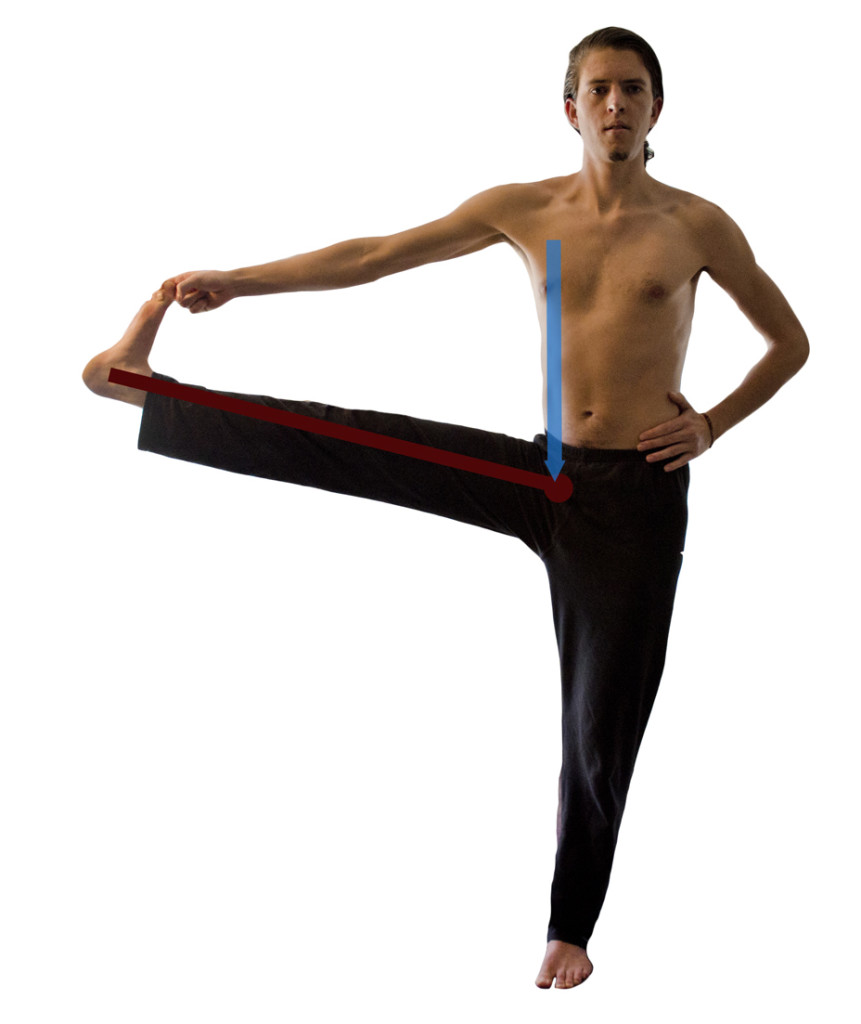
Exhale and take the right leg out to the right side. Make this movement from the right leg alone, without letting the pelvic girdle turn to face right. Stop and hold at the point that the movement starts to come from the hips rather than the leg. Keep the right hip dropping and in line with the left. Attempt to roll the thighbone up and back (rotating the femur externally). Do not relax the resistance of the right arm – there should be a firm counteraction between the foot and hand.

 UHP J B

Seen from front:

UHP J B front


Hold this position for 5 breaths.

Inhale, bring the leg back to center.

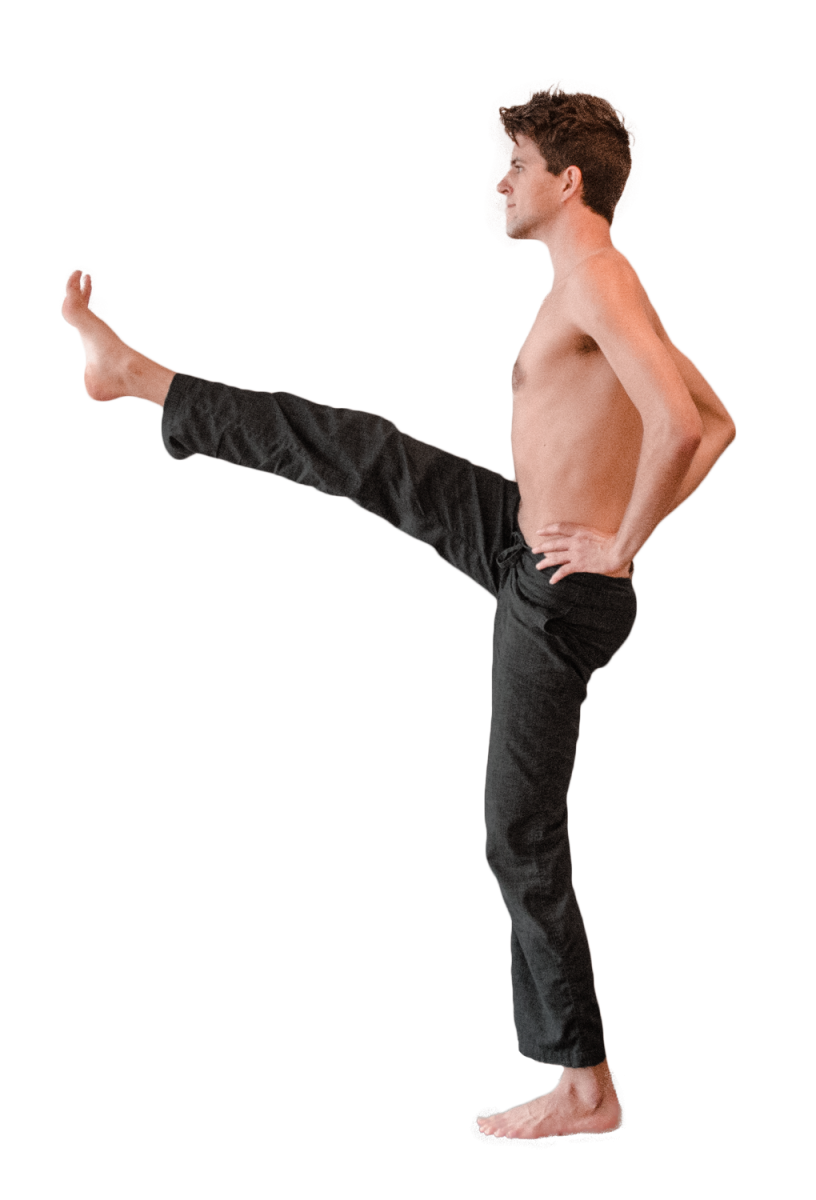
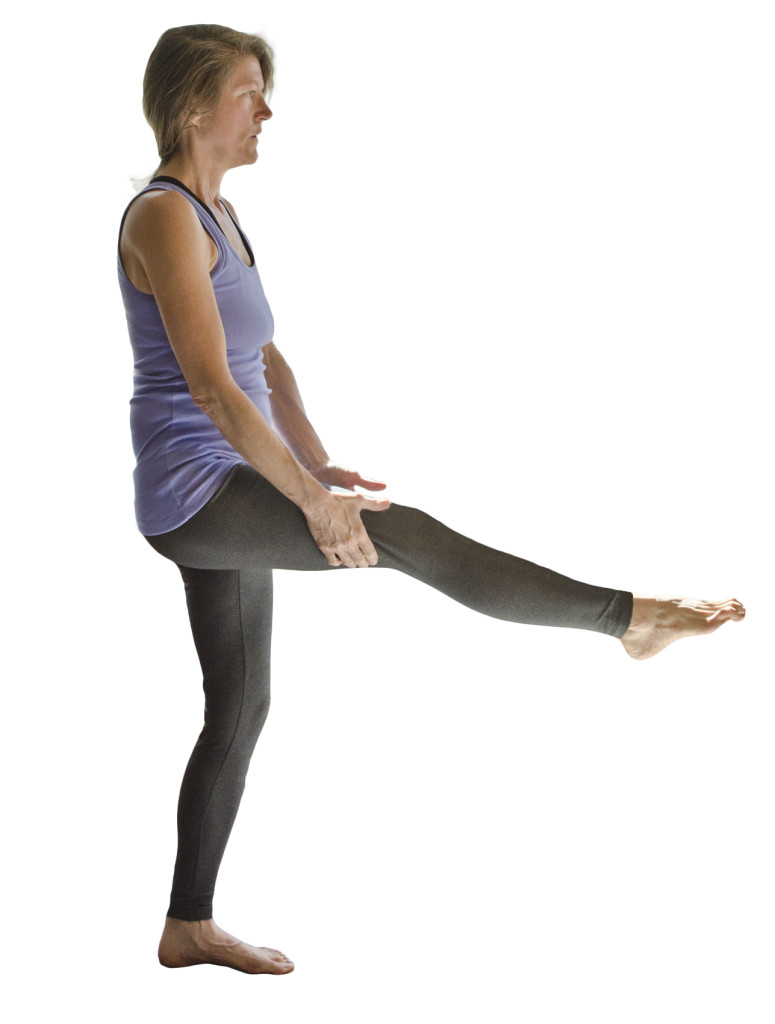
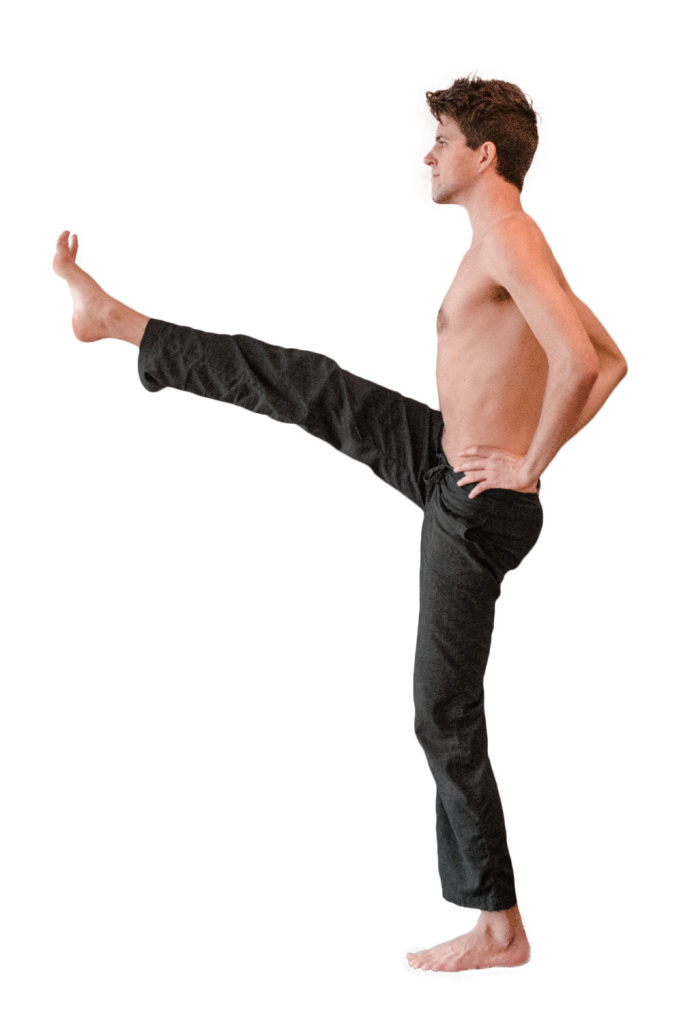
Exhale, grasp behind the knee with both hands, point the toes, and lift the leg as high as you can.

UHP J C prep


Inhale, release the leg, keeping it elevated under its own power as the hands come to the hips.

UHP J C

Hold this position for 5 breaths.

Exhale, release the leg and come back to Samasthiti.

Repeat these positions on the left side.

Full posture:

From Samasthitiinhale and press the left hand into the left hip. Keep the right leg straight as you lift it until it’s parallel to the floor.  Reach to grasp the right big toe with the first two fingers of the right hand, pull the right arm back into the shoulder socket, then straighten both legs as much as possible by simultaneously pressing through the right and left big toe mounds. Lift the crown of the head to the ceiling, elongating the spine.

Utthita-Hasta-Padangusthasana-A-Prep

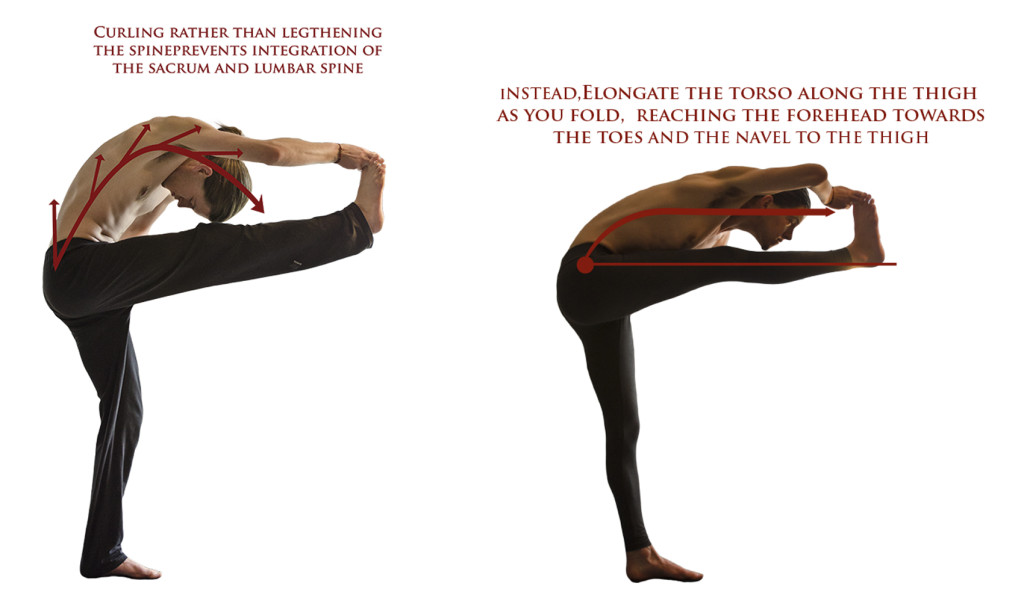
Exhale and fold forward over the right leg; fold from the pelvis not the upper body. Lengthen the spine along the right leg.

(Utthita Hasta Padangusthasana A)

Utthita-Hasta-Padangusthasana-A

Hold this position for 5 breaths.

Inhale and return to an upright position keeping your grip on the toe (as pictured above).

Exhale and take the right leg out to the right side. Make this movement from the right leg alone, without letting the pelvic girdle turn to face right. Keep the right hip dropping and in line with the left. Attempt to roll the thighbone up and back (rotating the femur externally), but make sure the toes stay upright. Keep pressing out through the mound of the big toe and pulling back with the right hand.

Inhale and bend the right elbow to draw the leg upwards. Ensure that this movement is coming from the leg and not the hips (see common mistakes below). Look over the left shoulder.

(Utthita Hasta Padangusthasana B)

Utthita-Hasta-Padangusthasana-BHold this position for 5 breaths.

Inhale, bring the leg back to center.

Exhale, and lift the leg as high as you can. Bring your forehead to the shin.


Inhale, release the leg, keeping it elevated under its own power as the hands come to the hips. Keep lifting the right leg, and also focus on straightening the left leg, lifting the left hip, and lifting the entire upper body towards the ceiling, lengthening the spine. Without this effort, this posture will quickly slump and deteriorate.

(Utthita Hasta Padangusthasana C)

Utthita-Hasta-Padangusthasana-CHold this position for 5 breaths.

Exhale, release the leg and come back to Samasthiti.

Repeat these positions on the left side.

Common Mistakes

Utthita Hasta Padangusthasana A


UHP A Mistake 1 m


Often, the body will attempt to use your weight, rather than your muscles, to balance. This means that the right (uplifted) arm is drawn forward by the weight of the leg while the left shoulder and left side of the torso fall back to shift your center of gravity backwards.

Correct for this tendency by pressing the big toe forward firmly and pulling the right arm back into the right shoulder socket as hard as you can. Bend the elbow slightly to engage the muscles of the arm more fully. Engaging the muscles in this way will create straightness and lift (the mechanics of this are discussed in the introduction above)

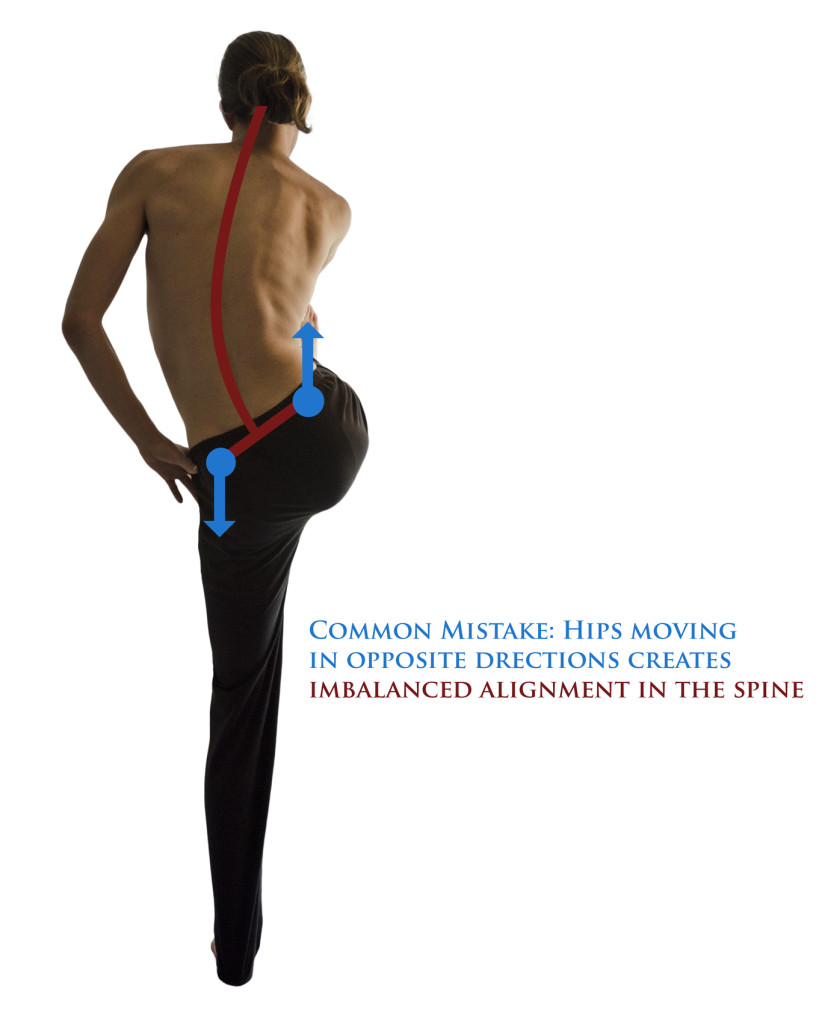
This same position viewed from the rear shows another imbalance.

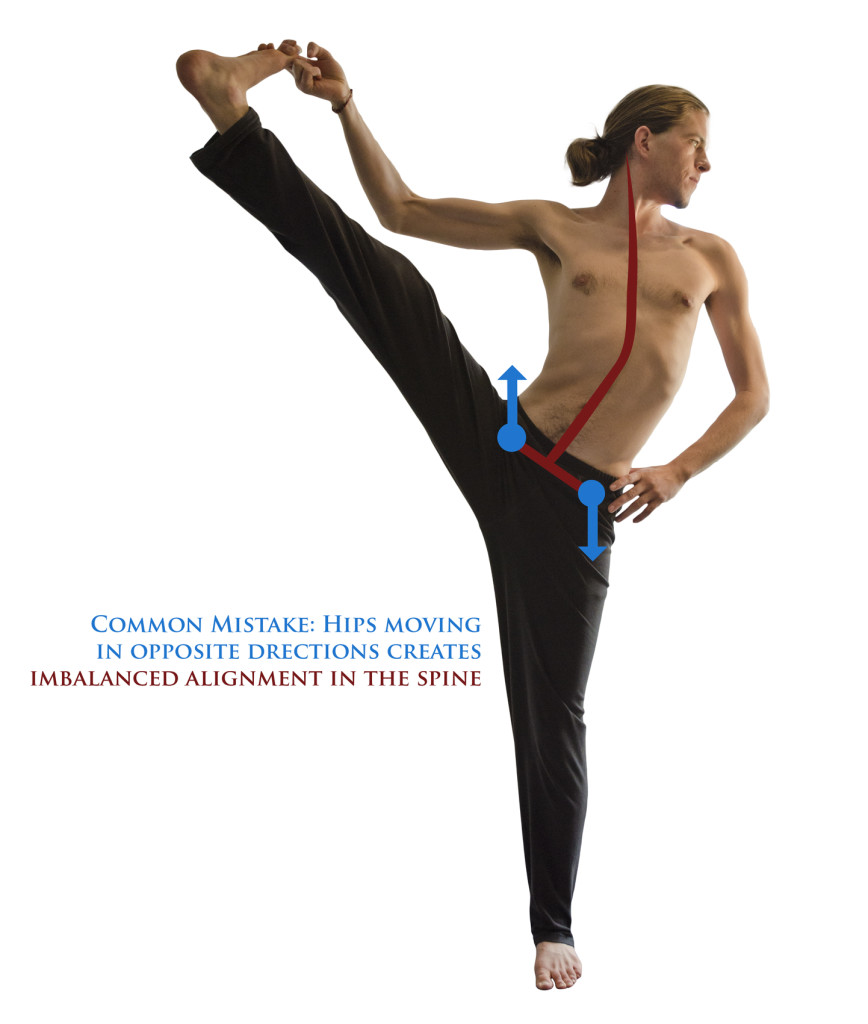
UHP A Mistake 2 m

The right hip is lifting while the left hip is dropping downwards. This is created by tightness in the hamstrings – the right leg is dragging the hip up with it. As the hip rises, the spine bends laterally to make room for the hip. The right side of the torso shortens while the left side lengthens.

Correct for this by dropping the right hip down towards the mat. Lift the left hip upwards. Breathe into the right side of the rib cage to aid expansion and lengthening. As you lift the right leg, it should articulate in the hip socket; the hips should not move from their neutral positioning.

If tightness is extreme, you may be unable to equalize the hips while grasping the big toe. In this case, hook a strap around the ball of the right foot to allow yourself a more upright posture. As your flexibility and strength improves, walk the hand along the strap until you’re able to grasp the toe.

Utthita Hasta Padangusthasana A, folded

Utthita Hasta Padangustasana A both

Ensure that the movement of forward folding originates from the pelvis rather than the upper body. Curling down from the rib cage will close the upper body and freeze the pelvis and lower back in an upright position. You’ll lose a valuable opportunity to challenge balance and strengthen the internal abdominal and pelvic muscles.

Utthita Hasta Padangusthasana B

UHP B Mistake 2 m

In this photo, the right hip is rising upwards while the left is descending. This creates a lateral bend in the spine. As in the variation, this is caused by the hip becoming “stuck” with the leg. The action of lifting the leg has been dissociated to the hips instead. This is often the result of just focusing on bringing the foot as high as possible, which the body achieves by lifting the hip higher.

To correct, come back to neutral. Lengthen the right side of the body by pressing down into the right hip and lifting the left hip upwards. As you lift the right leg upwards, keep pressing the right hip downwards to resist the upward motion of the leg. As discussed previously, the importance of creating resistance between the big toe and fingers cannot be overemphasized.

Utthita Hasta Padangustasana B Prep m

Utthita Hasta Padangusthasana C


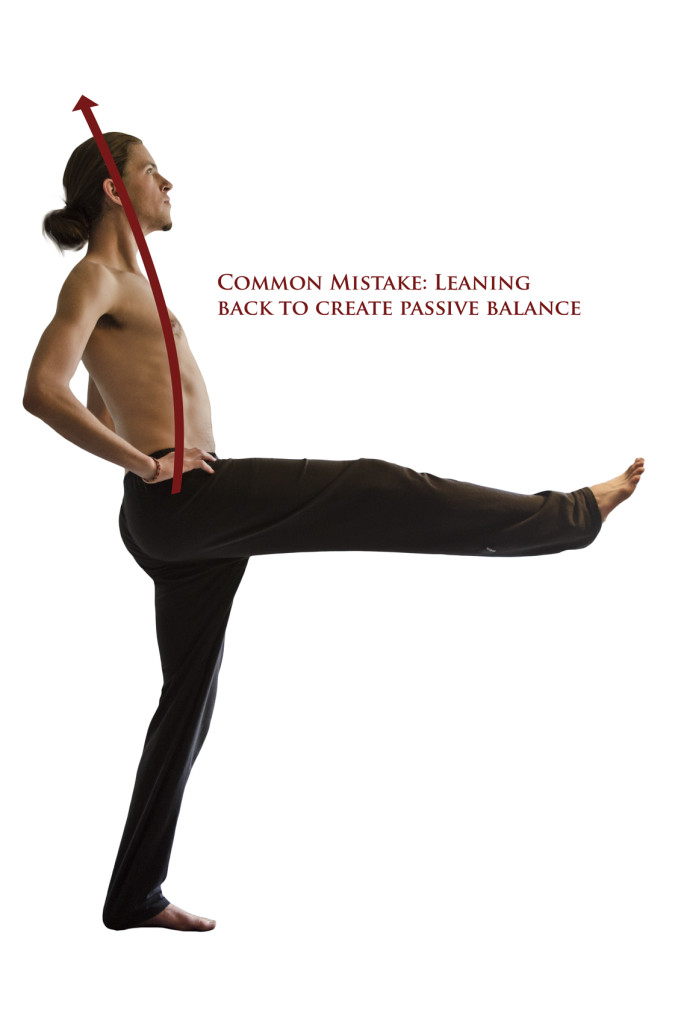
UHP C Mistake 1 m

This photo shows leaning backwards as the body tries to lift the right leg by shifting the center of gravity backwards and lengthen the psoas/pectineus/ quadriceps (these muscles often cramp at a shorter length until they’ve been strengthened sufficiently).

Correct by pressing the sternum forward towards the leg to bring the torso upright, then use the bandhas to lift the whole upper body towards the ceiling. Press out through the right foot as if pressing into a wall to engage the external hip muscles and consolidate your center of gravity. If the muscles of the thigh begin to cramp, keep your torso upright and bend the knee slightly.

5 of 7
1234567