Posts by: Griffin

“Modification” is a dirty word

“I’m sorry,” she said, “I’m really out of shape.”

I said something soothing in response. That wasn’t the first time that class she had said something of the sort. It wasn’t until later that I found the words I really wanted: “Why are you apologizing to me? I’m here to serve you, no matter if you’re athletic or stiff or crippled from an accident. There’s no need for you to diminish yourself.”

As a Yoga teacher, I focus on therapeutic movement. I don’t expect anyone to do anything besides what they can do right at that moment. I try to help every one of my students find their own best expression of a Yoga pose, and I don’t expect it to be the same or even similar between one student and the next.

And yet, people who practice with me are often apologizing and making excuses. They ask, ‘Okay, but how is this pose supposed to look?’

It’s not supposed to look like anything! The point is the effect it has in your body and mind. The value of posture is that it serves as a gateway to transformation.

In Yoga practice, modification is a dirty word. The true choice is not between a modification or the ‘full pose:’ is it appropriate, or inappropriate?

If what you’re doing is appropriate for you in that moment, it’s the full pose. Period. Yoga poses are nothing more than concepts, and how that concept takes flesh differs between my body and yours, from one breath to the next. We’re doing a disservice to ourselves by thinking of our ability, our flexibility, our strength, our practice as less than “normal,” as deficient, or in some way lacking.

By expecting everyone’s Yoga to look just the same, to take the same course, we are setting ourselves up to miss out on the opportunities waiting for us. And when we don’t “measure up” to the image we have, we might think we’re doing something wrong, or are less suited for Yoga.

Yoga isn’t a tryout or a boot camp. There are no standards to measure up to. It’s a system designed for no other purpose than to serve the individual practitioner.

Notice in yourself, in each moment, the rich dialogue between breath and body, awareness and thought, movement and stillness. Observe your rhythms and be a student of your subtleties.  Trust yourself to discern between helpful and harmful. Your appropriate practice might be uncomfortable, it might be scary; listen for the flicker of wisdom that gives you the strength you need to keep moving forward. Know when to release habit or ambition and rest, to take care of your body; to build a practice sustainable over decades.

You might be able to find a teacher, a guide to help you on this path. You might not. You must develop your own sense of direction. Know when to work hard and challenge yourself. Know when to slow down and take your time. Practice your Yoga.  There’s no easy formula, and practicing someone else’s Yoga won’t get you far.

I’m not advocating a free-for-all: I believe that intelligent sequencing and alignment is necessary. I believe in discipline, practicing hard, and seeing results. But I’ve learned over the years that, even with the amazing and brilliant teachers I am lucky to have, I have to take responsibility for my own practice.

Instead of measuring yourself against others, measure your progress in terms of the wisdom and sensitivity you develop, in the gradually deepening well of peace in the core of your being. After all, strength and flexibility and relaxation are just side effects. Very pleasant and attractive side effects, yes, but the goal of Yoga is much more ambitious: to correct warps in our perception; to create lasting peace from within.

So, to my student: Don’t worry. You’ll be “in shape” before long. But I truly hope that’s not the greatest reward awaiting you in Yoga.


Originally published by yoganonymous.

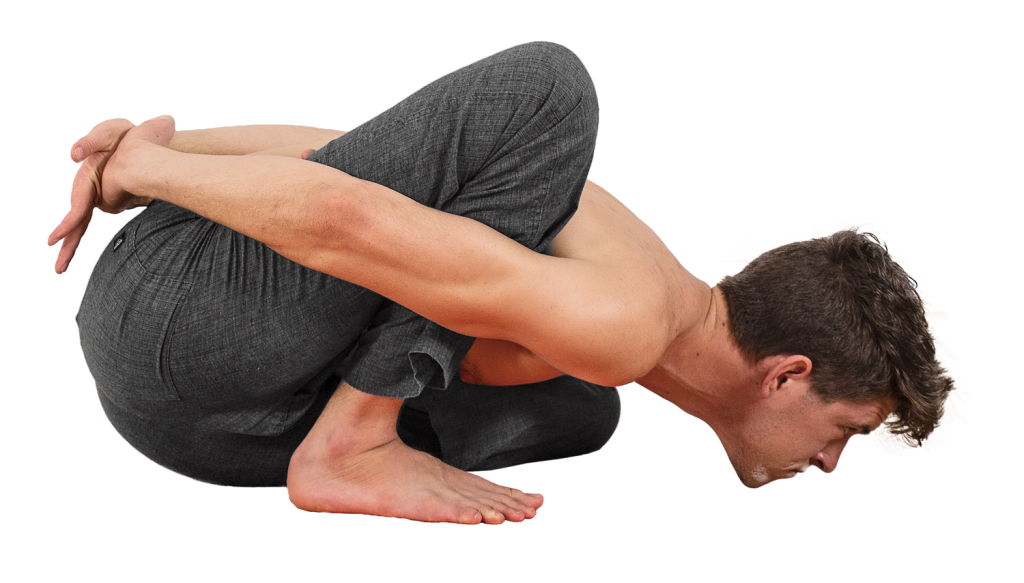
Marichyasana D

Marichyasana D

  • Marichi: “Ray of Light.” Marichi, as one of the aspects of the sun, is the master of illusions, the one who awakens us from dreams or delusions. Also, the name of a sage, one of the Seven Rishis of the Vedas.
  • Asana: Pose

Marichyasana D is the seventeenth pose of the primary series, and the twelfth seated pose. There are four variations of Marichyasana (A, B, C, D). A & B are forward folds (straight leg / lotus leg), and C & D are twists (straight leg / lotus leg).

The common thread of the Marichyasana poses is (1) the loosening of the Sacroiliac (SI) joint—as such, it is an essential posture for aspirants to deep backbending and lotus postures—and (2) enhancing the mobility of the shoulder girdle by binding the hands together behind the back.

The following is a discussion of the position on the right side, as pictured. As an asymmetrical posture, it must be repeated on the left side. In Ashtanga, always twist to face right first; the second side is to face left. The exception to this rule, traditionally, is Pasasana. 

FOCUS ON…

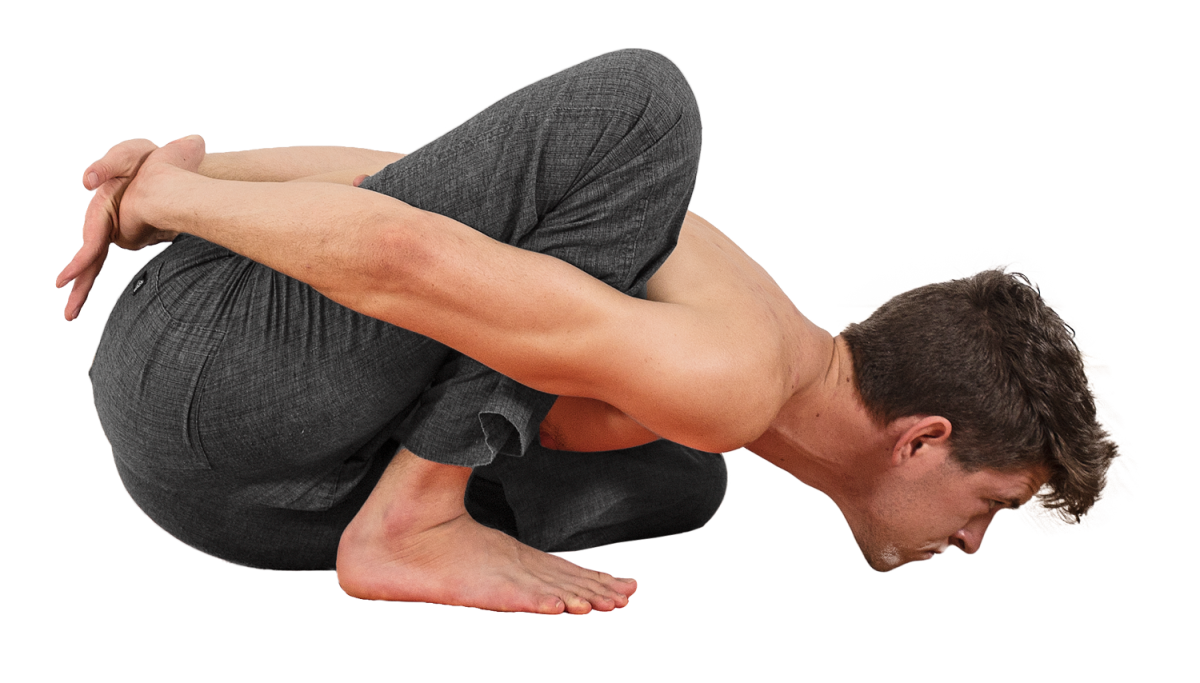
Marichyasana D is the half-lotus variation, as is B. For the first side, the left leg is placed into lotus (or crossed underneath), then the right leg is bent, into a squatting position. It is important that the right leg is in a true squat, supporting the weight of the body. Shifting the weight forward will also allow the lotus knee to press fully into the earth; if the weight is on the back of a posteriorly rotated pelvis, the lotus knee will be floating regardless of flexibility.

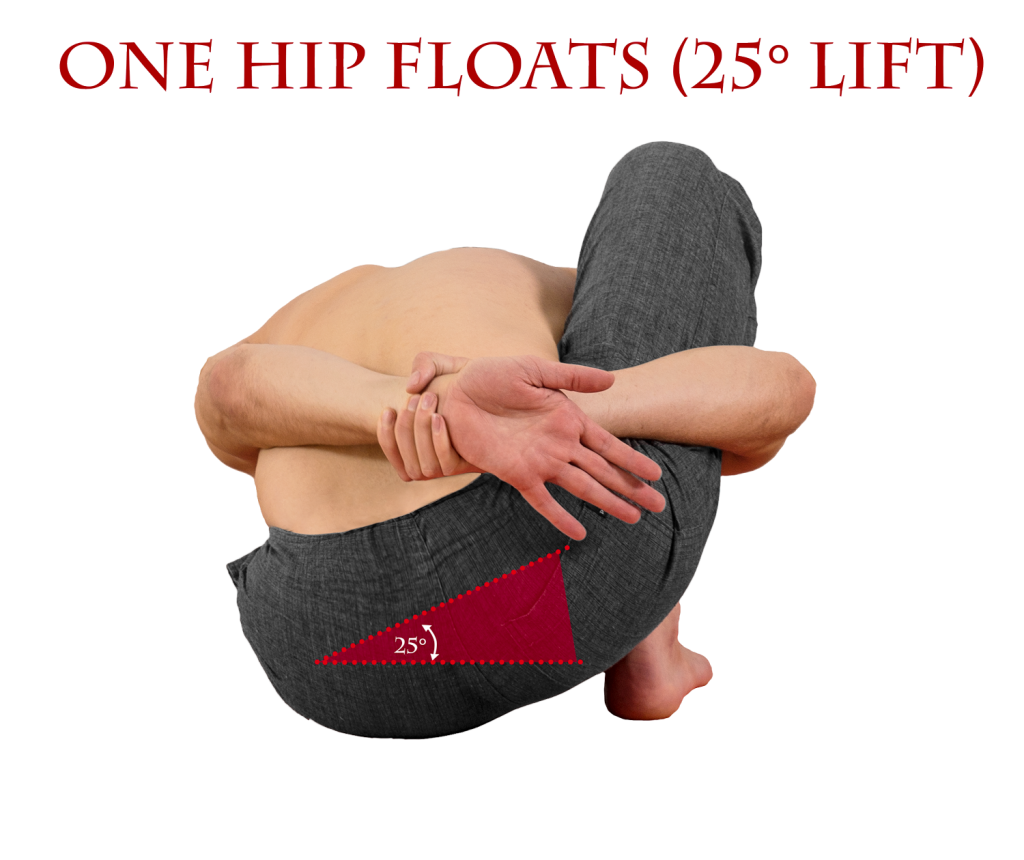
The ‘default,’ ineffective, position is typically for the hips to be on the ground, supporting the body’s weight, posteriorly tilted. Although it is important in all the Marichyasana variations for the hips to be mobile, it is especially necessary in the twisted variations. For the weight to be in the sitting bones is both immobilizing—preventing a full twist—and dangerous to the sacrolumbar junction, which would experience increased force while in its most vulnerable alignment (flexion + twisted). The pelvis should be neutral, not posteriorly tilted. When leaning forward enough for the right hip to float and the weight to be in the right foot, the spine will be at < 90° angle relative to the floor.
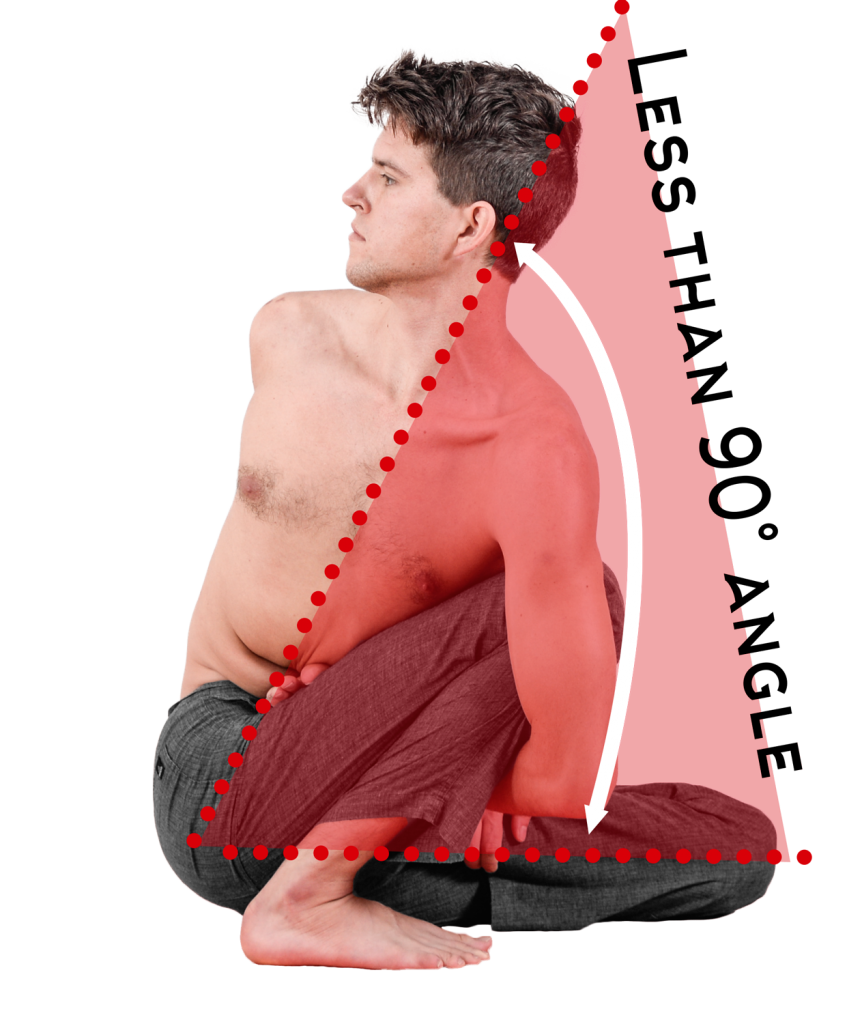


Marichyasana-D-Side-Markup

You must shift your weight forward so the right sitting bone lifts slightly off the ground, and the weight comes into the right foot. The left hip stays on the ground. DO NOT try to keep the hips “square” in any twist. Allow unrestricted movement from the hips while entering and exiting twists. In the state of the pose, you can gently work towards squaring (emphasis on “ing;” focus on the process) the hips. If the pelvis is held rigidly, you will be at a higher risk of injury because force will not be able to transfer properly between the spine and the ilia (SI joint).

The SI joint is the connection between the two halves of the hips (ilia) and the base of the spine (sacrum), and serves as the connection between the lower body and the torso. In many Western body this joint is fused or immobile from our sitting and exercise patterns. That immobility contributes to back pain, “humpback” (kyphosis), etc. In backbending, healthful movement of the SI joint is essential to avoid overuse injury of the lumbar spine.

To enter the twist, it is important to lean back slightly to ensure that movement can come all the way from the hips. Simultaneously, harness the power of the exhalation to curl and twist fully. If you don’t lean back, the pelvis and lumbar spine will not be able to participate in the movement, and/or the skin of the abdomen will get “stuck” on the thigh. This results in either a shallow, uncomfortable twist, or if you’re hypermobile, over-twisting of the thoracic and cervical vertebrae.

The next action is to bind the arms (around the bent leg). The basic principles are the same as binding in A or B variation; the bind in this posture is somewhat more demanding. Both arms are in full internal rotation, and the chest must be lifted. The twisting action must include the collarbone, where it joins the manubrium over the heart (the sternoclavicular joint). Trying to twist just the forearm without involving the collarbone will be futile. Check the Solutions section below for suggestions on how to work towards a full bind.

Once bound, use the strength of the bound leg to help propel the twist. The interplay of resistance between the bound leg and the binding arm allows length to come back into the spine, the shoulders to open and relax, and the twist to deepen.

The benefit of binding, in addition to increasing the range of motion and health of the shoulder girdle, is that it makes it necessary to use your core musculature in order to stay upright. Propping yourself up with your hands in a twist can give a sensation of increased stability, leverage, and ease…Unfortunately, too much leverage in a twist, combined with relaxed muscles and a posterior pelvic tilt can destabilize the spine. 

To twist healthfully and responsibly, sit upright and distribute the effort of twisting evenly from the hips to the crown of the head. Although the spine is more mobile in twisting in certain places, the internal experience of effort can feel dispersed equally.

The gaze is down the length of the nose, beyond the back of the mat. Keep the head high, soften any tension in the face, and adopt a regal gaze.

Principles of Forward Folding:

Vinyasa of the Pose

From Sat, jump through and land in Dandasana.

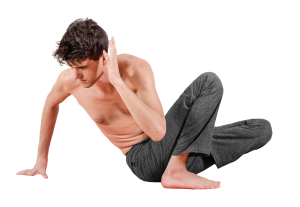
Still exhaling, place the left leg in lotus position (or cross underneath; discussed below). Bend the right knee fully.

Marichyasana-B-PrepMarichyasana-B-Prep-Lotus

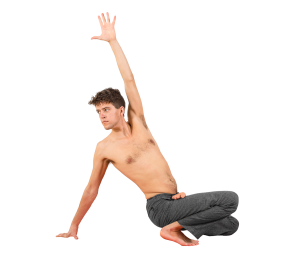
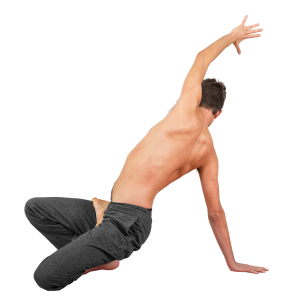
Place your right hand behind you. Inhale and reach the left hand up and back, lengthening the belly and starting the twist.

Marichyasana-D-PrepMarichyasana-D-Prep-2

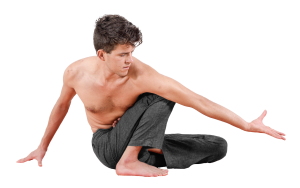
Exhale, curl in and hook the left elbow as far down the right thigh as possible. Internally rotate the left arm as much as possible, including the collarbone.Bring your weight forward, and bind the hands.*

Marichyasana D With Angle Marichyasana-D-Prep-4

This is the state of Marichyasana D; hold for five breaths. With every breath, sit up straighter and taller.
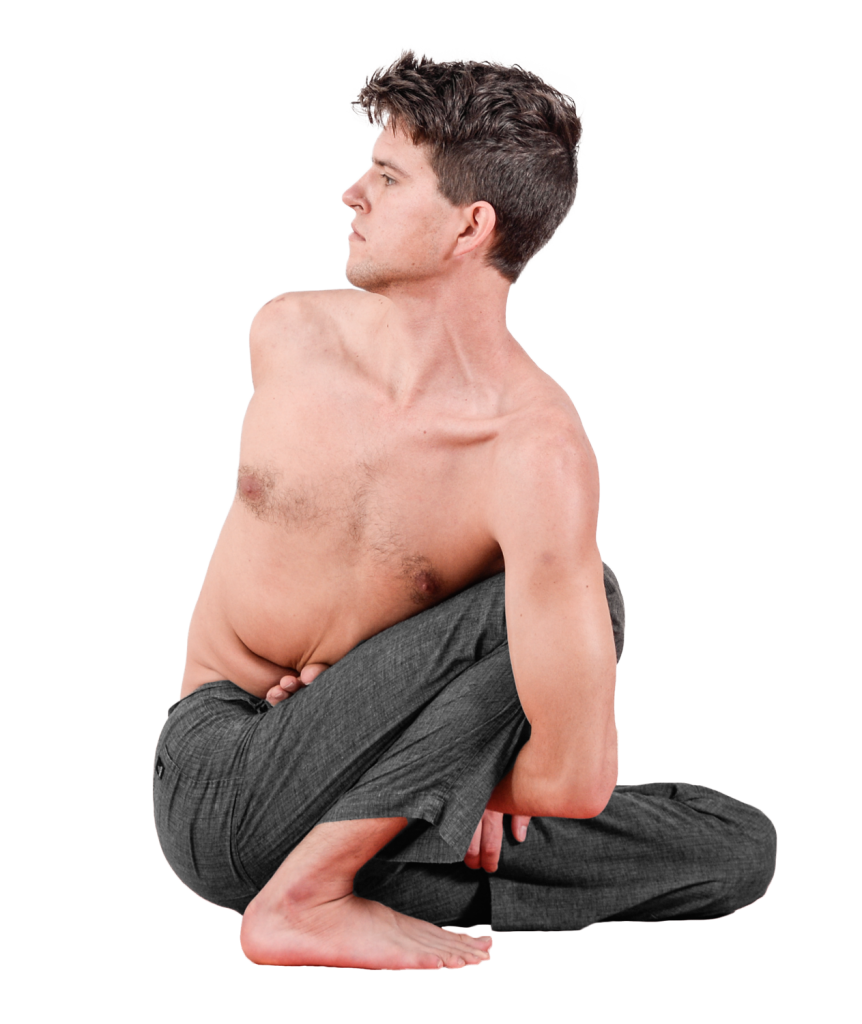
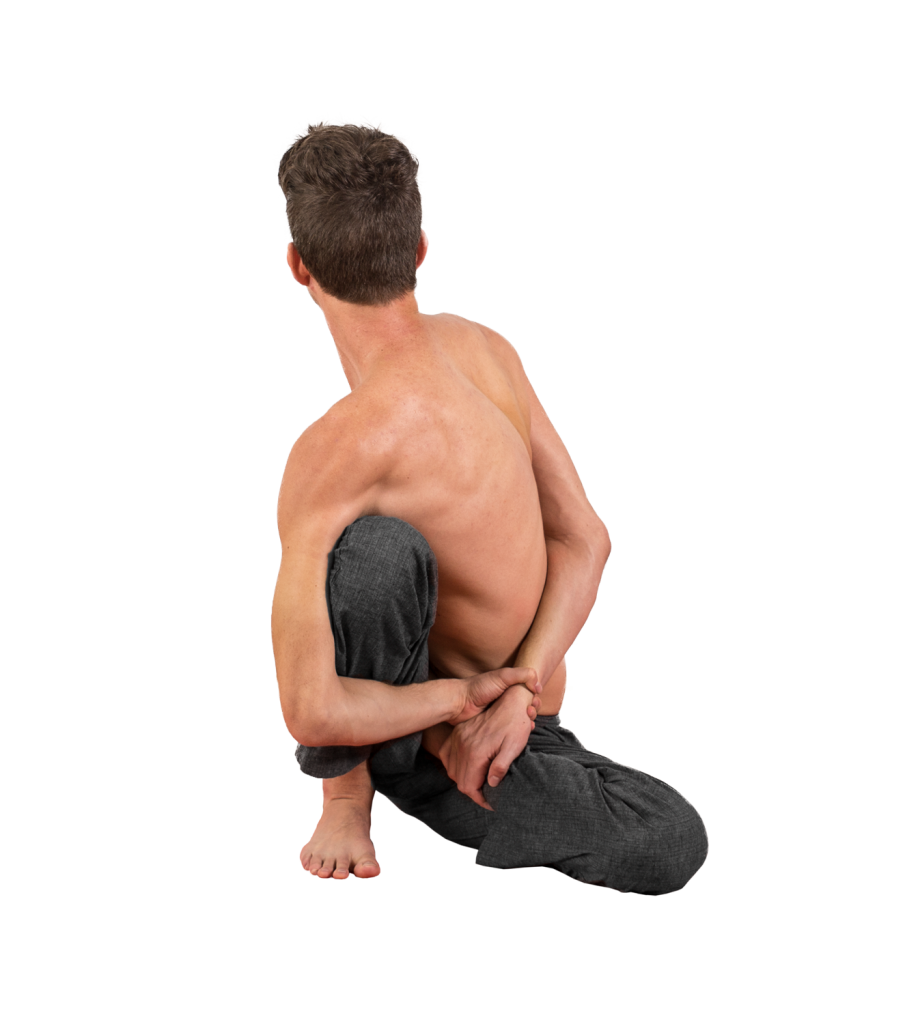
 

Marichyasana-D-Side Marichyasana-D

On the fifth exhalation, turn your head to look forward towards the front edge of your mat.

Inhale, and release both hands with control (don’t let them “pop” apart), placing them to the sides of the hips.

Exhale, jump back and take vinyasa.**

Repeat for the second side.

*Binding the wrist is the preferred method. Alternatives are listed below; if you can hold the wrist, straighten the elbows more and more as you gain flexibility to help the torso lengthen.

**Traditionally, vinyasa is taken between sides of asymmetrical postures. If you’re just starting out and building stamina, or have time constraints and require a faster practice, the vinyasa between sides may be omitted.

ALTERNATIVES & SOLUTIONS

If lotus is inaccessible or painful, simply cross the leg beneath.

An intermediate stage is to work on getting the armpit and knee together without binding fully. Additionally, this is a useful variation for those with injury to the shoulder girdle (commonly, torn or irritated bicep tendon). You will have an easier time if you keep the left elbow bent rather than straight:
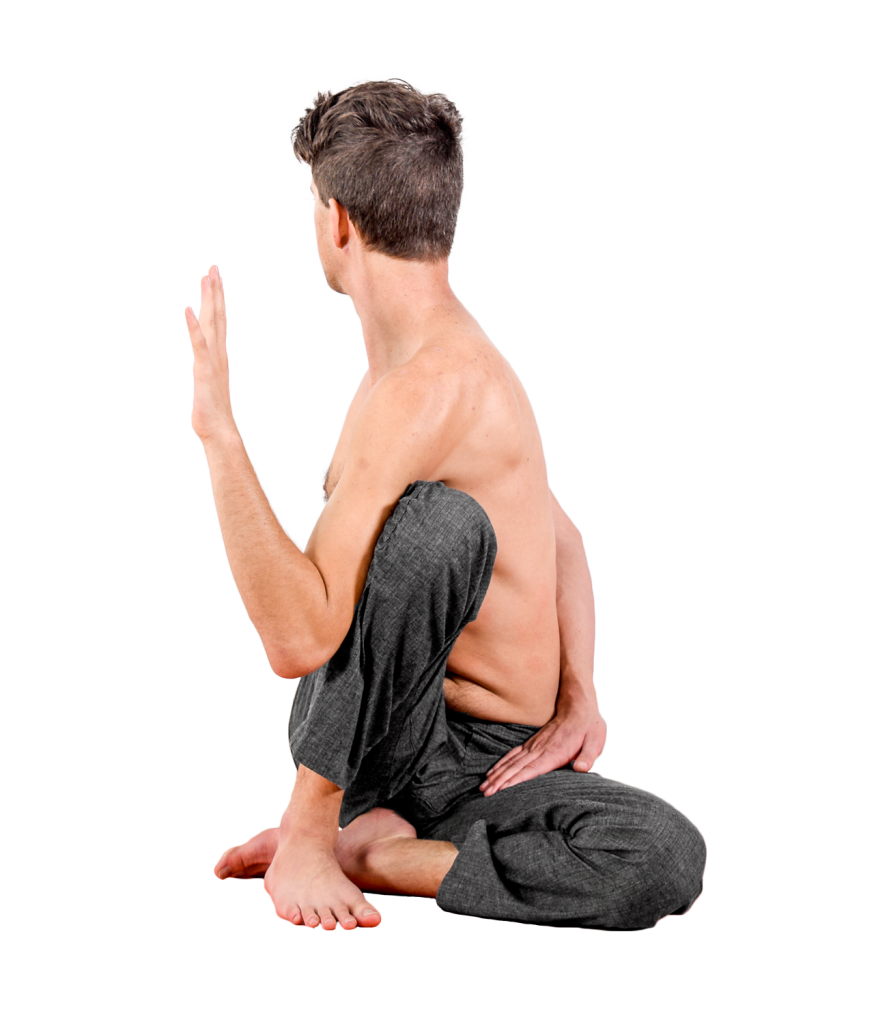
Marichyasana-D-Variation

If you’re unable to sit up straight (the spine is rounding), or if your right sitting bone feels stuck on the ground (rolling back): place a blanket or block beneath the hip of the lotus leg. Add additional support if necessary until both the leg and spine can be straightened.

If you have had knee injury or surgery, and/or feel a pinching sensation when the knee is closed fully in this way, place a rolled up washcloth or piece of fabric behind the knee. When you squeeze the cloth with your knee, the bones of the femur and tibia will be held slightly apart. In the majority of cases, this alleviates or eliminates any pinching sensation or pain. The more severe the injury, the greater amount of cloth should be used. The support can be reduced over time as the joint heals. It’s also helpful when recovering from a knee injury to sit up higher using blankets.

If you can wrap the arms around behind the back, but cannot bind the hands, use a strap or towel to bridge the distance. Over time, walk the hands closer and closer, then bind fingertips, then clasp hands, and finally the wrist.

COMMON MISTAKES

Hunching forward, or letting the head hang, is common when binding or balancing is a challenge. With every breath, work on sitting up straight, lifting the sternum, and lengthening the belly. Focus on feeling and projecting an air of nobility and grace.

The common mistakes of the Marichyasana family appear in this position, as well:

Be sure that you have the necessary amount of space between the foot and opposite leg. If they are too close, or touching, it is impossible to create the proper actions that define this pose. If your foot slides in when you’re in the pose, use a block as a spacer.

One of the most common errors is for the right leg to be “dead” or listing off to the side. This shows that the hip and thigh musculature is not participating effectively in the movement.

Take the necessary steps to make the leg fully vertical, which, depending on the situation, might include:

Press with the leg away from the midline, propelling the twist

Encourage by squeezing with the arms

Lean further forward, sitting up on a block if needed

Push the right foot and left heel firmly into the ground

Spend 5 breaths easing into the posture and getting the legs and hips into position before binding.

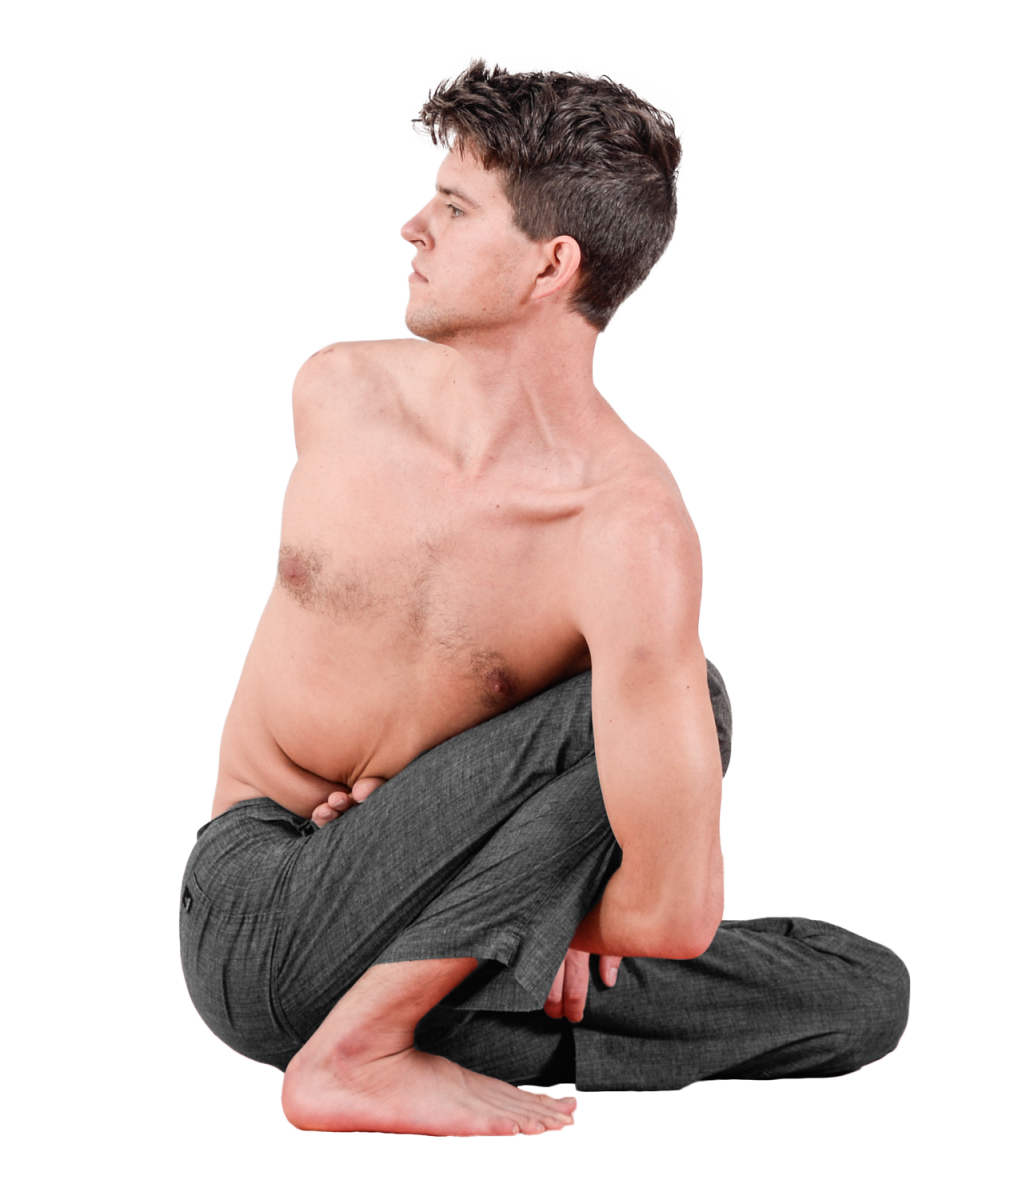
Marichyasana C

Marichyasana C

  • Marichi: “Ray of Light.” Marichi, as one of the aspects of the sun, is the master of illusions, the one who awakens us from dreams or delusions. Also, the name of a sage, one of the Seven Rishis of the Vedas.
  • Asana: Pose

Marichyasana C is the sixteenth pose of the primary series, and the eleventh seated pose. There are four variations of Marichyasana (A, B, C, D). A & B are forward folds (straight leg / lotus leg), and C & D are twists (straight leg / lotus leg).

The common thread of the Marichyasana poses is (1) the loosening of the Sacroiliac (SI) joint—as such, it is an essential posture for aspirants to deep backbending and lotus postures—and (2) enhancing the mobility of the shoulder girdle by binding the hands together behind the back.

The following is a discussion of the position on the right side, as pictured. As an asymmetrical posture, it must be repeated on the left side. In Ashtanga, always twist to face right first; the second side is to face left. The exception to this rule, traditionally, is Pasasana. 

FOCUS ON…

Many practitioners try to muscle their way into this posture, using their upper body. In reality, it unfolds from the pelvis and low belly. The upper body plays a role, but in a supporting and refining role, rather than as the fundamental action.

The right leg is bent, into a squatting position, the left straight, as in Marichyasana A. It is important that the right leg is in a true squat, supporting the weight of the body. It is essential for there to be a sense of power and weight in the legs. The ‘default’ position is typically for the hips to be on the ground, supporting the body’s weight. All too often I see students leaning—or falling—backward, heavy on their sitting bones. Think of this family of positions as being similar to squatting rather than similar to sitting. Although it is important in all the Marichyasana variations for the hips to be mobile, it is especially necessary in the twisted variations. For the weight to be in the sitting bones is both immobilizing—preventing a full twist—and dangerous to the sacrolumbar junction, which would experience increased force while in its most vulnerable alignment (flexion + twisted). The pelvis should be neutral, not posteriorly tilted. When leaning forward enough for the right hip to float and the weight to be in the right foot, the spine will be at < 90° angle relative to the floor.

Angle of Marichyasana C

You must shift your weight forward so the right sitting bone lifts slightly off the ground, and the weight comes into the right foot. The left hip stays on the ground. DO NOT try to keep the hips “square” in any twist. Allow unrestricted movement from the hips while entering and exiting twists. In the state of the pose, you can gently work towards squaring (emphasis on “ing;” focus on the process) the hips. If the pelvis is held rigidly, you will be at a higher risk of injury because force will not be able to transfer properly between the spine and the ilia (SI joint).

The SI joint is the connection between the two halves of the hips (ilia) and the base of the spine (sacrum), and serves as the connection between the lower body and the torso. In many Western body this joint is fused or immobile from our sitting and exercise patterns. That immobility contributes to back pain, “humpback” (kyphosis), etc. In backbending, healthful movement of the SI joint is essential to avoid overuse injury of the lumbar spine.

To enter the twist, it is important to lean back slightly to ensure that movement can come all the way from the hips. Simultaneously, harness the power of the exhalation to curl and twist fully. If you don’t lean back, the pelvis and lumbar spine will not be able to participate in the movement, and/or the skin of the abdomen will get “stuck” on the thigh. This results in either a shallow, uncomfortable twist, or if you’re hypermobile, over-twisting of the thoracic and cervical vertebrae.

The next action is to bind the arms (around the bent leg). The basic principles are the same as binding in A or B variation; the bind in this posture is somewhat more demanding. Both arms are in full internal rotation, and the chest must be lifted. (Check the Solutions section below for suggestions on how to work towards a full bind.)

Once bound, use the strength of the bound leg to help propel the twist. The interplay of resistance between the bound leg and the binding arm allows length to come back into the spine, the shoulders to open and relax, and the twist to deepen.

The benefit of binding, in addition to increasing the range of motion and health of the shoulder girdle, is that it makes it necessary to use your core musculature in order to stay upright. Propping yourself up with your hands in a twist can give a sensation of increased stability, leverage, and ease…Unfortunately, too much leverage in a twist, combined with relaxed muscles and a posterior pelvic tilt can destabilize the spine. 

To twist healthfully and responsibly, sit upright and distribute the effort of twisting evenly from the hips to the crown of the head. Although the spine is more mobile in twisting in certain places, the internal experience of effort can feel dispersed equally.

The gaze is down the length of the nose, beyond the back of the mat.

Principles of Forward Folding:

Vinyasa of the Pose

From Sat, jump through and land in Dandasana.

Still exhaling, bend the right knee into the chest. Close the joint fully. Measure a hand-length distance between that foot and the left thigh.

Measuring the correct distance

Place your right hand behind you. Inhale and reach the left hand up and back, lengthening the belly and starting the twist.

Marichyasana C PrepMarichyasana C Prep

Exhale, curl in and hook the left elbow as far down the right thigh as possible. Bring your weight forward, and bind the hands.* This is the state of Marichyasana C; hold for five breaths. With every breath, sit up straighter and taller.

Marichyasana C

Marichyasana C

On the fifth exhalation, turn your head to look forward towards the front edge of your mat.

Inhale, and release both hands with control (don’t let them “pop” apart), placing them to the sides of the hips.

Exhale, jump back and take vinyasa.**

Repeat for the second side.

*Binding the wrist is the preferred method. Alternatives are listed below; if you can hold the wrist, straighten the elbows more and more as you gain flexibility to help the torso lengthen.

**Traditionally, vinyasa is taken between sides of asymmetrical postures. If you’re just starting out and building stamina, or have time constraints and require a faster practice, the vinyasa between sides may be omitted.

ALTERNATIVES & SOLUTIONS

If this pose is very difficult, spend additional time twisting in the standing postures. You can take a shallower twist by holding the right knee in the crook of the left elbow rather than trying to bind around it.

An intermediate stage is to work on getting the armpit and knee together without binding fully. Additionally, this is a useful variation for those with injury to the shoulder girdle (commonly, torn or irritated bicep tendon). You will have an easier time if you keep the left elbow bent rather than straight:

Marichyasana C Variation

If you’re unable to sit up straight (the spine is rounding), or if your right sitting bone feels stuck on the ground (rolling back): place a blanket or block beneath the hip of the straight leg. Add additional support if necessary until both the leg and spine can be straightened. Also try spending more time in D variation. Since both legs are bent in Marichyasana D, the hamstrings have less influence.

If you have had knee injury or surgery, and/or feel a pinching sensation when the knee is closed fully in this way, place a rolled up washcloth or piece of fabric behind the knee. When you squeeze the cloth with your knee, the bones of the femur and tibia will be held slightly apart. In the majority of cases, this alleviates or eliminates any pinching sensation or pain. The more severe the injury, the greater amount of cloth should be used. The support can be reduced over time as the joint heals. It’s also helpful when recovering from a knee injury to sit up higher using blankets.

If you can wrap the arms around behind the back, but cannot bind the hands, use a strap or towel to bridge the distance. Over time, walk the hands closer and closer, then bind fingertips, then clasp hands, and finally the wrist.

COMMON MISTAKES

The common mistakes of the Marichyasana family appear in this position, as well:

Be sure that you have the necessary amount of space between the foot and opposite thigh. If they are too close, or touching, it is impossible to create the proper actions that define this pose. If your foot slides in when you’re in the pose, use a block as a spacer.

The left—straight—leg can be “asleep” or externally rotated. Bring it back to vertical, spread the toes, and press through the mound of the big toe.

One of the most common errors is for the right leg to be “dead” or listing off to the side. This shows that the hip and inner thigh musculature is not participating effectively in the movement.

Take the necessary steps to make the leg fully vertical, which, depending on the situation, might include:

Press the right knee away from the midline, propelling the twist

Encourage by squeezing with the arms

Lean further forward, sitting up on a block if needed

Push the right foot and left heel firmly into the ground

Spend 5 breaths easing into the posture and getting the legs and hips into position before binding.

Marichyasana B

Marichyasana B

  • Marichi: “Ray of Light.” Marichi, as one of the aspects of the sun, is the master of illusions, the one who awakens us from dreams or delusions. Also, the name of a sage, one of the Seven Rishis of the Vedas.
  • Asana: Pose

Marichyasana B is the fifteenth pose of the primary series, and the tenth seated pose. There are four variations of Marichyasana (A, B, C, D). A & B are forward folds (straight leg / lotus leg), and C & D are twists (straight leg / lotus leg).

The common thread of the Marichyasana poses is (1) the loosening of the Sacroiliac (SI) joint—as such, it is an essential posture for aspirants to deep backbending and lotus postures—and (2) enhancing the mobility of the shoulder girdle by binding the hands together behind the back.

The following is a discussion of the position on the right side, as pictured. As an asymmetrical posture, it must be repeated on the left side.

FOCUS ON…

B Variation differs from A in that the left leg is in Lotus position rather than straight. Alternatively, it can be crossed behind the right ankle if Lotus inappropriate for your body. The right leg is bent, into a squatting position. It is important that the right leg is in a true squat, supporting the weight of the body. The ‘default’ position is typically for the hips to be on the ground, supporting the body’s weight. You must shift your weight forward so the right sitting bone lifts slightly off the ground, and the weight comes into the right foot. The left hip stays on the ground. In this way, the force of movement is directed through the SI joint, using gravity to your advantage to create mobility. If your weight remains on both sitting bones, relatively little will happen in this posture. It is essential for there to be a sense of power and weight in the legs. All too often I see students leaning—or falling—backward, heavy on their sitting bones. Think of this family of positions as being similar to squatting rather than similar to sitting. Both sitting bones being on the ground will also prevent the lotus knee from properly contacting the earth.

One hip is slightly lifted in Marichyasana Positions

The SI joint is the connection between the two halves of the hips (ilia) and the base of the spine (sacrum), and serves as the connection between the lower body and the torso. In many Western body this joint is fused or immobile from our sitting and exercise patterns. That immobility contributes to back pain, “humpback” (kyphosis), etc. In backbending, healthful movement of the SI joint is essential to avoid overuse injury of the lumbar spine.

Once your pelvis is aligned, the next hurdle is to bind the arms (around the bent leg). This requires that the line of the collarbones lengthen, the sternum lift, and the shoulders to draw back: essential actions in any forward fold, but highlighted here. Once bound, the arms attempt to straighten backwards, hugging the bent knee in tightly. (Check the Solutions section below for suggestions on how to work towards a full bind.)

There is a slight twisting action in the torso: wrap the length of the spine from root to crown to address the straight leg fully. There can be a tendency for the torso to twist in order to help bind the arms. That twist is a part of the entrance, but straighten out once the arms have been bound. This is not a posture dedicated to twisting; a ‘counter-twist’ is simply needed to keep facing straight forward.

The gaze is down the length of the nose; often in the direction of the big toe. If you’re very deeply folded forward, the chin reaches towards or touches the mat. The gaze is down the length of the nose.

Principles of Forward Folding:

Vinyasa of the Pose

From Sat, jump through and land in Dandasana.

Still exhaling, place the left leg into lotus so that the left foot is at the right hip crease. Bend the right knee into the chest and shift your weight forward so that the weight is on the right foot, left knee, and left sitting bone. Make sure the right tibia is straight vertically; keep the right foot in front of the right shoulder rather than letting it slide towards your midline. Folding forward, sweep the arms wide in an action like swimming, and binding the right leg, grasp the left wrist with the right hand behind the back.*

Marichyasana-B-PrepMarichyasana-B-Prep-Lotus

Inhale and reset, tugging with the strength of the shoulders to lengthen the sternum & straighten the spine.

Exhale, fold forward fully. This is the state of Marichyasana B; hold for five breaths.

Marichyasana B

Marichyasana B from the Side

Inhale, sit up and release both hands, placing them to the sides of the hips. Practitioner’s choice to straighten the right leg or not; vinyasa can be performed with the right shin pressing into the right upper arm. (This may be easier if you have relatively mobile hips, since with the arm supporting the right shin, you will have to lift less weight to jump back.)

Exhale, jump back and take vinyasa.**

Repeat for the second side.

*Binding the wrist is the preferred method. Alternatives are listed below; if you can hold the wrist, straighten the elbows more and more as you gain flexibility to help the torso lengthen.

**Traditionally, vinyasa is taken between sides of asymmetrical postures. If you’re just starting out and building stamina, or have time constraints and require a faster practice, the vinyasa between sides may be omitted.

ALTERNATIVES & SOLUTIONS

If you’re not ready for lotus, or it’s not appropriate for your body, cross the leg so the left foot is behind the right foot:

Marichyasana-B-Cross

Alternative version without Lotus

As with A Variation, if the bind is not coming, you might find it helpful to stop at the first vinyasa, with the hands pressing into the floor for leverage.

This will allow the hips to start responding to the position. Additionally, you might try spending time throughout the day squatting rather than sitting when appropriate, for example, to read or eat.

If you’re unable to sit up straight (the spine is rounding), or if your right sitting bone feels stuck on the ground (rolling back): place a blanket or block beneath the hips. Add additional support if necessary until both the leg and spine can be straightened. Also try spending more time in B variation. Since both legs are bent in Marichyasana B, the hamstrings have less influence.

If you have had knee injury or surgery, and/or feel a pinching sensation when the knee is closed fully in this way, place a rolled up washcloth or piece of fabric behind the knee. When you squeeze the cloth with your knee, the bones of the femur and tibia will be held slightly apart. In the majority of cases, this alleviates or eliminates any pinching sensation or pain. The more severe the injury, the greater amount of cloth should be used. The support can be reduced over time as the joint heals. It’s also helpful when recovering from a knee injury to sit up higher using blankets.

If you can wrap the arms around behind the back, but cannot bind the hands, use a strap or towel to bridge the distance. Over time, walk the hands closer and closer, then bind fingertips, then clasp hands, and finally the wrist.

COMMON MISTAKES

Do not try to do this posture in Lotus if you’re unable to have the lotus knee fully closed and the foot at the hip crease. You risk knee injury if you try this position with an underdeveloped lotus position.

The same mistakes from A Variation are also encountered here:

Be sure that you have the necessary amount of space between the foot and thigh. If they are too close, or touching, it is impossible to create the proper actions that define this pose. If your foot slides in when you’re in the pose, use a block as a spacer.

One of the most common errors is for the right leg to be “dead” or listing off to the side. This shows that the hip and inner thigh musculature is not participating effectively in the movement. Notice the distance between the head and foot in these two photographs.

Marichyasana-A-ComparisonTake the necessary steps to make the leg fully vertical, which, depending on the situation, might include:

Hug the knee in tight to the chest (Using the leg muscles)

Encourage by squeezing with the arms

Lean further forward, sitting up on a block if needed

Push the right foot and left heel firmly into the ground

Spend 5 breaths easing into the posture and getting the legs and hips into position before binding.

Marichyasana A

Marichyasana A

  • Marichi: “Ray of Light.” Marichi, as one of the aspects of the sun, is the master of illusions, the one who awakens us from dreams or delusions. Also, the name of a sage, one of the Seven Rishis of the Vedas.
  • Asana: Pose

Marichyasana A is the fourteenth pose of the primary series, and the ninth seated pose. There are four variations of Marichyasana (A, B, C, D). A & B are forward folds (straight leg / lotus leg), and C & D are twists (straight leg / lotus leg).

The common thread of the Marichyasana poses is (1) the loosening of the Sacroiliac (SI) joint—as such, it is an essential posture for aspirants to deep backbending and lotus postures—and (2) enhancing the mobility of the shoulder girdle by binding the hands together behind the back.

The following is a discussion of the position on the right side, as pictured. As an asymmetrical posture, it must be repeated on the left side.

FOCUS ON…

The left leg is straight, in the action of Paschimottanasana. The right leg is bent, into a squatting position. It is important that the right leg is in a true squat, supporting the weight of the body. The ‘default’ position is typically for the hips to be on the ground, supporting the body’s weight. You must shift your weight forward so the right sitting bone lifts slightly off the ground, and the weight comes into the right foot. The left hip stays on the ground. In this way, the force of movement is directed through the SI joint, using gravity to your advantage to create mobility. If your weight remains on both sitting bones, relatively little will happen in this posture. It is essential for there to be a sense of power and weight in the legs. All too often I see students leaning—or falling—backward, heavy on their sitting bones. Think of this family of positions as being similar to squatting rather than similar to sitting.

One hip is slightly lifted in Marichyasana Positions

The SI joint is the connection between the two halves of the hips (ilia) and the base of the spine (sacrum), and serves as the connection between the lower body and the torso. In many Western body this joint is fused or immobile from our sitting and exercise patterns. That immobility contributes to back pain, “humpback” (kyphosis), etc. In backbending, healthful movement of the SI joint is essential to avoid overuse injury of the lumbar spine.

Once your pelvis is aligned, the next hurdle is to bind the arms (around the bent leg). This requires that the line of the collarbones lengthen, the sternum lift, and the shoulders to draw back: essential actions in any forward fold, but highlighted here. Once bound, the arms attempt to straighten backwards, hugging the bent knee in tightly. (Check the Solutions section below for suggestions on how to work towards a full bind.)

There is a slight twisting action in the torso: wrap the length of the spine from root to crown to address the straight leg fully. There can be a tendency for the torso to twist in order to help bind the arms. That twist is a part of the entrance, but straighten out once the arms have been bound. This is not a posture dedicated to twisting; a ‘counter-twist’ is simply needed to keep facing straight forward.

The gaze is down the length of the nose; often in the direction of the big toe. If you’re very deeply folded forward, with the head touching the shin, gaze to the shin. Craning your neck to keep looking at the big toe is not beneficial.

Principles of Forward Folding:

Vinyasa of the Pose

From Sat, jump through and land in Dandasana.

Still exhaling, bend the right knee into the chest. Close the joint fully. Measure a hand-length distance between that foot and the left thigh. Folding forward, sweep the arms wide in an action like swimming, and binding the right leg, grasp the left wrist with the right hand behind the back.*

Measuring the correct distanceMarichyasana-A-Prep-2

These photos show pulling against the ground with the hands in order to fold more deeply. If you have long hamstrings, bind in a smooth motion without putting the hands on the floor.

Inhale and reset, tugging with the strength of the shoulders to lengthen the sternum & straighten the spine.

Exhale, fold forward fully. This is the state of Marichyasana A; hold for five breaths.

Marichyasana-A

Inhale, sit up and release both hands, placing them to the sides of the hips. Practitioner’s choice to straighten the right leg or not; vinyasa can be performed with the right shin pressing into the right upper arm. (This may be easier if you have relatively mobile hips, since with the arm supporting the right shin, you will have to lift less weight to jump back.)

Exhale, jump back and take vinyasa.**

Repeat for the second side.

*Binding the wrist is the preferred method. Alternatives are listed below; if you can hold the wrist, straighten the elbows more and more as you gain flexibility to help the torso lengthen.

**Traditionally, vinyasa is taken between sides of asymmetrical postures. If you’re just starting out and building stamina, or have time constraints and require a faster practice, the vinyasa between sides may be omitted.

ALTERNATIVES & SOLUTIONS

If you want to try it but can’t get all the way into the position, you might find it helpful to stop at the first vinyasa, with the hands pressing into the floor for leverage:

Marichyasana-A-Prep-2 Marichyasana-A-Variation

This will allow the hips to start responding to the position. Additionally, you might try spending time throughout the day squatting rather than sitting when appropriate, for example, to read or eat.

If the hamstrings feel quite tight, or if you’re unable to sit up straight (the spine is rounding), or if your right sitting bone feels stuck on the ground (rolling back): place a blanket or block beneath the hips. Add additional support if necessary until both the leg and spine can be straightened. Also try spending more time in B variation. Since both legs are bent in Marichyasana B, the hamstrings have less influence.

If you have had knee injury or surgery, and/or feel a pinching sensation when the knee is closed fully in this way, place a rolled up washcloth or piece of fabric behind the knee. When you squeeze the cloth with your knee, the bones of the femur and tibia will be held slightly apart. In the majority of cases, this alleviates or eliminates any pinching sensation or pain. The more severe the injury, the greater amount of cloth should be used. The support can be reduced over time as the joint heals. It’s also helpful when recovering from a knee injury to sit up higher using blankets.

If you can wrap the arms around behind the back, but cannot bind the hands, use a strap or towel to bridge the distance. Over time, walk the hands closer and closer, then bind fingertips, then clasp hands, and finally the wrist.

COMMON MISTAKES

Be sure that you have the necessary amount of space between the foot and thigh. If they are too close, or touching, it is impossible to create the proper actions that define this pose. If your foot slides in when you’re in the pose, use a block as a spacer.

One of the most common errors is for the right leg to be “dead” or listing off to the side. This shows that the hip and inner thigh musculature is not participating effectively in the movement. Notice the distance between the head and foot in these two photographs.

Marichyasana-A-ComparisonTake the necessary steps to make the leg fully vertical, which, depending on the situation, might include:

  • Hug the knee in tight to the chest (Using the leg muscles)
  • Encourage by squeezing with the arms
  • Lean further forward, sitting up on a block if needed
  • Push the right foot and left heel firmly into the ground
  • Spend 5 breaths easing into the posture and getting the legs and hips into position before binding.
The Vinyasa

The Vinyasa

How to Jump back and Jump through

Vinyasa means ‘carefully ordered.’ It refers to the sequence as a whole, since each movement has been carefully choreographed. It also refers to the connective tissue between each pose, which is the subject of the following discussion. The vinyasa between poses is the middle section of the Surya Namaskar form (Sun Salutation): catvari (chaturanga); panca (urdhva mukha svanasana); and Sat (adho mukha svanasana.)*

The vinyasa is performed between each pose and between the right and left side of asymmetrical postures. If time or energy must be budgeted, it is also acceptable to only take vinyasa between postures but not between sides. If you choose not to take vinyasa between sides of every posture, it is still a good idea after deep twists, such as Marichyasana D, or any pose where you feel like you would benefit from a ‘reset.’

The vinyasa method offers a few main benefits:

  • It highlights the role and importance of the breath, and serves as a frequent reminder to reconnect with the breath if attention has wandered.
  • It offers a reset, metaphorically wiping the slate clean between postures, by taking the spine and limbs through a wide range of movement.
  • It builds a considerable amount of strength throughout the body and specifically in the shoulders, deep belly, and hip flexors.
  • It quickly develops the practitioner’s endurance.

If you have reached the seated poses, you are already well familiar with the Surya Namaskar form. The main challenge is the transition from the posture to catvari, and from Sat to the next posture. These actions are often referred to as ‘jumping back’ and ‘jumping through.’

Jumping Back & Through

Jump back: “jumping back” is something of a misnomer because the action isn’t accomplished by jumping, but by tucking crossed legs as close to the torso as possible, with the knees near the shoulders, rounding/flexing the spine, lifting the body with the strength of the shoulders and the engagement of uddiyana and mula bandha and leaning forward in this tight package until the legs are positioned behind you to release into chaturanga.

Jumping through can be accomplished with either straight legs or with legs crossed and tucked close to the torso like in the jump back. The cross-legged variation is typically easier, but not always. A minority of practitioners, due to their proportions, find jumping through with straight legs easier.

Cross the legs and make a tight ball as you push off the floor and bring the hips forward. Press off through the straight arms and stay as high and tucked as you can. Before landing, with spine flexed and bandha engaged, straighten the legs and come to a seat. Jump at the end of an exhalation from adho mukha svanasana after bringing the knees as close as possible to the chest. An exhalation also encourages engagement of the muscles of the abdomen and pelvic floor.

In the case of straight leg jump throughs, it’s important to remember that the legs are longer than the arms so in order for the legs to get through the arms you must be able to keep the heels lifted off the ground (dorsiflexion of the foot) until the legs are close to parallel with the floor. As you jump, the hips will have to lift high. From adho mukha svanasana, bring the knees close to the chest, lower the hips and keep the legs and shoulders engaged and lifting as you exhale, look between your hands and jump forward.

When jumping either back or through with crossed legs, be sure the feet & toes are pointed out to the sides. Flexed feet get stuck easily on the ground, which equals crashing.

Training the Vinyasa

To work on vinyasa, follow these 5 stages. You will likely need at least 6 months to a year to learn all the stages. Don’t get discouraged! If you practice every day you’ll gain strength quickly.

First: from a seated position, cross the legs, rock forward onto the feet and place the hands down in front of you. Stand up part way and jump the feet back. From Sat, step or hop into a cross-legged position, bringing the right foot to the left wrist and the left foot to the right wrist, then sit down. Make this your vinyasa between poses, while you work on the following exercises. Over time, you will be able to incorporate the following techniques that require additional strength and coordination if you wish.

This method is also great for practitioners who want to take vinyasa but have a mild wrist or shoulder injury that makes lifting up fully infeasible.

To start building the strength to lift and jump, try repeating the following exercise 5 or 6 times daily. These exercises are best performed during a “break” from the regular sequence, perhaps at navasana, rather than between sides of postures.

Training the ‘tuck’ with blocks. (Lolasana)

  • Place blocks to the side of the hips.
  • Lift the hips hip off the ground
  • Cross the legs and hug the knees into the chest. Lift the feet off the ground.
  • Rock back and forth
  • After a few rocks, bring the feet back as far as you can. Start to bend the elbows and lean forward. The feet will likely touch the ground—once they do, immediately jump back to catvari.

After a period of practice, you will be able to jump forward and back on blocks.

Tip: Practicing with socks can help you slide if you practice on a wood or slippery surface. That will allow you to feel the fluid, floating motion, rather than getting your feet stuck on a sticky mat.

After working with this for a while, try without the blocks. The feet still get stuck, but you can hop back. Think of it as a two-part jump back: from seated to halfway back, then another jump to catvari.

Next—after a couple months, perhapsuse the blocks again. This time, use your additional strength to lift up a bit higher and jump all the way back without touching down mid-way.

The final step is to jump back smoothly without the blocks, either curled in tightly or with the legs straight. Remember, slow & controlled movement, not smashing down. If you’re trying with the legs straight, be sure you keep the toes flexed and the hips lifted so you don’t stub your toes.

And that’s it! There are various stylistic interpretation of the vinyasa depending which pose you’re jumping into or out of, but with this foundation you’ll be well prepared for any variation.


When using props: blocks can be used as props while building strength and getting used to the motions of tucking, lifting and tipping forward in quick succession. Blocks should be placed directly at the outer edge of the legs directly in front of the hips (mid-thigh), and not further away from the body. If blocks are placed too far away from the sides of the body, the arms and shoulders lose their advantage of providing length to lift the torso between the arms. If the blocks are placed directly next to the hips, your center of gravity will not be balanced and it will be more difficult to lift your feet. Leaving blocks under your hands while you jump through can also provide additional lift. Depending on your level of strength and the proportions of your arms, legs, and torso, some of these actions may be more difficult than others. Spend extra time working on the hardest actions.

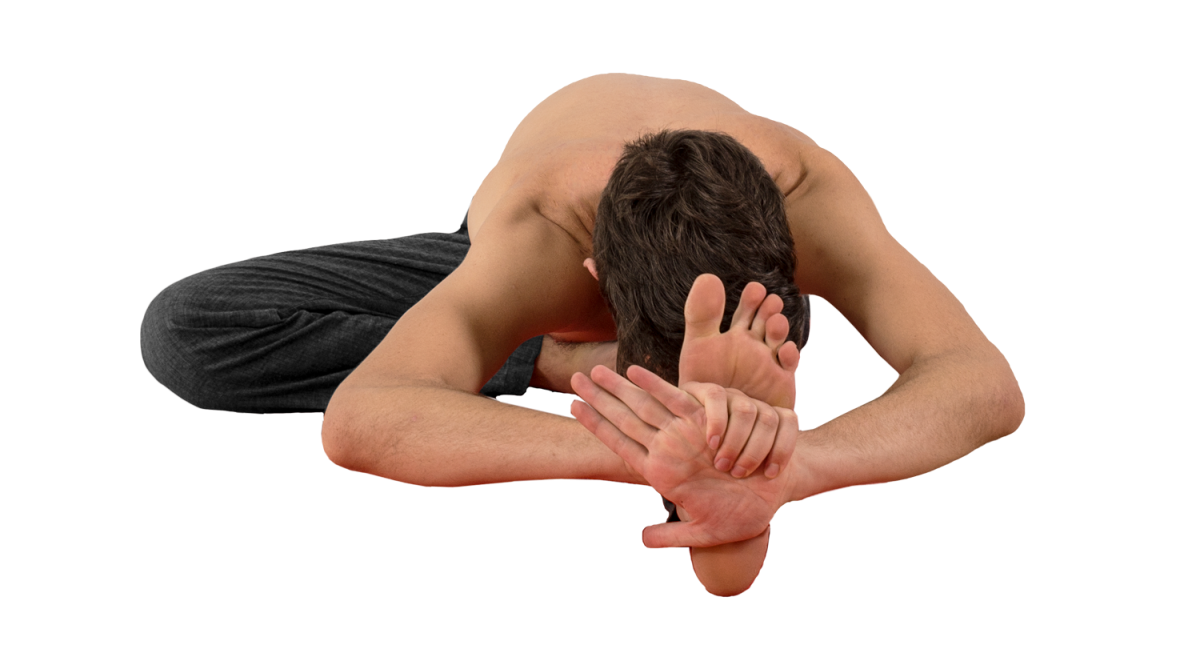
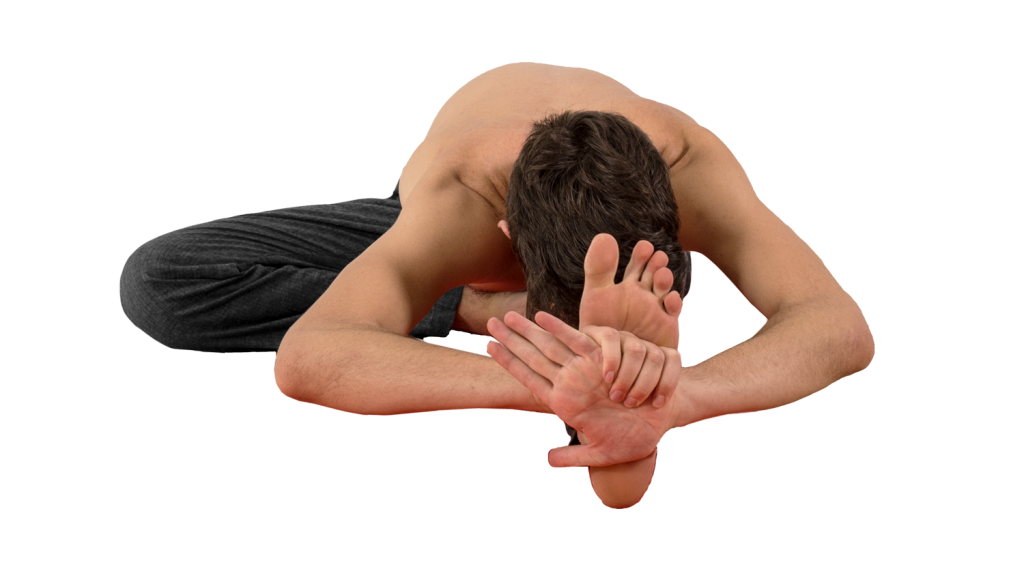
Janu Sirsasana C

Janu Sirsasana C

  • Janu: Knee
  • Sirsa: Head
  • Asana: Pose

Janu Sirsasana C is the thirteenth pose of the primary series, and the eighth seated pose. There are three variations of Janu Sirsasana (A, B, C) which differ in foot placement.

Although this pose is intense and demanding, it offers a unique method of enhancing the mobility of the tissues inside the knee joint. Additionally, it is a very therapeutic action on the toes and the plantar fascia (sole of the foot). It encourages the proper tone and lift of the foot’s natural arches.

The following is a discussion of the position on the right side, as pictured. As an asymmetrical posture, it must be repeated on the left side.

FOCUS ON…

This is the most challenging variation, requiring the most flexibility. The main action of this pose is similar to that of A. In C variation, the toes are tucked under so that the right foot is perpendicular to the floor, and the sole of the foot is flush with the left thigh. The bent leg can be arranged at a 45-60° angle. Additional stretch is also possible in the hamstrings of the straight leg.

All the toes should be flexed, so that the ball of the right foot is on the ground, and the right knee touches the ground as well. The heel ought to press into the left thigh firmly.

This pose is rather intense for many practitioners, and it is important to ease into it. Don’t try too much too quickly, and especially avoid putting any weight or trying to force the knee or foot into position.

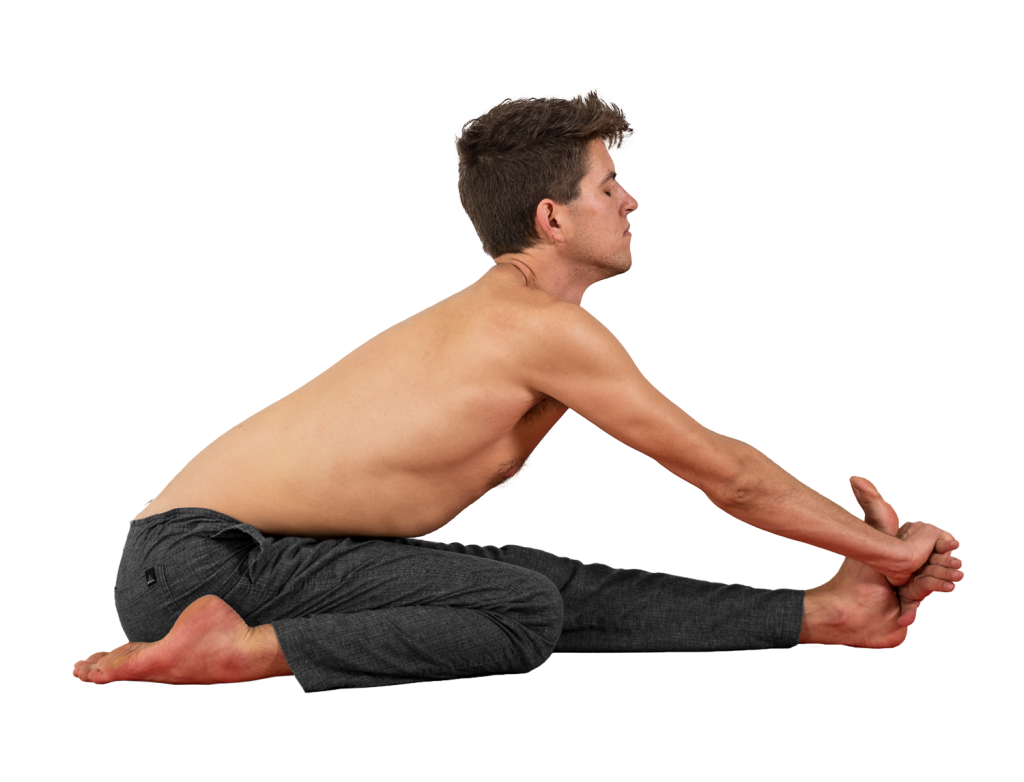
Janu Sirsasana is a “hip opener,” lengthening the muscles of the inner thigh and groin. The action of the straight leg is that of Paschimottanasana.

There is a slight twisting action in the torso: wrap the length of the spine from root to crown to address the straight leg fully. There can be a tendency for the hips or low belly to face a 45° angle between the femurs, which should be avoided. This is not a posture dedicated to twisting; a ‘counter-twist’ is simply needed to keep facing straight forward.

Principles of Forward Folding:

Vinyasa of the Pose

From Sat, jump through and land in Dandasana.

Inhale, take hold of the right ankle. Turn it so that the toes face down to the mat. With the toes tucked under, take your hands by your sides and move your hips forward so that your foot rotates into a fully vertical position. Reach your hands upwards, and lengthen your torso.
Janu-Sirsasana-C-Prep

Exhale, fold forward and, holding your right wrist, place the hands against the sole of the left foot with the palms facing away from you.*

Inhale and reset, tugging with the strength of the shoulders to pull the chest through the arms, straightening the spine.

Exhale, fold forward fully. This is the state of Janu Sirsasana C; hold for five breaths.

Janu Sirsasana C

Inhale, sit up and release both hands, placing them to the sides of the hips. Lift your hips slightly, and move your hips back to release the right foot. DO NOT try and straighten the right leg immediately without moving the hips back—that’s a likely way to injure your knee.

Exhale, jump back and take vinyasa.**

Repeat for the second side.

*Binding the wrist is the preferred method. Alternatives are listed below; if you can hold the wrist, bend the elbows more and more as you gain flexibility to help the torso lengthen.

**Traditionally, vinyasa is taken between sides of asymmetrical postures. If you’re just starting out and building stamina, or have time constraints and require a faster practice, the vinyasa between sides may be omitted

ALTERNATIVES & SOLUTIONS

This pose is fairly demanding and is not appropriate for anyone with an acute knee injury. It should never be forced, and you should not try and push your knee down with your hands. Take care entering and exiting it.

If you want to try it but can’t get all the way into the position, you might find it helpful to stop at the first vinyasa, with the hands lifting the hips up and forwards. This will allow the knee, ankle, and toes to become more accustomed to the position without as much pressure and weight.

If the hamstrings feel quite tight, or if you’re unable to sit up straight (the spine is rounding), place a blanket or block beneath the hips. Add additional support if necessary until both the legs and spine can be straightened.

If you have had knee injury or surgery, and/or feel a pinching sensation when the knee is closed fully in this way, place a rolled up washcloth or piece of fabric behind the knee. When you squeeze the cloth with your knee, the bones of the femur and tibia will be held slightly apart. In the majority of cases, this alleviates or eliminates any pinching sensation or pain. The more severe the injury, the greater amount of cloth should be used. The support can be reduced over time as the joint heals. It’s also helpful when recovering from a knee injury to sit up higher using blankets. If none of these suggestions help, keep practicing Janu Sirsasana A variation and other related poses before integrating this posture.

If your bent knee doesn’t touch the ground, you might find it helpful to place a block under the leg so you can find the sensation of pressing down through the leg.

COMMON MISTAKES

Make sure that the ball of the foot is on the ground evenly, and that all 5 toes are in contact with the floor and active. Don’t let the foot, heel, ankle, or knee relax in this—stay active and engaged.

Coming out of this pose by immediately trying to straighten your right knee could be disastrous. This pose places a great deal of pressure in the knee joint, which is weakest in twisting. It is important to release that pressure before straightening the leg, by moving the hips backwards first.

Twisting only the upper body or head towards the straight leg shows that the belly and hips are ‘dead,’ or not involved in the pose. Make sure to move from the very low belly.

Janu Sirsasana B

Janu Sirsasana B

  • Janu: Knee
  • Sirsa: Head
  • Asana: Pose

Janu Sirsasana B is the twelfth pose of the primary series, and the seventh seated pose. There are three variations of Janu Sirsasana (A, B, C) which differ in foot placement.

The following is a discussion of the position on the right side, as pictured. As an asymmetrical posture, it must be repeated on the left side.

FOCUS ON…

The action of this pose is similar to that of A. The main difference is that the rotation of the femur bone is reversed, so that both legs are in internal rotation. With the leg in this position, full flexion of the knee is ensured by the weight of the body. The bent leg can be arranged at a 50-60° angle. Additional stretch is also possible in the hamstrings of the straight leg.

Janu Sirsasana is a “hip opener,” lengthening the muscles of the inner thigh and groin. The action of the straight leg is that of Paschimottanasana.

There is a slight twisting action in the torso: wrap the length of the spine from root to crown to address the straight leg fully. There can be a tendency for the hips or low belly to face a 45° angle between the femurs, which should be avoided. This is not a posture dedicated to twisting; a ‘counter-twist’ is simply needed to keep facing straight forward.

Principles of Forward Folding:

Vinyasa of the Pose

From Sat, jump through and land in Dandasana.

Inhale, bend both knees slightly. Cross your right leg, so that the shin is perpendicular to the front edge of your mat. Use your hands to lift your body slightly, and sit on the heel. At this point, the top of the foot is fully on the floor and the toes are pointing out from under the left hip. The heel should be in contact with the perineum. Straighten your left leg. Reach your hands upwards, and lengthen your torso.*

Exhale, fold forward and, holding your right wrist, place the hands against the sole of the left foot with the palms facing away from you.**

Inhale and reset, tugging with the strength of the shoulders to pull the chest through the arms, straightening the spine.

Janu Sirsasana B Reset

Exhale, fold forward fully. This is the state of Janu Sirsasana B; hold for five breaths.

Janu Sirsasana B

Inhale, sit up and release both hands, placing them to the sides of the hips. Lift your hips slightly, and move your hips back to come off the right foot.

Exhale, jump back and take vinyasa.***

Repeat for the second side.

*Sometimes it is taught that the right toes should be pointed straight forward, towards the front of the mat, however I find this less helpful in encouraging the internal rotation of the femur, flexion of the knee. It also tends to feel unbalanced, since there is no support beneath the left hip.

**Binding the wrist is the preferred method. Alternatives are listed below; if you can hold the wrist, bend the elbows more and more as you gain flexibility to help the torso lengthen.

***Traditionally, vinyasa is taken between sides of asymmetrical postures. If you’re just starting out and building stamina, or have time constraints and require a faster practice, the vinyasa between sides may be omitted

ALTERNATIVES & SOLUTIONS

If the hamstrings feel quite tight, or if you’re unable to sit up straight (the spine is rounding), place a blanket or block beneath the hips. Add additional support if necessary until both the legs and spine can be straightened.

If reaching the toes is challenging or makes you feel crunched, use a strap or towel. Pull the strap with your arms, resist with your feet. This will allow you to feel the interplay between the actions of the arms and the legs that allows the spine to lengthen and the chest to remain full. Otherwise, if you strain yourself to reach the toes, you will likely not be able to find or appreciate the subtleties of the posture. Alternatively, reach to the shin (but do the same pulling action) instead of using a prop.

If you have had knee injury or surgery, and/or feel a pinching sensation when the knee is closed fully in this way, place a rolled up washcloth or piece of fabric behind the knee. When you squeeze the cloth with your knee, the bones of the femur and tibia will be held slightly apart. In the majority of cases, this alleviates or eliminates any pinching sensation or pain. The more severe the injury, the greater amount of cloth should be used. The support can be reduced over time as the joint heals. It’s also helpful when recovering from a knee injury to sit up higher using blankets. If none of these suggestions help, keep practicing Janu Sirsasana A variation and other related poses before integrating this posture.

If your bent knee doesn’t touch the ground, you might find it helpful to place a block under the leg so you can find the sensation of pressing down through the leg.

COMMON MISTAKES

Take the time to figure out how to find the correct—and comfortable—alignment.

Twisting only the upper body or head towards the straight leg shows that the belly and hips are ‘dead,’ or not involved in the pose. Make sure to move from the very low belly.

Janu Sirsasana A

Janu Sirsasana A

  • Janu: Knee
  • Sirsa: Head
  • Asana: Pose

Janu Sirsasana A is the eleventh pose of the primary series, and the sixth seated pose. There are three variations of Janu Sirsasana (A, B, C) which differ in foot placement.

The following is a discussion of the position on the right side, as pictured. As an asymmetrical posture, it must be repeated on the left side.

FOCUS ON…

Janu Sirsasana is a “hip opener,” lengthening the muscles of the inner thigh and groin. The action of the straight leg is that of Paschimottanasana, while the action of the bent leg is to rotate externally at the thighbone (similar to that of Trikonasana). This serves to create freedom in the pelvis, by fostering mobility in how the thighbone can move in relation to the pelvis. “Stiffness” can be thought of as a lack of potential movement of the thighbone in the hip socket (acetabulum).

Keep the hips facing straight forward (neutral, or in the same position as Samasthiti/Dandasana). It is very common for the hips to turn toward the right as the right leg is tucked into position, which creates significant distortion in this asana. This is especially common if attempting to make a 90° angle between the femurs. The right leg is anatomically incapable of being at a 90° angle in this position. Instead, allow it to be 60-80°, as much as the shape of your pelvis allows. The angle may increase slightly over time.

There is a slight twisting action in the torso: wrap the length of the spine from root to crown to address the straight leg fully. There can be a tendency for the body to be slightly twisted, drawn back toward the right side, which should be avoided. This is not a posture dedicated to twisting; a ‘counter-twist’ is simply needed to keep facing straight forward.

To enliven the asana, make sure you press the sole of the right foot into the right leg firmly. Though it may be tempting to passively “stretch” and let gravity take over, that is a much less effective strategy. Passive feet and legs are sure signs of vacant asana.

Principles of Forward Folding:

Vinyasa of the Pose

From Sat, jump through and land in Dandasana.

Inhale, bend the right knee into the chest, then open it out to the side; press the thigh and knee firmly into the ground. Press the sole of the right foot into the left thigh. Reach the both hands up and lengthen the abdomen and torso.Janu-Sirsasana-A-prep

Exhale, fold forward and, holding your right wrist, place the hands against the sole of the left foot with the palms facing away from you.*

Inhale and reset, tugging with the strength of the shoulders to pull the chest through the arms, straightening the spine.

Exhale, fold forward fully. This is the state of Janu Sirsasana A; hold for five breaths. Focus on external rotation of the right femur, internal rotation of the left femur. This dynamic encourages movement and awakens the hips.

Janu Sirsasana A

Inhale, sit up and release both hands, placing them to the sides of the hips.

Exhale, jump back and take vinyasa.**

Repeat for the second side.

*Binding the wrist is the preferred method. Alternatives are listed below; if you can hold the wrist, bend the elbows more and more as you gain flexibility to help the torso lengthen.

**Traditionally, vinyasa is taken between sides of asymmetrical postures. If you’re just starting out and building stamina, or have time constraints and require a faster practice, the vinyasa between sides may be omitted

ALTERNATIVES & SOLUTIONS

If the hamstrings feel quite tight, or if you’re unable to sit up straight (the spine is rounding), place a blanket or block beneath the hips. Add additional support if necessary until both the legs and spine can be straightened.

If reaching the toes is challenging or makes you feel crunched, use a strap or towel. Pull the strap with your arms, resist with your feet. This will allow you to feel the interplay between the actions of the arms and the legs that allows the spine to lengthen and the chest to remain full. Otherwise, if you strain yourself to reach the toes, you will likely not be able to find or appreciate the subtleties of the posture. Alternatively, reach to the shin (but do the same pulling action) instead of using a prop.

If you have had knee injury or surgery, and/or feel a pinching sensation when the knee is closed fully in this way, place a rolled up washcloth or piece of fabric behind the knee. When you squeeze the cloth with your knee, the bones of the femur and tibia will be held slightly apart. In the majority of cases, this alleviates or eliminates any pinching sensation or pain. The more severe the injury, the greater amount of cloth should be used. The support can be reduced over time as the joint heals. It’s also helpful when recovering from a knee injury to sit up higher using blankets.

If your bent knee doesn’t touch the ground, you might find it helpful to place a block under the leg so you can find the sensation of pressing down through the leg.

COMMON MISTAKES

Close the knee fully. If the knee is slightly open, for example if the foot is mid-thigh or at the knee instead of at the groin, an unhealthy shear force generated in the knee. This could lead to knee pain, and at the least it will prevent the knee from ever reaching the floor.

Twisting only the upper body or head towards the straight leg shows that the belly and hips are ‘dead,’ or not involved in the pose. Make sure to move from the very low belly.

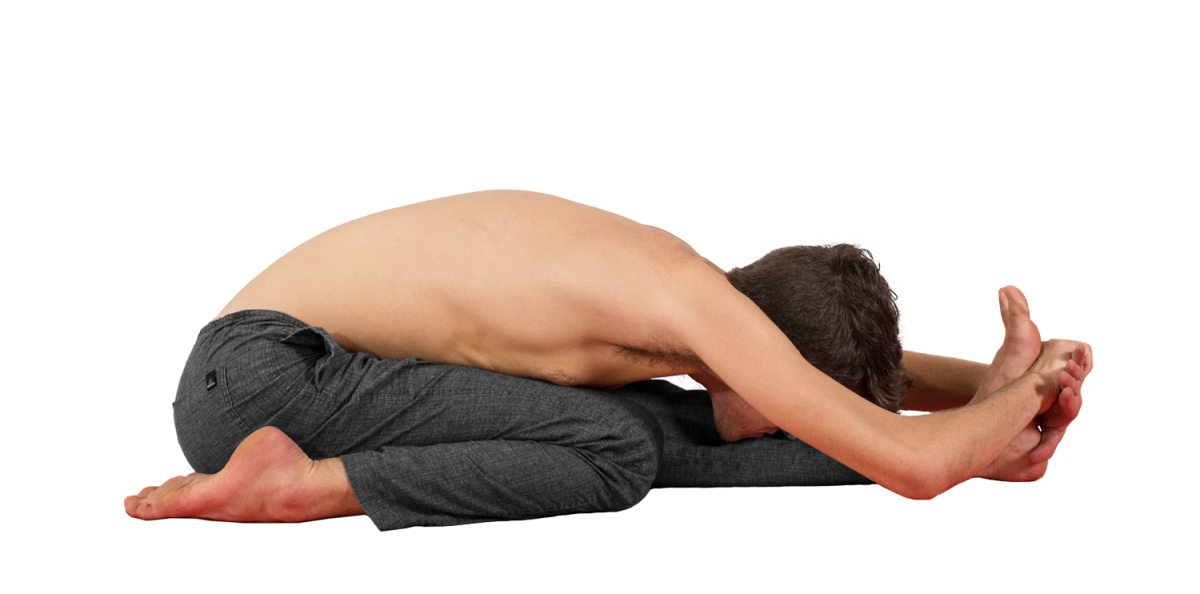
Triang Mukhaikapada Paschimottanasana

Triang Mukhaikapada Paschimottanasana

  • Triang: Three parts
  • Mukhaikapada: Face to one leg
  • Paschim: West / Behind (Referring to the dorsal or back surface of the body)
  • Uttana: Stretched
  • Asana: Pose

Triang Mukhaikapada Paschimottanasana is the tenth pose of the primary series, and the fifth seated pose.

The following is a discussion of the position on the right side, as pictured. As an asymmetrical posture, it must be repeated on the left side.

FOCUS ON…

I recommend that you close the knee fully (pull the knee to the chest) before moving it to the side, rather than bending while you put it in position. In this way, the knee is more protected against torsion.

If you have large calves, you will likely find it helpful to grab the calf muscle with your hand and pull it to the side as you close your knee, allowing a deeper fold.  Keep the thighbones parallel to one another; the knees may or may not touch depending on your proportions.

Ensure that the top of the foot is fully in contact with the ground, as often the pinky side is lifted slightly. Spread the toes wide and keep the foot active. Note that the foot is to the side of the hips, do not sit on it.

This pose could be a focused lengthening of the quadriceps group, the hamstrings, or both. In any case, make an effort to ground the sitting bones fully, especially on the side of the bent knee.

Asymmetrical postures are often more complicated than their symmetrical counterparts, because you will have to process and coordinate simultaneous but different actions: each leg is actively involved in its own pattern. The straight leg needs to still be doing all the appropriate actions of a forward fold as in Paschimottanasana, while the bent knee has its pattern of lengthening the quadricep and sinking the sitting bone low.

Don’t forget the principles of forward folding. It may feel different here, especially if the quadriceps are tight, but especially focus on maintaining length on the front midline of the body, from the navel to the sternum.

Principles of Forward Folding:

Vinyasa of the Pose

From Sat, jump through and land in Dandasana.

Inhale, place the right foot along the outer edge of the right hip. Reach the both hands up and lengthen the abdomen and torso.

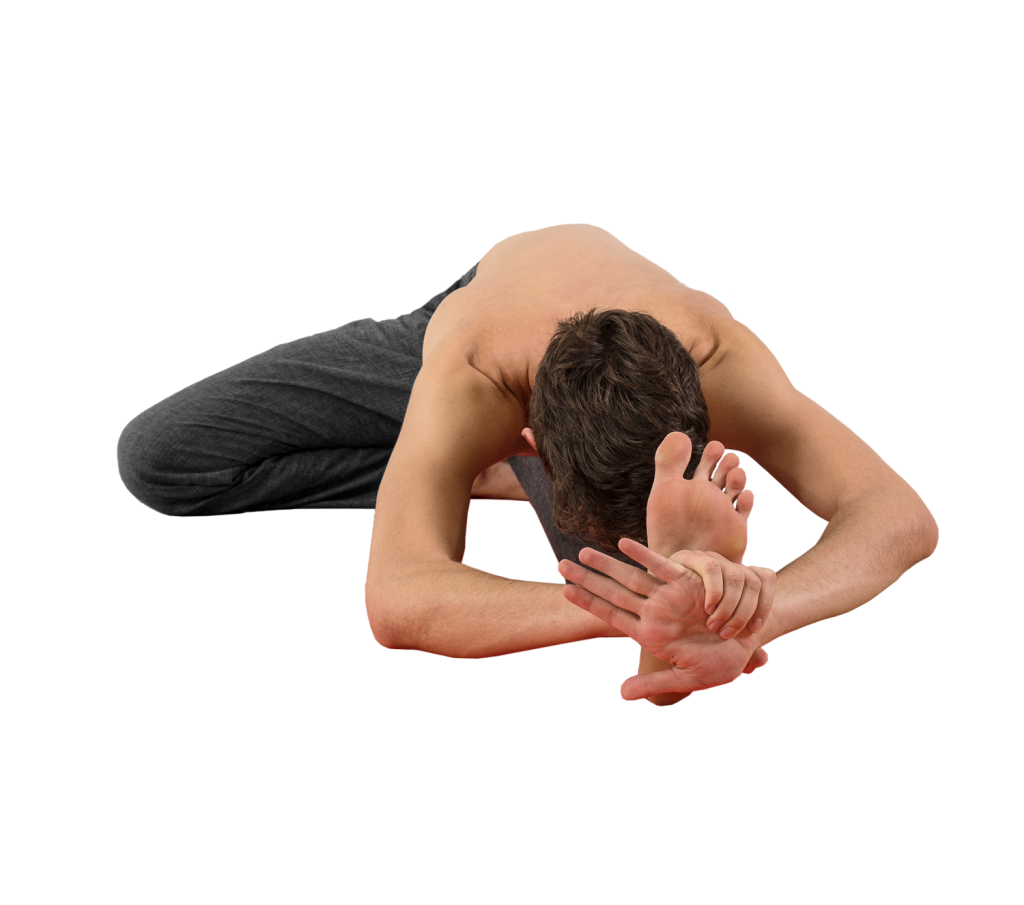
Exhale, fold forward and, holding your right wrist, place the hands against the sole of the left foot with the palms facing away from you.*

Inhale and reset, tugging with the strength of the shoulders to pull the chest through the arms, straightening the spine.

Triang Mukhaikapada Paschimottanasana


Exhale, fold forward fully. This is the state of the pose; hold for five breaths.

Triang Mukhaikapada Paschimottanasana

Inhale, sit up and release both hands, placing them to the sides of the hips.

Exhale, jump back and take vinyasa.**

Repeat for the second side.

*Binding the wrist is the preferred method. Alternatives are listed below; if you can hold the wrist, bend the elbows more and more as you gain flexibility to help the torso lengthen.

**Traditionally, vinyasa is taken between sides of asymmetrical postures. If you’re just starting out and building stamina, or have time constraints and require a faster practice, the vinyasa between sides may be omitted

ALTERNATIVES & SOLUTIONS

If the hamstrings feel quite tight, or if you’re unable to sit up straight (the spine is rounding), place a blanket or block beneath the hips. Add additional support if necessary until both the legs and spine can be straightened.

If reaching the toes is challenging or makes you feel crunched, use a strap or towel. Pull the strap with your arms, resist with your feet. This will allow you to feel the interplay between the actions of the arms and the legs that allows the spine to lengthen and the chest to remain full. Otherwise, if you strain yourself to reach the toes, you will likely not be able to find or appreciate the subtleties of the posture. Alternatively, reach to the shin (but do the same pulling action) instead of using a prop.

If you feel like you’re tipping over to one side—towards the straight leg—place a block or blanket only under the hip of the straight leg. Use enough support that the pelvis feels level. You need to be able to find a sense of rootedness or heaviness through the sitting bone on the bent-knee side.
If you have had knee injury or surgery, and/or feel a pinching sensation when the knee is closed fully in this way, place a rolled up washcloth or piece of fabric behind the knee. When you squeeze the cloth with your knee, the bones of the femur and tibia will be held slightly apart. In the majority of cases, this alleviates or eliminates any pinching sensation or pain. The more severe the injury, the greater amount of cloth should be used. The support can be reduced over time as the joint heals. It’s also helpful when recovering from a knee injury to sit up higher using blankets.

COMMON MISTAKES

The most common mistake is not using one of the alternatives listed above when it is necessary to do so.

If you are fairly flexible—able to have both sitting bones on the ground without props—be sure that you’re not leaning towards the bent knee, or curving to the side. Keep your weight equal between the sitting bones, and make sure both legs are participating in the combination of strength and lengthening required of them.

4 of 7
1234567