Utthita Parsvakonasana: Extended Side Angle
Note: Touch or hover your mouse over underlined terms for a definition.
Utthita Parsvakonasana
- Utthita: Extended
- Parsva: Side
- Kona: Angle
This is the fifth posture in the Standing Series.
This is a deceptively complicated posture, and practicing it correctly demands great awareness. It is concerned primarily with the external rotation of the upward side of the body.
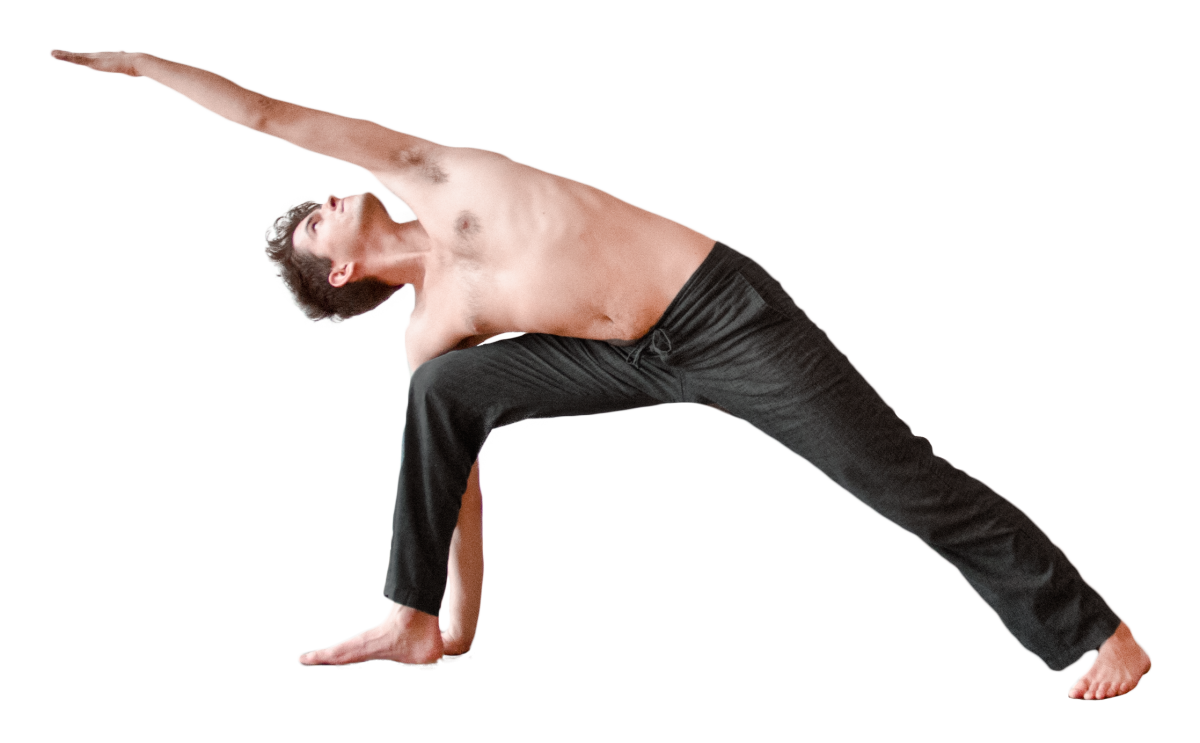
The following is a discussion of the position on the right side, as pictured. As an asymmetrical posture, it must be repeated on the left side.
In the legs, this posture focuses on strengthening and opening the pelvic region: the right leg (bent) is strengthening through the quadriceps and abductor muscles while the hip adductors lengthen. In the left (straight) leg, the hamstrings strengthen, hip adductors contract eccentrically while the quadriceps lengthen.
In the core, this position challenges the psoas muscle and presents an opportunity to lengthen and strengthen both the psoas and the lower back by engaging uddiyana bandha.
The spine lengthens, the muscles of the shoulders lifting the rib cage away from the pelvis and keeping the spine in neutral alignment. The right (lower) arm presses down while the left (upper) lifts overhead, rotating the rib cage forward and creating a stretch through the entire left side of the body from outer edge of the foot to the fingertips.
There are two distinctive stages – practice the first as you focus on opening the pelvis, and proceed to the second only after you’ve mastered stage 1.
Contraindications: Neck pain or cervical spine injury: do not look upwards. If you have an injury in the knee or shoulder, modify by slightly bending the joint or finding a comfortable position.
Stage 1:
 From Samasthiti, inhale and step your right foot back ~3′ and pivot the body 90°, bringing the hips square towards the side of the room. Turn the right foot out to the back of the room – not more than 90°, keeping the outside edge of the foot parallel with the edge of your mat. Bring the right heel in line with the ball of the left foot.
Picking your stance:
- Right heel to left ball of the foot will give you a little more mobility through the pelvis and help to bring the right hip forward (it has a tendency to fall back behind the midline of the body-see ‘Common Mistakes’ below).
- Keeping the feet too close together will ‘freeze’ the pelvis in a lifted position. Try keeping the feet 3-4′ apart depending on your leg length and flexibility. Knee position is a good indicator: if your knee is out over your toes or farther, your stance is much too short. If your knee is way back behind the ankle, your stance is too long. The upper leg should be parallel with the floor, creating a 90° angle at the knee.
Bend the right knee, reaching the fingertips to the sides in a Warrior II stance. Now reach the right fingertips towards the back wall, lengthening the right side of the torso.
Place the forearm on the knee and reach overhead with the left hand, creating a straight line from left foot to left fingers. Keep the muscles of the shoulders engaged to keep the left arm from squeezing towards the neck or ears – make sure there is a gap, and that the arm is strong in the shoulder socket. If the shoulder muscles are relaxed, the arm will tend to pull slightly out of the socket, creating instability in the joint.
Press the forearm and knee together, pressing the knee forward and resisting the movement with the arm. This paradoxical movement will help to open both the right hip and rotate the right shoulder forward into alignment over the knee. Keep both sides of the torso long and straight, and be mindful that the chest doesn’t rotate forward, collapsing towards the ground.
Press the left hip down towards the right foot. You will feel this intensify the stretch of the adductor muscles on the inside of the thigh.
Spread the toes wide and press the inside arch of both feet firmly into the mat. The left foot especially will have a tendency to lift the arch and big toe up off the mat, rolling and compressing the ankle. Be sure you keep the ankle strong by pressing down through the big toe and inside arch of the foot.
Gaze up to the left fingers, or, if your neck has been injured or looking up is painful, look forward (as pictured) and avoid twisting the neck.
Take 5 deep breaths, then lift through the left hand and return to a standing position. Pivot the feet and repeat these steps on the left side.
Stage 2:
Do not proceed to this step until your body feels relaxed and strong in stage 1.
 From Samasthiti, inhale and step your right foot back ~3′ and pivot the body 90°, bringing the hips square towards the side of the room. Turn the right foot out to the back of the room – not more than 90°, keeping the outside edge of the foot parallel with the edge of your mat. Bring the right heel in line with the heel of the left foot.
Bend the right knee, reaching the fingertips to the sides in a Warrior II stance. Now reach the right fingertips towards the back wall, lengthening the right side of the torso.
Place the right palm on the mat or block and reach overhead with the left hand, creating a straight line from left foot to left fingers. Bring the side of your torso, especially the abdomen and lower part of the rib cage, onto the right thigh. Press the arm and lower leg together firmly to create stability and opening through both the hips and shoulders.
Continue to focus on lengthening and straightening the body as described in Stage 1.

A major decision to make here is whether to place the palm on the inside or outside of the foot. Hand placement will have a surprisingly large impact on the entire posture.
Traditionally, the hand is placed on the outside of the foot (index finger to pinky toe).
Unless you’re an experienced practitioner with very loose muscles through the chest and hips, this hand position will tend to roll the chest forward and down, twisting the spine. It also unhelpfully encourages the tendency to hyperextend through the lower back, reinforcing weakness at the T12/L5 vertebrae. This is evident if the navel is farther forward than the sacrum or shoulders, creating one big ‘arch’ throughout the spine rather than 4 neutral curves. Another indicator of this is if you can feel or see the bottom rib ‘flaring’ up. In a neutral position, the bottom ribs should be covered by the abdominal muscles, and you will be unable to feel the bottom edge of the ribs.
Furthermore, pressing the arm forward and the knee back will contract the muscles of the chest (mostly the pectoralis major) and the hip abductor muscles. This will suck the chest down towards the mat, rotating both shoulders forward and down, plus pull the right hip back farther behind the midline and roll the left hip forward and down. These are all trends that we are trying to reverse through the practice of the posture.
Thus, I typically recommend that the hand be placed on the inside of the foot (pinky finger to big toe):
- Press the navel back towards the spine (uddiyana bandha) and ‘tuck’ the rib cage down into the abdominals. When you’re doing this correctly, you will feel an intense effort through the abdominal muscles and a lengthening and decompression of the lumbar spine. It is very important that you do this step first. If you proceed to the next step before stabilizing the abdominal area, your lumbar spine will hyperextend and you will receive little benefit from this posture.
- Press the arm back into the leg & press the knee forward into the arm: this will engage the muscles of the back, pulling the chest open and rotating the shoulders into a vertical position over the knee. It will also contract the hip adductors, which work to move the knee inwards; since the knee can’t move (you’re pressing down into the right foot and the right arm is generating resistance) this force will be transmitted to the hip, pulling the right hip forward towards the midline. Keep this effort up throughout the posture; it is essential for stabilizing the pelvis and opening the chest and hips to the side.
Focus on rolling the entire left side of the body up and back (external rotation). Roll the thigh up and back, roll the left hip itself up and back, and lift and rotate the left shoulder. When in proper alignment, the hips will be ‘stacked’ vertically, and both shoulders will be floating over the knee.
Viewed from the front to show rotation of the shoulders and hips.
 Next, focus on lengthening through the spine, pulling the rib cage and crown of the head up away from the pelvis. Breathe deeply, expanding through the rib cage to create space between the shoulder blades (scapulae) and spine.
After you feel loose and comfortable in this position, play with bringing the hand to the outside of the foot. If your body is sufficiently prepared, moving the hand back will make a slight but important improvement in the alignment of the hips and shoulders over the midline of the body. As you can see in the photo above, the crown of the head and both shoulders are a fraction of an inch in front of the vertical axis of the body (red line); moving the hand to the other side of the foot can help to move the shoulders and head back that small amount. However, as mentioned above, if you try to do this too soon you will more likely hyperextend the spine and collapse through the upper body. Choose your position with great awareness.
Common Mistakes:
These two photos show some positions that are very common yet, unfortunately, not very effective. Note that though these photos show the right hand on the mat, these mistakes are equally common with the forearm on the knee. That said, these positions are especially common in someone who is too eager to advance from stage 1 to stage 2 of this posture, and can often be corrected simply by using a block or placing the forearm on the knee.

In this photo we can observe that the feet are too close together. This is severely limiting the mobility of the pelvis: the only way to lower the hips would be to bring the right knee way out over the toes, which is undesirable. There is little cohesiveness to this posture, and the body is moving in a segmented way: there are distinct forces of motion at work in the lower body, the torso, and the upper body; the crown of the head is falling down towards the ground rather than lifting towards the left hand.
Also of note is that the torso is compressing on the right side. The right side is shorter than the left, and you can even see the ribs lifting up on the left side of the body. This ‘flaring’ is indicative of a lateral bend at the junction of T12/L5.
Viewed from the front, we can see that very little of the body is aligned vertically. There is a very clear relationship between the left hip and shoulder: they tend to move together to create balance. If you’re tight through the upper body and rolling forward, the hip will automatically compensate by moving back to prevent you from falling forward. The same thing will happen if the pelvic area is tight – if the hips move far behind the midline of the body, your upper body will have to move forward to prevent you from falling backwards. The body will compensate for tightness in the side of the pelvis and abdomen by making the movement more of a forward fold than lateral extension, making the posture into a lunge with one hand lifted. Rolling the torso forward allows the body to avoid stretching the tight or weak muscles. Be mindful of this tendency as you practice Utthita Parsvakonasana. To correct this posture, lift back to neutral. Don’t worry about going deeply into the posture just yet, it’s much more important to have correct alignment. As you move into the position, focus on making an intense effort to roll the left hip and shoulder up and back to open the side of the body.
[…] source […]