Utthita Trikonasana – Extended Triangle Pose

- utthita – extended;
- tri – three;
- kona – angle;
- asana – pose
Utthita Trikonasana is the third of the Ashtanga-Vinyasa standing positions. The primary effect of this pose is an increased ability to rotate the forward leg (right pictured) in the hip socket, plus a strengthening of the oblique abdominal muscles. This posture can also be very beneficial for the health of the knee joint, stretching the medial (inside) collateral ligament (the next position, revolved triangle, creates balance by stretching the lateral [outside] collateral ligament).
The following is a discussion of the position on the right side, as pictured. As an asymmetrical posture, it must be repeated on the left side.
From Samasthiti, inhale and step your right foot back 3-4′ and pivot the body 90°, turn the right foot 180° so it faces the rear of your mat. Turn the left foot in slightly – 5° at most. Raise both hands to the sides, parallel with the floor.
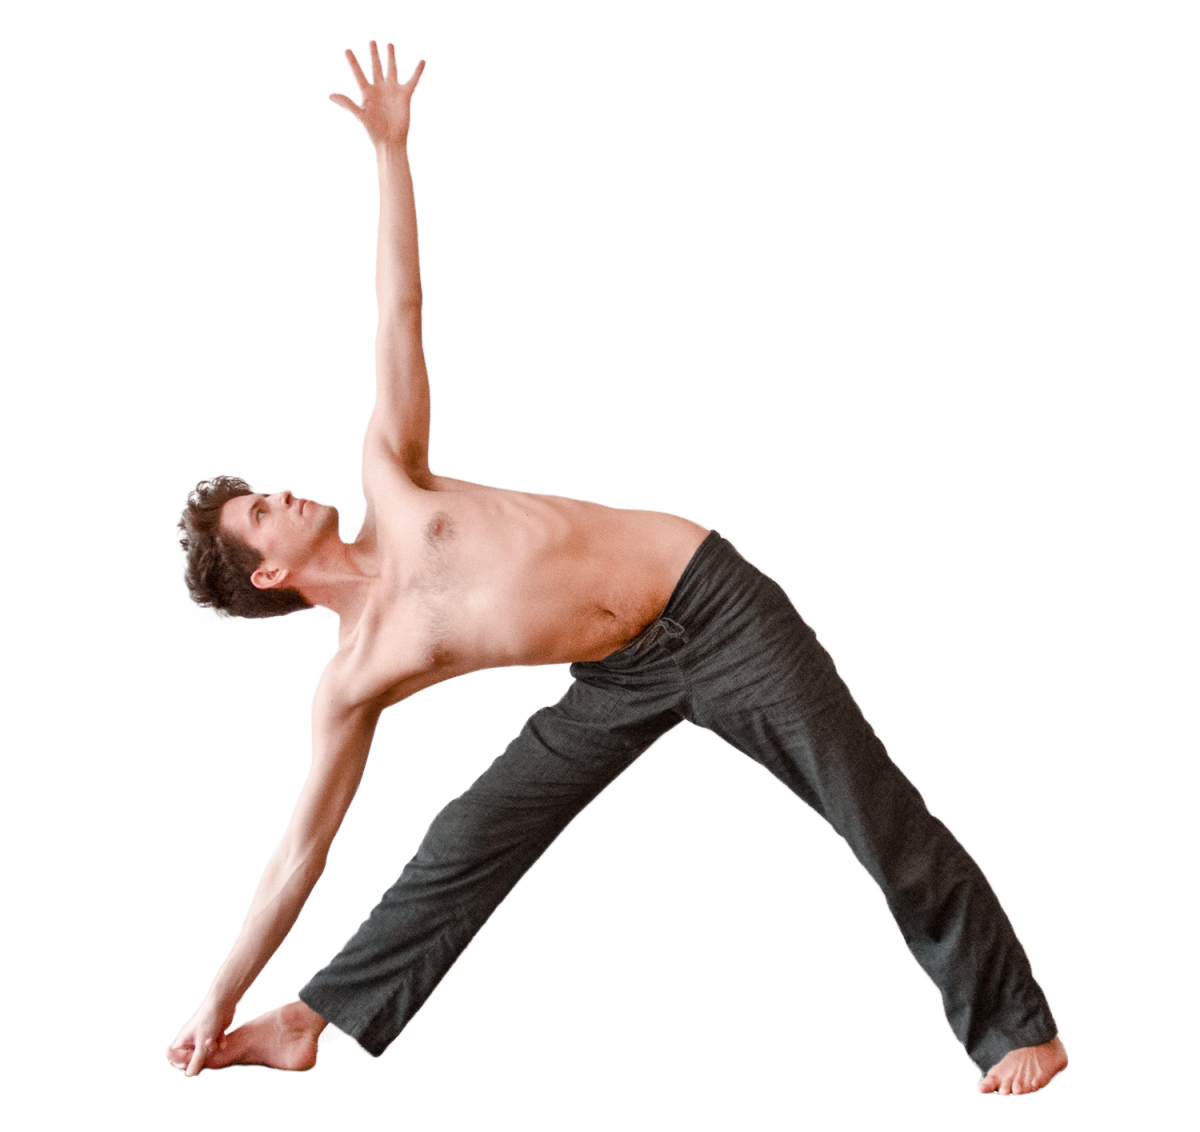
Exhale, turn your gaze over the right hand, and stretch to the side over your extended right leg. Reach to the side, not down. Rotate your pelvis, lifting your left hip above the right as you grasp your big toe. Lift the left hand towards the ceiling and gaze towards the left thumb. Lift the left hand towards the ceiling, broadening both shoulders. Lengthen the spine, and press the bottom side rib cage down towards the thigh. Maintain this position for five breaths, then lift your torso upright with inhalation.
Exhale, pivot the feet to the left, following the same steps to come into Trikonasana on the left side. Maintain this position for five breaths, then inhale as you return to an upright position.
This is the state of Trikonasana. If you’re unable to grab the toe, don’t worry. Many practitioners must first practice a variation to cultivate flexibility in the pelvis. Simply place the top of the hand on the inside of the shin or on a block. Only reach down as far as you can without bending the spine or rolling forward.
Contraindications: Neck pain or cervical spine injury: take care in looking upwards, or revise head position. Torn or tender hamstrings, pain in the pelvis or hip: avoid the posture and focus on healing and strengthening in other positions, or practice it with caution, taking a more upright posture. Knee pain: bend the knee slightly & refer to foot position discussion below. If pain persists, maintain a more upright torso position & ask a qualified practitioner to assess your alignment.
Warning: Those with excess flexibility or lack of muscle tone in the quadriceps are in danger of hyperextension of the knee joint, characterized by an opening of the knee backwards. Over time, pain will be felt behind the knee. Address this by bending the front leg 5° and focus on consciously contracting the quadriceps muscles to lift the kneecap. Beyond the risk of overuse injury, “locking” the joint will load the ligaments, and muscular strength will never develop, rendering the asana relatively ineffective.
Alignment:
As the name of this position suggests, we create a triangle with the body. What triangle?
A triangle is formed between the ankles (base) and the upper middle finger (apex).

Over time, as the spine comes towards parallel with the ground, we can use geometry to determine factors such as ideal stance, where to place the hands, and how much to lower the upper body. Many triangles can be drawn here, but three are of particular importance. They connect at the sacrum, and radiate outwards from that point. The ‘base’ triangle is made by aligning both ankles and the sacrum. A second is formed between sacrum, right ankle, and base of the cervical spine (C7/T1). The third connects the sacrum, C7/T1, and the left middle finger. The common edge between the bottom two triangles bisects the right leg, while the edge between the top two triangles lies along the spine.

The essential feature of Trikonasana is that the right leg opens at an approximately 90° angle from the rest of the body, challenging the flexibility of the hip adductors. This lengthening of the inner hamstrings is intensified by the rotation of the pelvis and the extension of the upper body over the right leg. The pelvis is the prime focus of this asana, and the majority of the movement will occur there.
It is imperative that the upper body be kept in a neutral position. To do otherwise is to dramatically dilute the effects of this movement. The body above the pelvis remains in the same anatomical position as if you had lifted your hands to the sides from Samasthiti. Keep the hips and shoulders aligned, resisting the inclination to collapse in a spiral towards the right foot. Press back through the navel & lumbar spine to counteract hyperextension. Allowing this asana to originate from any movement except the lateral rotation of the hips will result in a compromised position.
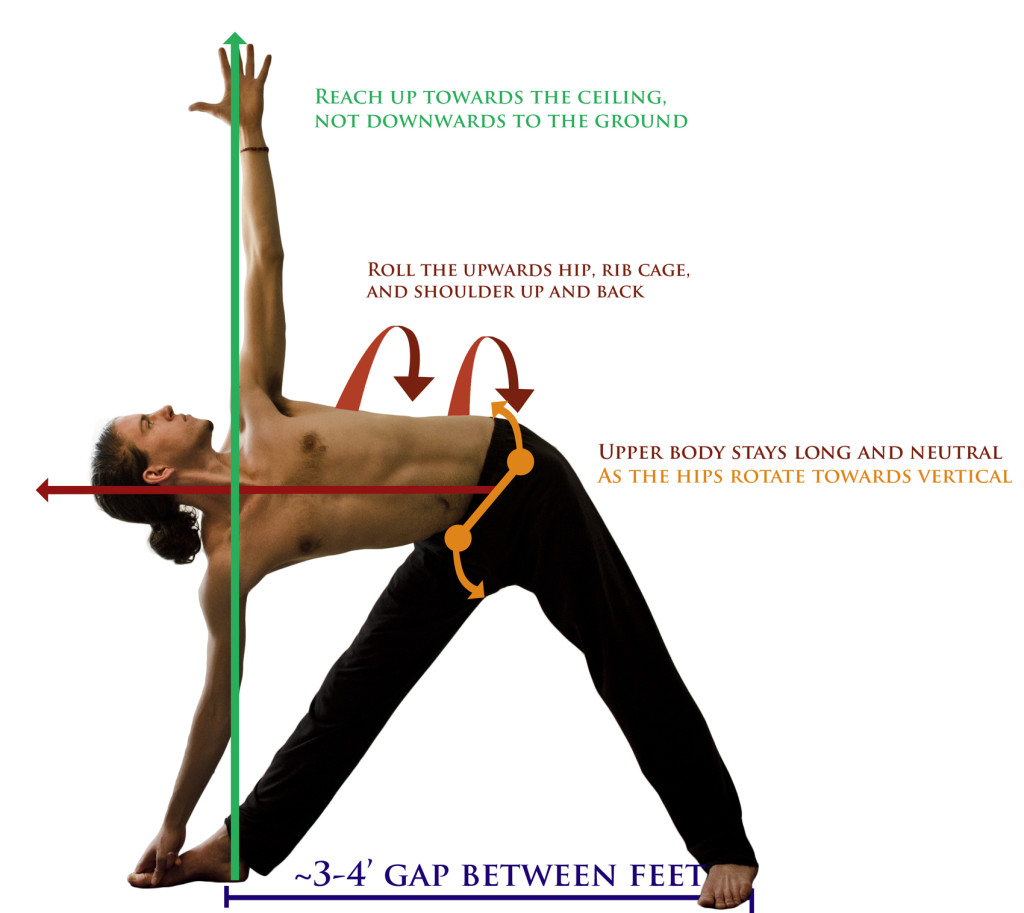
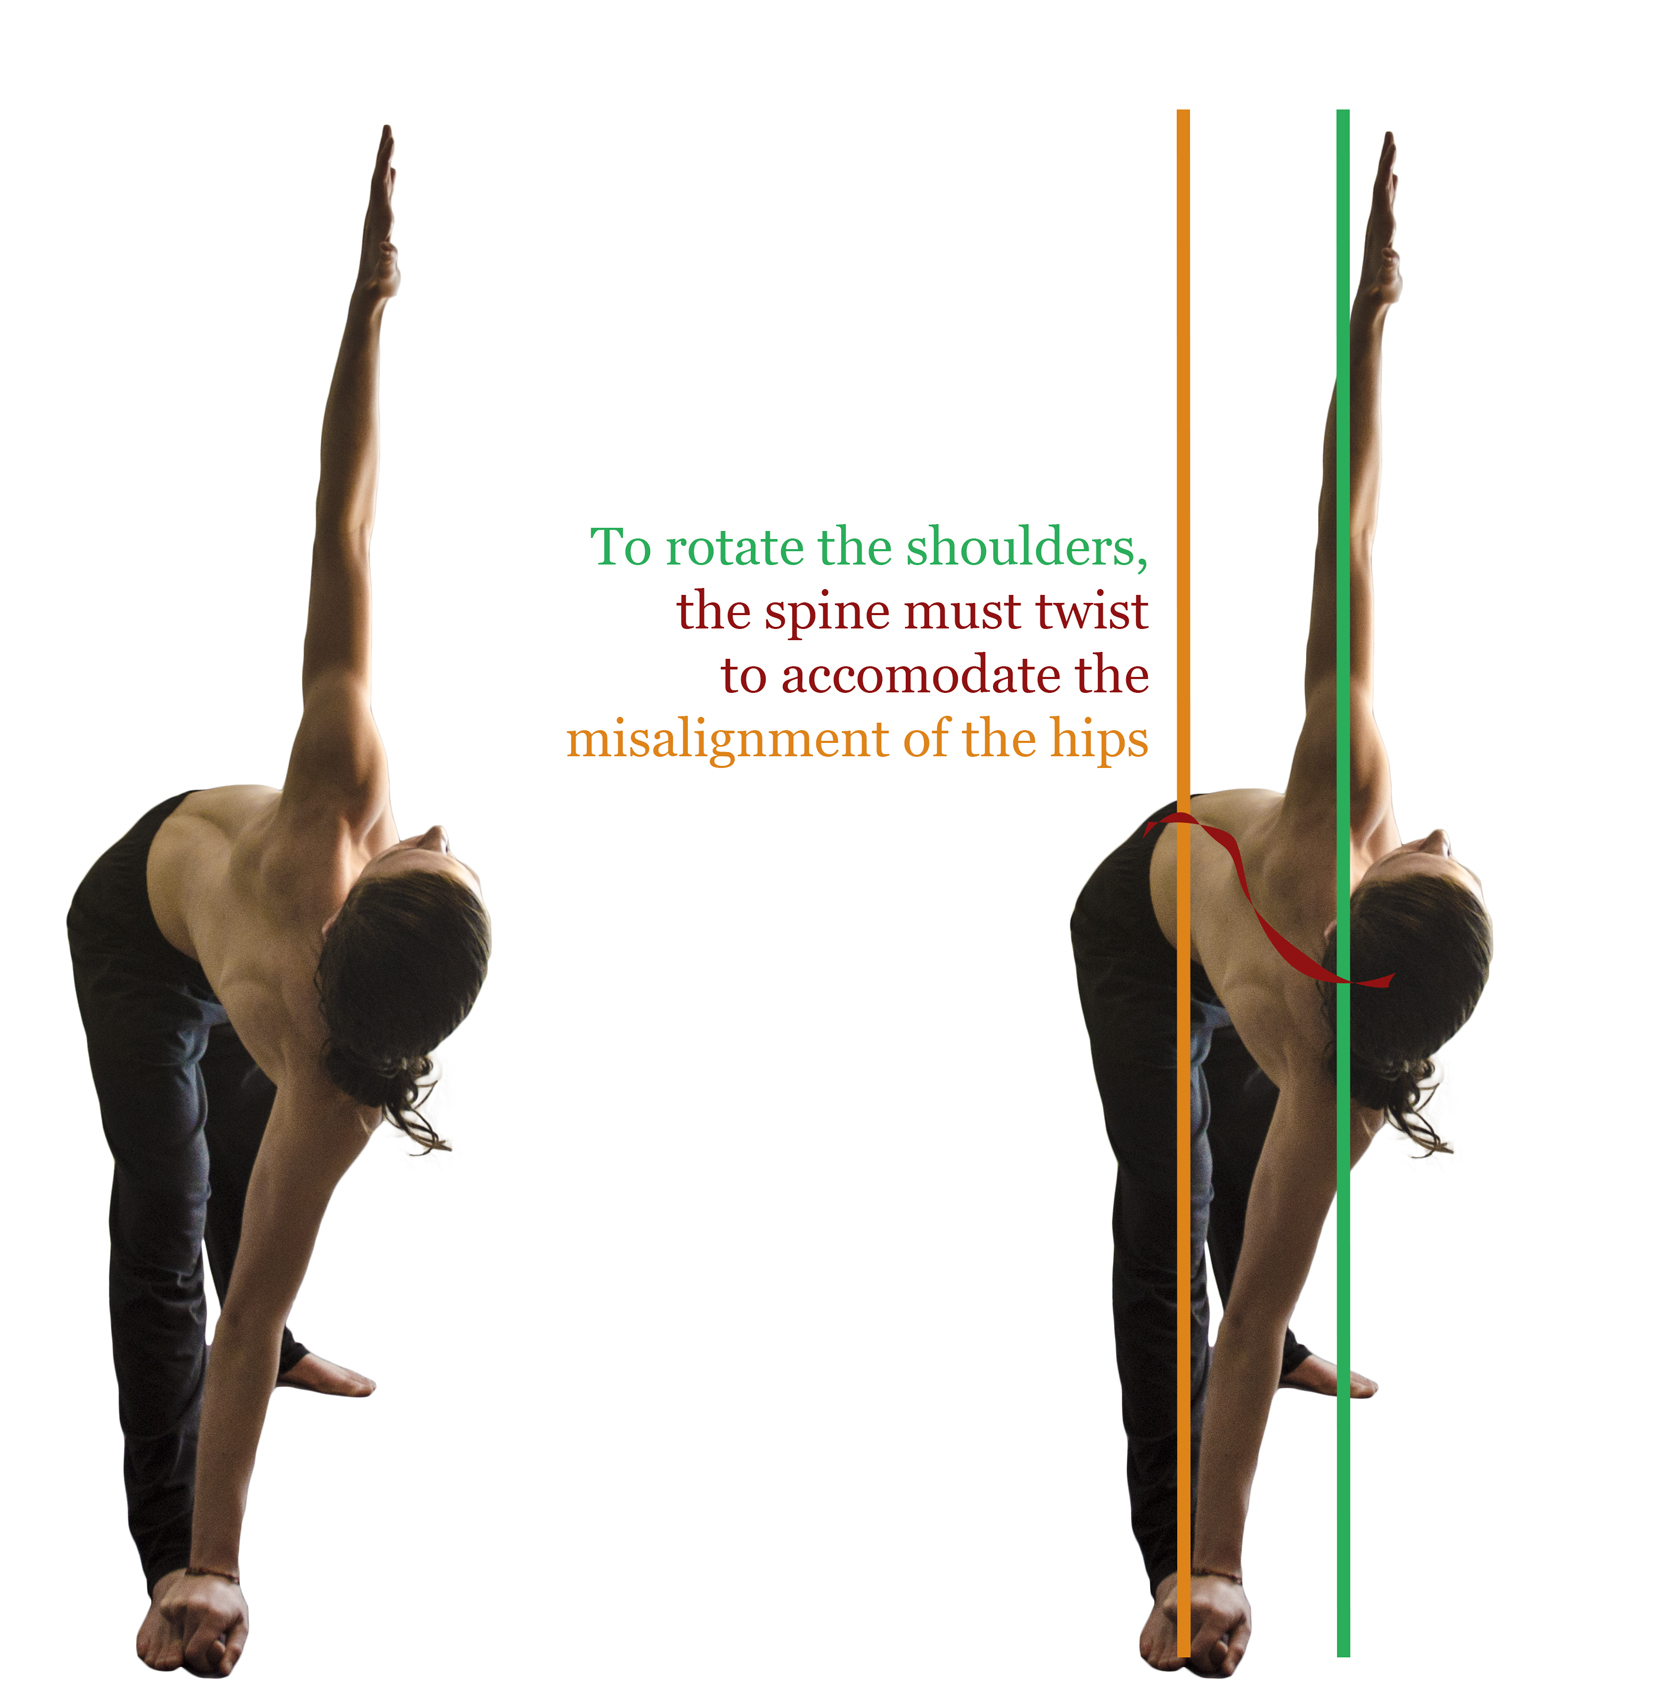
To ensure proper pelvic alignment, begin by reaching laterally with the right hand and shoulders, focusing on lifting the left hip vertically, while the right hip rotates down towards the mat. Roll the left hip up and back to prevent the body’s natural tendency to compensate by rolling the hips forward (which will result in a twisting of the spine, pictured below)
The spine has mobility through T12/L5, which means you would be able to reach the right hand closer to the foot by bending the spine laterally (lowering the shoulders towards the ground while lifting the lowest ribs upwards). Do not allow this to happen; reach for the ceiling, not the ground. Keeping the spine neutral will be more effort and you won’t be able to go quite as deep, but if you keep T12/L5 strong, you will have much finer control over the sacrum and be able to work deeply in the pelvic muscles. Press the bottom few ribs down towards the knee to straighten the spine and ensure that it does not bend laterally; you will know you are performing this adjustment correctly when you feel an intense sensation through the right side of the pelvis and in the abdomen just above the left hip.
Observe in the above photograph that the spine – represented by the red line – is parallel with the floor, and remains completely straight.
The oblique abdominal muscles take much of the upper body’s weight here – do not rest weight onto the right hand. Some practitioners may find it useful to place a block on the inside of the right foot and bring the hand onto it. This can be useful for cases in which the abdominal muscles are weak and unable to support the weight of the upper body in correct alignment. However, avoid relying on the block as a crutch, pressing firmly into the block and letting the body weight fall into the hand. Instead, lift through the side of the torso, actively resisting the force of gravity with the muscles of the trunk, which will strengthen over time. Broaden the shoulder blades, bringing both shoulders down and away from the ears by engaging the latissimus dorsi, and lift the left hand and shoulder towards the ceiling. If you can comfortably grasp the toe, lift through the upper body, making the effort of pulling the big toe up towards the face with a straight arm (bending the arm will engage different muscles-keep it straight here) and resist the movement with the muscles of the legs, pressing the hand down to the mat with the toes. There will be no movement of either hand or foot (the legs are much stronger and will be able to easily keep the foot rooted), but this movement will create an “anchor” for your hand to pull on, which is very effective for straightening the shoulders and ribs and engaging the muscles on the left (top) side of the torso.
Foot positioning is very important here as well. Small changes can make significant impact on the overall posture.

Take enough space between your feet. 3-4 feet is usually a good range. My legs are long, so my stance is almost 4′ wide. If your legs are shorter, bring the feet in a little bit, but having the feet less than 3′ apart will most likely hamper your ability to maintain proper hip alignment.

The ideal stance, in which the right big toe, right heel, and left arch are along a line, is very demanding on the flexibility of the hip. The practitioner must be able to access the ability of the right thigh to rotate externally while keeping the hips facing forward, or this foot position will simply twist the pelvis towards the right and lead to instability through the legs, knees, and ankles.
For a newer practitioner who has not yet developed the ability to fully externally rotate the thighs, it is recommended that the feet be positioned in a way that is slightly less demanding on the flexibility of the inner thighs. Bring the right heel/big toe line to intersect the front of the left arch.

Keep the ankle strong and press down through the big toe mound and inside of the ankle. Do not let the root of the big toe of either foot lift up off the ground. Keep pressing into the big toe mounds to keep weight on both inner arches.
Keep both sides of the torso long and stretching – move the entire ribcage away from the pelvis, lifting from the junction of the thoracic and lumbar vertebrae.
Side View
All the joints are in the same vertical plane – the body has simply tilted to the side, and is not twisting or leaning forward. The body floats directly above the right leg.

Common Misalignment:
The following position is common in those who experience tightness in the pelvis. In this photo, observe that the primary movement is of the spine is curving to the side (lateral flexion), rather than a rotation of the pelvis. This is due to either tightness in the hamstrings or adductor muscles, or an unfamiliarity with consciously controlling pelvic rotation. A contributing factor could be that the feet are too close together to allow effective movement.
Notice that the right side of the body is scrunched while the left is lengthening excessively – this is a sign that the movement is originating from the rib cage & thoracic spine or waist area and not the hips. Hanging folds of skin on the right side of the body are a dead giveaway for this misalignment.

Even if the hand can be brought to the big toe, a quest for perceived ‘deepness’ of the posture may lead to a sacrifice of alignment. For this reason, it is not recommended to focus on bringing the hand to the foot. As mentioned above, the practitioner’s attention ought to be on the hamstrings and adductors, not on reaching the floor. Tight adductor muscles will keep the right hip frozen, sticking the right side of the buttocks out behind the midline of the body as viewed from the front (in the picture below, the right hip is far to the right of the vertical axis of the body).

Someone who continues to practices as in the above photo – with the hips rolling forward – will eventually become flexible enough to practice something similar to the following photo, in which it can be seen that the rotation has been focused at the upper ribcage and shoulders, rather than at the pelvis and thighs, creating a twisting and bending through the length of the spine, especially observable as an extension (arching) of the thoracic spine with the bottom few ribs poking forward, visible projecting out of the abdominal muscles. This will never lead to flexibility with proper alignment – just a deepening of the twisting and misalignment of the spine!
If you find yourself in any of these positions, come back up to neutral and focus on starting the rotation in the hips and keeping it there. Practicing this against a wall can be hugely beneficial – the left heel, both hips, and both shoulders ought to stay in contact with the wall for the duration of the posture.
The next photo shows the correct posture variation if you cannot yet reach the big toe, which is accomplished by the following steps:
- Lift the torso until the spine is straight (green line);
- bring the top of the hand to the inside of the shin or leg;
- focus on keeping the hips in proper alignment (red arrows):
- roll the left hip up and back;
- Engage the abductor muscles to lengthen the tight adductors – engage the muscles you’d use to bring your right leg forward (in the direction your torso is facing). This will contract the hip abductors on the outside of the right leg and pull the hips into position while simultaneously lengthening the adductors on the inside of the leg
- rotate the right hip sideways, down towards the mat;
- focus on bringing your shoulders and hips in line directly above the legs (e.g., not leaning or twisting forward);
- lengthen and straighten both sides of the body, especially the right side (blue arrows).

When the rotational ability of the pelvis has been reached, do not be tempted to keep going by bending or twisting the spine. As your hamstrings lengthen with practice, continue rotate the pelvis degree by degree.
Regular practice of this position with correct alignment will strengthen the knees, the hips, and the abdominal muscles. Trikonasana has a synergistic effect with all positions in which the rotation of the hip is challenged, including Virabhadrasana II (Warrior II), Padmasana (Lotus), Baddha Konasana (Bound Angle/Butterfly), and many more.
Thank you. Excellent article clearly pointing out the correct method. Based on David Swenson’s notes on the same pose, he calls for the distance the leg moves as 1 leg length. This would put me in the range under 3ft. Can you explain why this makes it difficult to maintain proper hip alignment? Iyengar method calls for 3.0 ft to 3.5 ft. so he echoes what you say but I don’t see any explanation.
Martin,
Thanks for the thoughtful question.
Trikonasana puts the hips in an interesting conundrum for most people: movement, ideally, is laterally..but the more the hips stay square, the less mobility they have to rotate into the vertical position necessary for Trikonasana. So a balance needs to be struck to allow both stability in the coronal plane and mobility in the transverse plane.
Experiment with the stance length for yourself. The shorter stance will most likely create a greater twist of the spine (which is not a goal of the position). For example, if you practiced on the right side, the left hip would go forward and the right hip collapse back (relative to the direction you’re facing-the long edge of the mat). The reason I do not recommend this is that it tends to create a twist and shear across the lower back and puts the shoulders in a different plane of movement from the hips and legs. It ends up looking like the third common mistake photo (posted above). So having the closer stance distance is much more demanding in terms of hip flexibility, and it tends to compress and shorten the spine. There’s nothing wrong with a shorter stance per se..I just meet very few people who can pull it off effectively. And if you’re not doing asana effectively, there’s no juice. It’s hard to grow and progress. So the short stance could perhaps be thought of as an advanced position.
An easy way to find a good stance is to take Chaturanga Dandasana. Make sure your arms form right angles at elbow and wrist (lay down on the mat if necessary). Step right right foot forward directly between the hands to Trikonasana. This stance will be a little bit longer than one leg length – it’s the distance from the heel to the base of the rib cage. It should allow you easier access to the vertical rotation of the hips without twisting to the sides. Focus on lengthening the spine – connect bandhas&breath to spread into the small of the back and the back of the diaphragm, straightening and stretching the spine (this will also lengthen the sides of the waist and the space between the ribs).
Let me know how it goes!
Hi Griffin,
Thank you for your thoughtful and insightful response. What you say about stance length makes sense. I did as you suggested with Chaturanga Dandasana (CD) and it is around 40″ or so when placing the rear heel where the toes were in CD above. Feels pretty good. Now I just need to work on the flexibility of hip and pelvis. Practice, patience should improve this but I am realizing, as you emphasize in the article that not compromising the spine straightness is key in this pose.
Namaste.
M.Deehan RYT200
Yes, I would say that in every pose the position of the spine should be of primary importance.
As Gregor Maehle writes in Ashtanga Yoga Practice & Philosophy, “sacrificing the alignment of the spine defies yogic principles.”
This pose has the potential, when practiced without mindfulness, to disadvantageously 1) twist the spine, 2) extend the spine, shortening and compressing the back, 3) laterally bend the spine 4) slope at an angle upwards or downwards. So there’s quite a lot to consider!
Another factor for stance is the relative length of body parts. I picked up David Swenson’s practice manual after your comment – notice that in the photograph, his hips are aligned forward, and his spine is parallel to the ground while grasping the big toe. That is an important indicator of an effective position in both extended and revolved triangle. Many people taking a shorter stance will be in a slight (or significant) forward fold, e.g., their head is lower than the pelvis – they need a longer stance. So we also need to take into account the length of the arms relative to the flexibility of hip/leg. Some people have short arms relative to their leg length (calling for a longer stance), and vice versa.
Hi Griffin
Thanks for this extremely detailed focus on Trikonasana. I’m training to be a yoga teacher and Trikonasana is the posture I have to study in depth and present to the group. Your explanation is amazing. I will be studying it in much depth. I have only just found your website so am looking forward to looking at your other postures.
Many thanks
Frea
Glad you find it helpful! Good luck with your training. Write in if you have any questions or want to chat about Yoga 🙂
Hai griffin, I am jatin from india studying yoga at RIMYI(Iyengar institute) in India. I am practising daily at home and today i have tried trikonasana as per your guidelines and it is miracle my spine is in complete cetral position during right hand side bending and it feels me very exciting. Thank you very much.
Can you send some tips for tadasana because when i joint inner heels and inner toes my inner legs above the knees are not touching each other. Further i do not feel balance and steadiness in tadasana.
Jatin,
Thanks for writing in! I’m glad you found the information helpful.
For Tadasana, which we call Samasthiti in the Ashtanga tradition, I recommend you do not put your heels together. The big toes may touch. Putting the heels together will not allow your ankles to be straight, and your weight will be on the outer heel rather than centered. Instead, let the anklebones touch (or have a slight gap) but let the heels be 2-5cm apart.
There is no need for your inner leg above the knee to touch. That depends on the shape of the femur and pelvic bones. Some people will just not have contact, which is OK.
Here is some additional information from my page on “Surya Namaskara A” which describes the Samasthiti position:
With the big toes touching and the heels slightly parted, lift the toes up, waking up the soles of the feet. Check your balance to make sure your weight is even; not standing on one foot more than the other. Draw the ankles towards one another to feel the outer arches of the feet lift and become defined. This should give the sensation of the roots of the big toes pressing down firmly. You may also feel some weight shift back towards the heels. Reach down through the heels
Engage the quadriceps, lifting the kneecaps to actively balance.
Straighten the spine and elongate the crown of the head towards the ceiling by extending the heels down into the earth, bringing the spine into a long, taut position.
In this position (and many yoga positions), we attempt to reduce these curvatures to lengthen the spine and decompress the vertebrae, which has the effect of increasing your height. In other words, the spine moves from a curvy S position – or, in some cases, the spine may have one dominant curvature, with the appearance of a ‘ ( ‘ – towards a straight line: |
It is not desirable for the spine to actually become straight, but that is the easiest way to describe the feeling of this posture, which strengthens the spine and reduces any excess curvature. This movement is done in several stages:
Pelvis floating between the two extremes of rotation. Depending on your spine, you may need to rotate it either anteriorly (‘lift’) or posteriorly (‘tuck’) to find a neutral rotation that supports the lower back.
Lift the rib cage and expand the chest and back – this is accomplished by spreading the shoulder blades to the sides (laterally) rather than squeezing the shoulder blades together behind the back. Be careful not to bend backwards. At the same time, the abdominals are engaged to prevent the bottom edge of the rib cage from ‘flaring.’ (You can check using your hands – if you can clearly feel the bottom ribs, “tuck” the ribs into the abdomen.)
Reposition the shoulders by lifting the arms in front of you, stretching the shoulders forward, then lifting the shoulders towards the ears, then moving the shoulders backwards, then bending the arms at a 90 degree angle and pressing down through the elbows towards the ground and slightly to the side. Continue to expand the shoulders to the sides as described in the previous step. After the shoulders are in position, bring the palms to hover by the sides of the thighs, but keep a slight tilt in the elbow and keep the muscles of the arm lightly engaged by reaching the fingers towards the mat.
Look down the length of the nose to feel the back of the skull lifting very slightly from the vertebrae of the neck. The head often needs to move back slightly in space so that the ears float above the shoulders.
The state of Samasthiti is feeling that the entire body is aligned on one central, vertical axis that pases through the center of the body along the inside edge of the spine, extending up through the crown of the head and down from the tailbone to the heels, into the earth.
What an excellent article! Thank you very much!