
Prasarita Padottanasana

Note: Touch or hover your mouse over underlined terms for a definition.
- Prasarita: Spread
- Pada: Feet
- Uttana: Stretched / Spread out
- Asana: Pose
This is the seventh position of the Ashtanga Standing Series. It consists of four movements, Prasarita Padottanasana A, B, C, & D. (Pictured above: D)
The essential aspect of this pose is, like all forward folds, a lengthening of the hamstring muscles and rotation of the pelvis. The entire back side of the body, from the heels to the hips, down the spine to the neck, lengthens and relaxes while the front side of the body takes the effort of balancing.
Contraindications: Any injury in the spine should be treated with great caution. Lumbar injury, especially, may be exacerbated by performing this position incorrectly. Rounding of the spine (see: ‘Common Mistakes’, below) can place a great deal of stress on the vertebrae. If you’re practicing with an injury, seek the guidance of an instructor to ensure that this position is performed healthfully. If you have a condition that affects your heart or blood pressure, be careful with bringing the head lower than the heart, which may induce dizziness.
Vinyasa to Enter Prasarita Padottanasana:
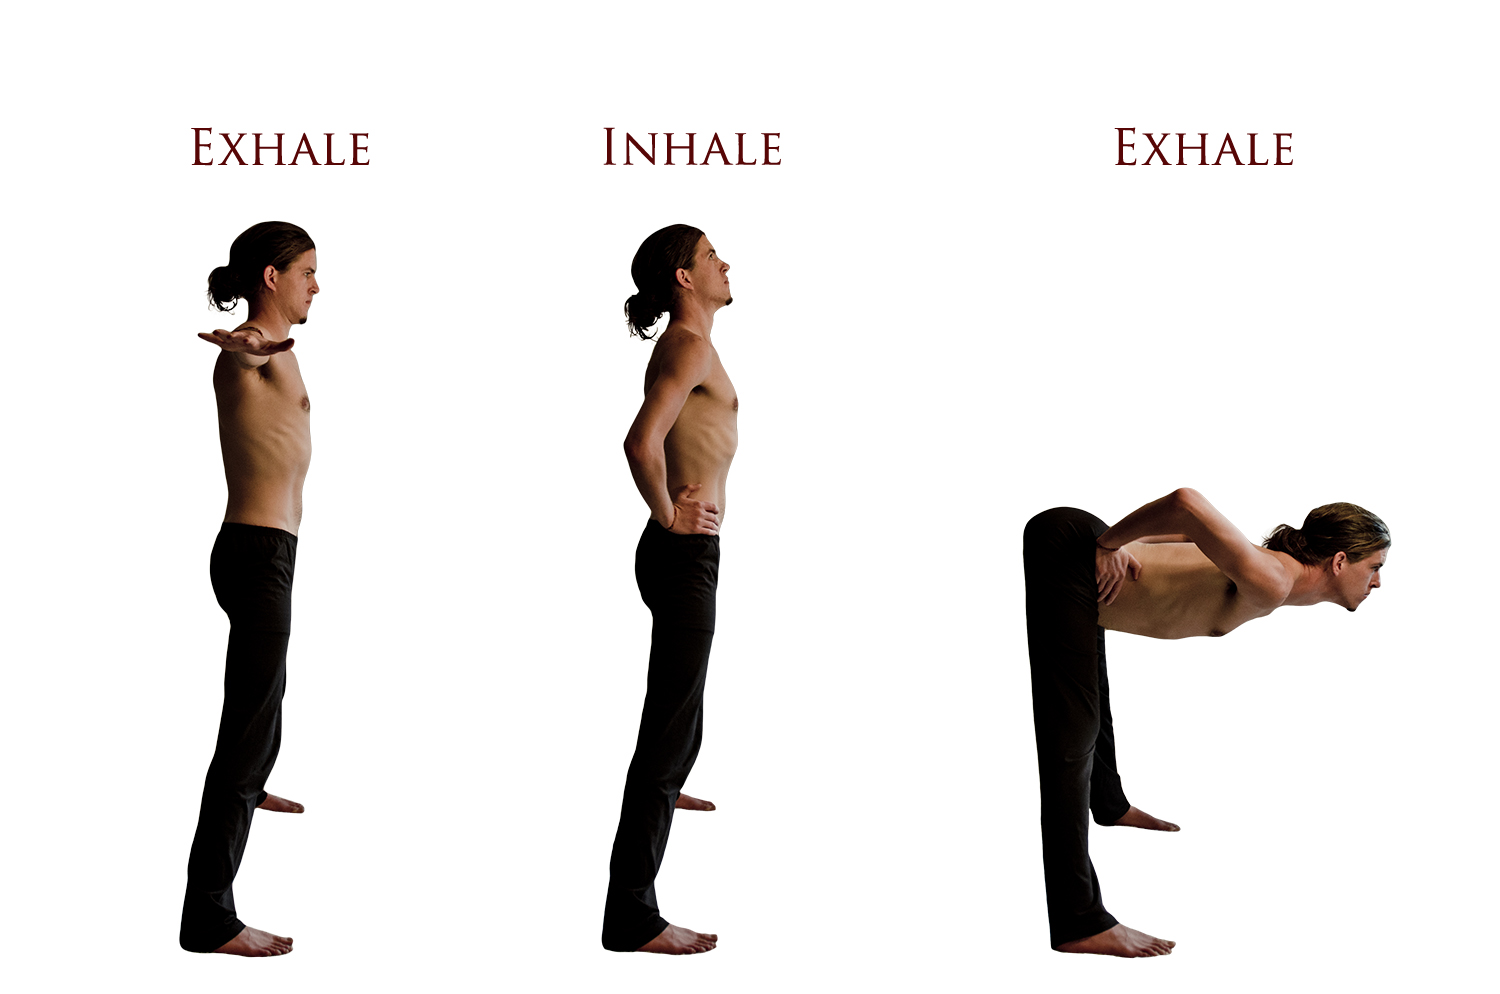
From Samasthiti, inhale and step your right foot back 3-4′ and pivot the entire body 90° to face the side. Bring the toes in slightly, so that the edges of the feet are parallel to the edges of the mat.
Exhale, reach the hands to the sides, parallel to the mat with fingers spread wide.
Inhale, Press the palms into the waist and look slightly upwards.
Exhale, rotate the hips forward, guiding with the hands if you find it helpful. Allow the upper body to be dragged along by the motion of the pelvis with the head coming down last. Proceed to Prasarita Padottanasana Variation, A, B, C, or D during the exhalation.
Stage 1 Variation:
This variation can replace any or all of the 4 positions. As such, it should be repeated 4 times, with Vinyasa between each 5 breaths.
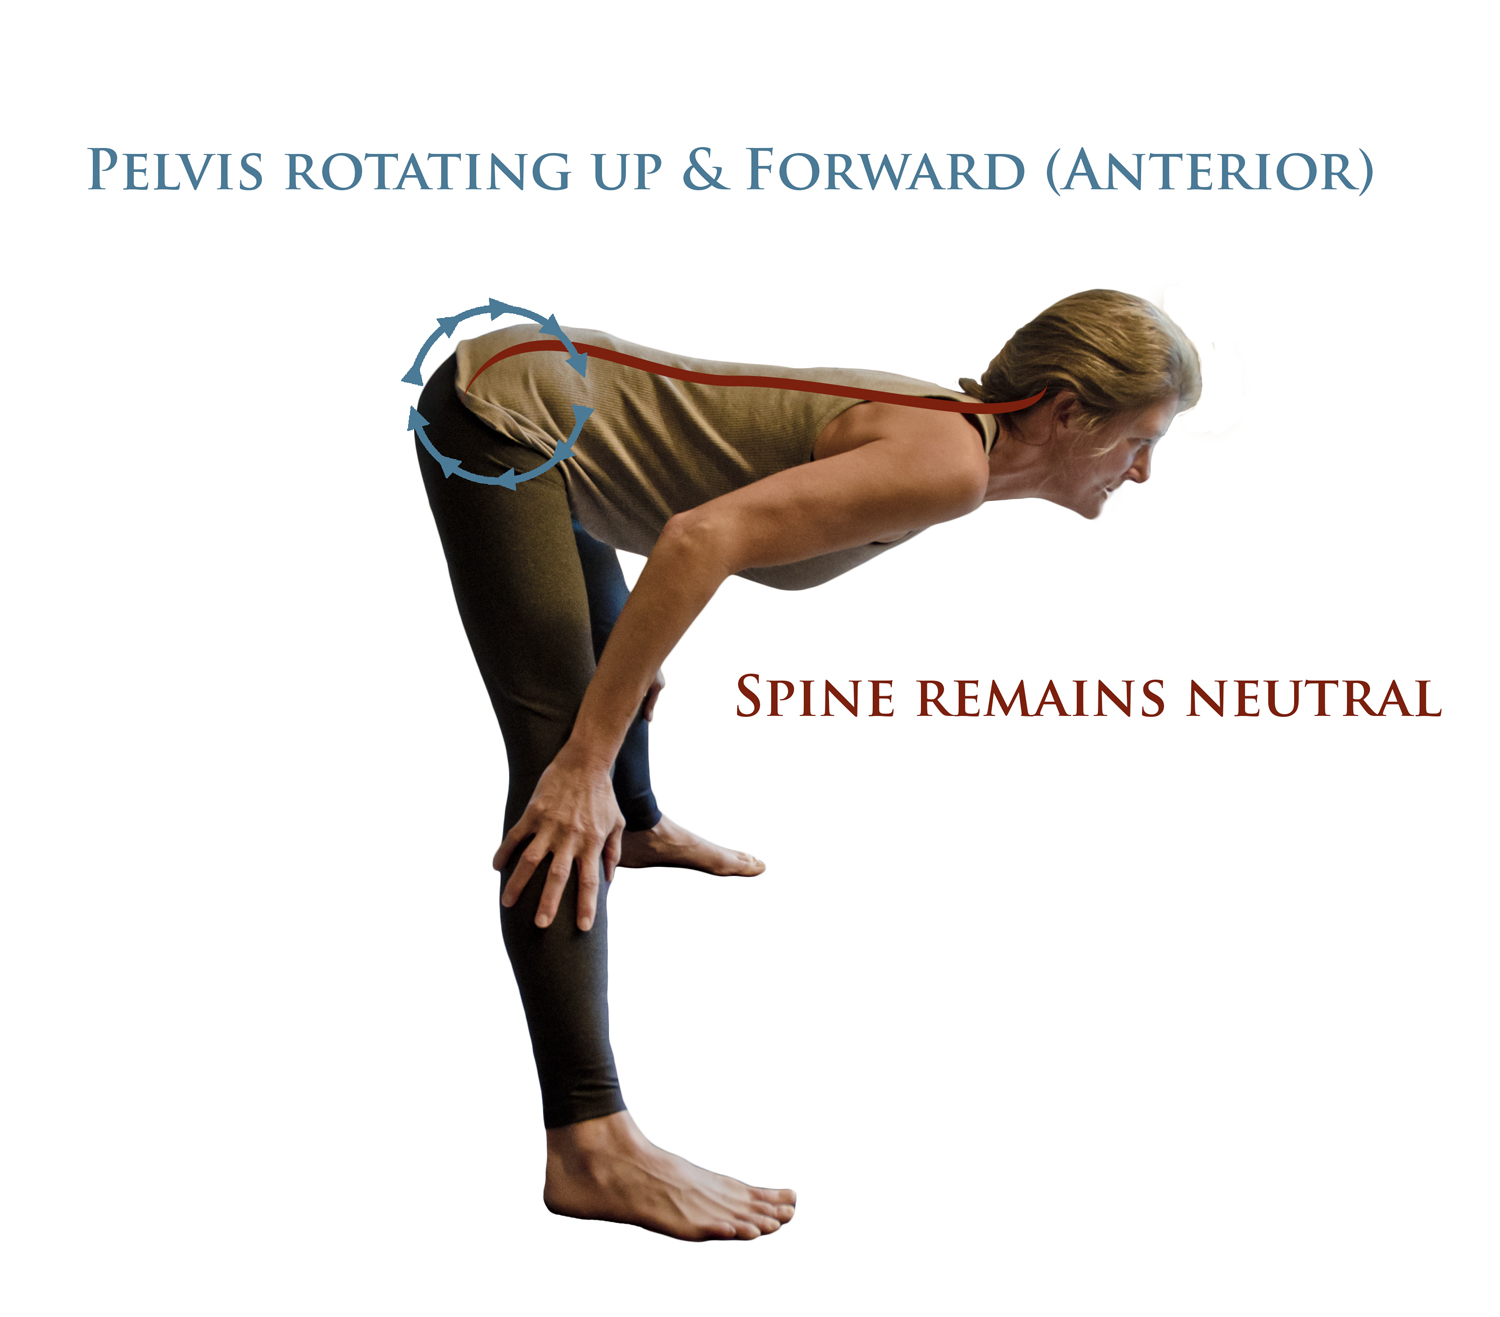
It is essential that the spine be kept in a relatively neutral position. As seen in the photo above, the natural curvature of the spine is reduced somewhat, but all 4 spinal curves remain visible. If your hamstrings are tight, you may be tempted to round the spine to reach the hands to the mat or lower on the legs. Instead, take this variation, keeping the hands as high up on the legs as you need to isolate the movement of this asana in the hips and sacrum. Keep the shoulders and gaze lifted to prevent rounding (flexion) of the spine.
Moving from the hips will fold the body in a wave-like motion: first the sacrum and hips, next the abdomen, then the rib cage, and finally the head.
As the hamstrings lengthen, integrate the advanced variations, but be mindful that the spine remains neutral.
Take 5 deep exhalations and return to neutral by:
Exhale, hands to waist.
Inhale, lift to standing
Repeat Vinyasa as described above for next 5 breaths.
Prasarita Padottanasana A:
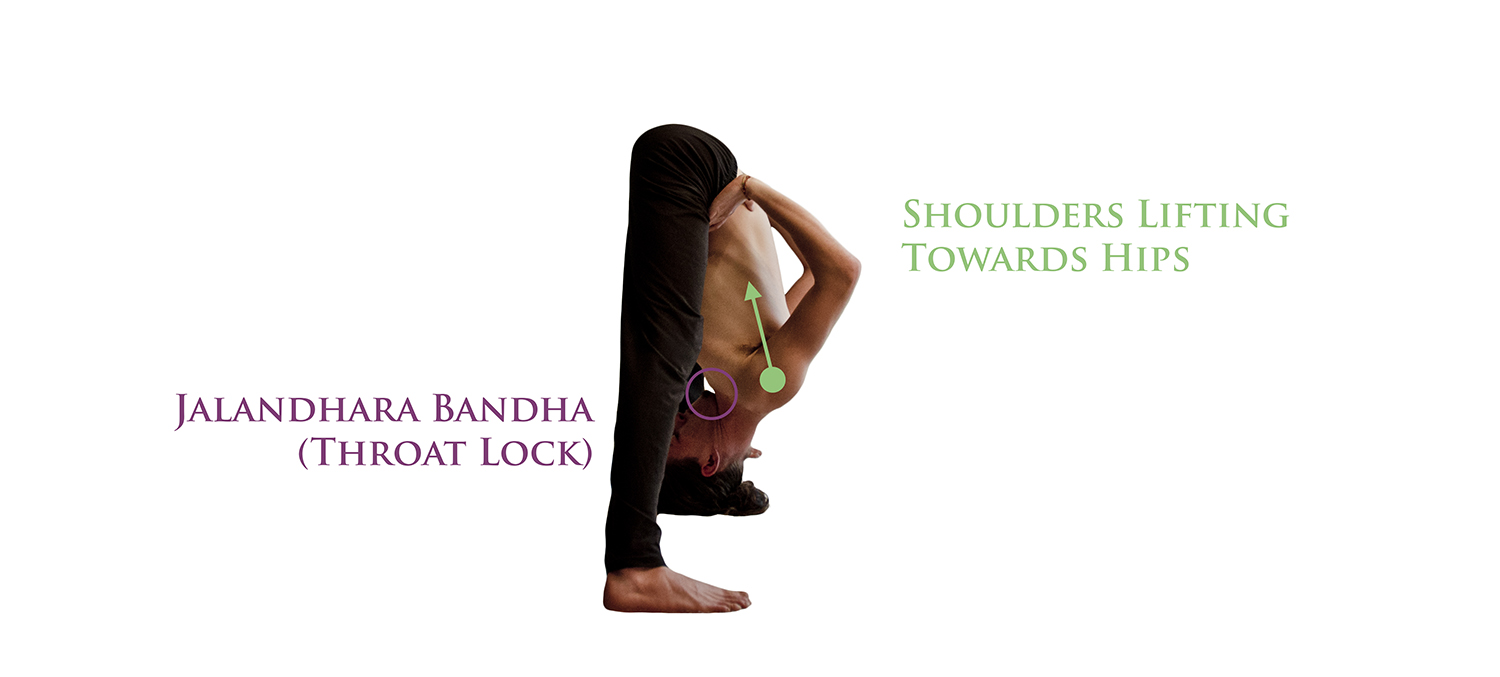
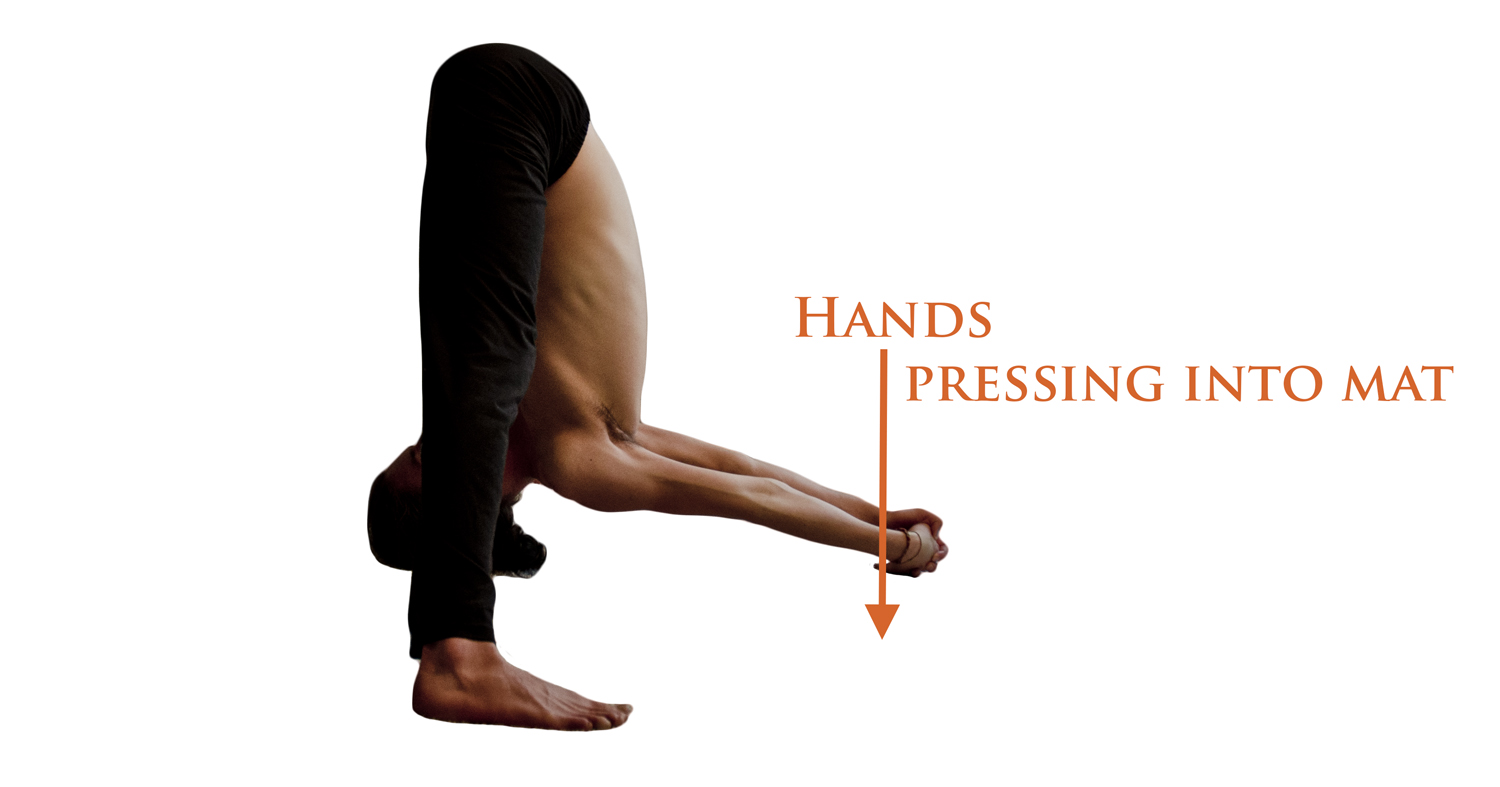
Note: for all the advanced variations, a point on the head called the ‘bindu’ (Sanskrit for ‘dot’ or ‘point’) presses into the mat. This is a point about one hand-width back from the crown of the head, where the skull begins to round. If the head does yet not reach the mat, continue to look forward and attempt to arch the back as you rotate from the pelvis.
From Vinyasa, continue to exhale as you place the hands on the mat between or slightly behind the feet.
Inhale, look forward. Straighten the arms and press the sternum down towards the mat, lifting and rotating the hips anteriorly to lengthen the hamstrings, as if trying to arch the back.
Exhale, fold forward fully, pressing the palms down into the mat to use the muscles of the chest and shoulders to fold. Tuck the chin into the throat (jalandhara bandha – see variation B for clearer view) and press the bindu into the mat. Keep the shoulders lifting towards the hips, palms pressing into the mat.
Take 5 deep exhalations.
Inhale, keep the hands on the mat as you lift halfway, looking forward.
Exhale, palms to waist.
Inhale, lift to standing.
Repeat Vinyasa to enter the next variation.
Prasarita Padottanasana B:
From Vinyasa, continue to fold forward as you exhale, until the bindu comes into contact with the mat. Press the hands into the waist, keeping the shoulders active, lifting through the elbows. Press the head down into the mat.
Take 5 exhalations.
Inhale, lift all the way to standing.
Prasarita Padottanasana C:
In the second step of Vinyasa, interlock the hands behind the back as you inhale and look upwards.
Exhale all the way down, bringing the hands overhead.
Press the bindu into the mat, and press the hands down, if possible touching the hands to the floor. Be mindful that the shoulders are lifting towards the hips, rather than allowing gravity to pull the shoulders down towards the neck.
Hold for 5 exhalations.
Inhale, lift to neutral, keeping the hands interlocked until you’re standing upright.
Take Vinyasa to the next variation.
Prasarita Padottanasana D:

As you exhale from Vinyasa, grasp the edges edges of the feet, sliding the fingers beneath the soles of the feet.
Inhale, keep the arms straight as you look forward. Press the sternum down to the mat and lift the hips, as if arching the back.
Exhale, use the strength of the shoulders to fold forward fully, reaching and lifting the elbows. Press the bindu into the mat.
Take 5 exhalations.
Inhale, keep the fingers beneath the feet as you lift halfway, straightening the arms and looking forward.
Exhale, hands float to waist.
Inhale to standing.
Exhale, reach the hands to the sides, turning the left foot to face the front of the mat. Step forward to Samasthiti.
Analysis:
Breathing: Be sure to inhale fully as you lift to standing. Take your time; don’t rush to a standing posture. You may feel dizzy if you lift too quickly. In inversions, when the head is below the heart, the veins carrying blood to the head relax their pumping action and dilate, since gravity is providing most of the force. If you lift too quickly, the veins will not be able to constrict quickly enough to match the movement. The dizziness is a symptom of vasogenic shock – a medical term which means that blood pressure in the veins is momentarily too low to pump blood against gravity to the brain. If you notice feelings of dizziness, take a few moments extra lifted halfway with the head at the level of the heart to allow the veins to constrict. Inhalation during is essential because inhalation not only supports the spine as it lifts the bodyweight, but increases heart rate. The increase in heart rate will help support blood flow more effectively than exhalation, in which heart rate is reduced.
Picking your stance:
Stance width is determined by the length of the spine relative to the length of the legs. Ideally, the pelvis will be at a height equal to the length of the upper body. The distance from the pelvis to the floor is modulated by the distance between the feet. 3-4′ will typically be sufficient.

With a total body height of 6’2″, a stance of just less than 4′ is effective.
Taking a stance that is too wide may be tempting if you’re focusing on bringing the head to the ground rather than maintaining posture. If the pelvis is too low, there will not be enough room between the pelvis and the floor to accommodate the length of the upper body. This forces a rounding of the back, and thus is to be avoided. A proper stance distance may feel a bit too short at first, but you’ll ‘grow into it’ as the hamstrings lengthen.
Be mindful also of the ankles. If the ankle joint is weak it may ‘roll’ to the outside. This can be seen visibly in the feet as a lift of the inside edge of the foot up from the mat and an increased pressure on the outer toes. The skin around the toes or outside edge of the foot may become white as it is compressed by the body’s weight. Correct this by pressing down through the big toe mounds, inside of the heel, and pressing the inside of the ankle towards the mat. To find a stable balance on the feet, spread the toes and sole as wide as you can, increasing the surface area of the foot on the mat. Lift the toes to strengthen the arch. Avoid gripping with the toes.
Ensure that the outside edges of the feet are parallel to the edges of the mat. It may be tempting to turn the toes diagonally outwards to increase the sense of balance or to stabilize the ankles. This movement is created by rotation of the thigh in the hip socket, which may torque the knees, increase compression in the lower back, and shift the muscular emphasis of the asana.
Common Mistakes:
The typical mistake here is a rounding of the back, leading with the head rather than the pelvis. This is evidenced by a pronounced rounding of the lower spine and a posterior rotation of the pelvis.

Since this position emphasizes hamstring flexibility, we need to look at pelvic movement – the degree of anterior rotation of the pelvis is an indicator of hamstring flexibility. If the pelvis is in posterior tilt, the hamstrings are quite tight. Switching to variation 1 will help train the pelvic rotation necessary to produce the posture. Without awareness of pelvic tilt, or if the pelvis is ‘frozen’, the body will compensate to produce the ‘look’ of the asana by moving from the spine and upper body rather than the pelvis. This will serve only to reinforce this pattern of movement of bending from the waist rather than the hips, which is most likely a habitual movement outside of Yoga practice as well (kyphotic curvature). Creating this movement entirely from pelvic tilt will increase awareness of the area and loosen the muscles and ligaments of the back side of the core – hamstrings, glutes, lower back, etc – which is essential for the health of the spine and pelvis. Creating the movement from movement of the head or spine is ineffective in the sense it reinforces a kyphotic curvature to the spine (already predominant in many who use chairs, cars and computers) and does not address pelvic tightness.
In addition to being ineffective, this movement places stress on the vertebrae of the lower back and encourages bulging of the discs. It is typically the result of either lack of awareness in the spine, or an overeagerness to complete the full posture. To correct this posture in the case of lack of flexibility, lift to variation 1 and focus on rotating the hips. If flexibility is present, practice the Vinyasa and focus on creating the movement with the pelvis.
As with many Yoga positions, correct posture can be determined partly by looking at forces of motion within the body. We want to force of motion aligned in the spine, beginning with the sacrum.
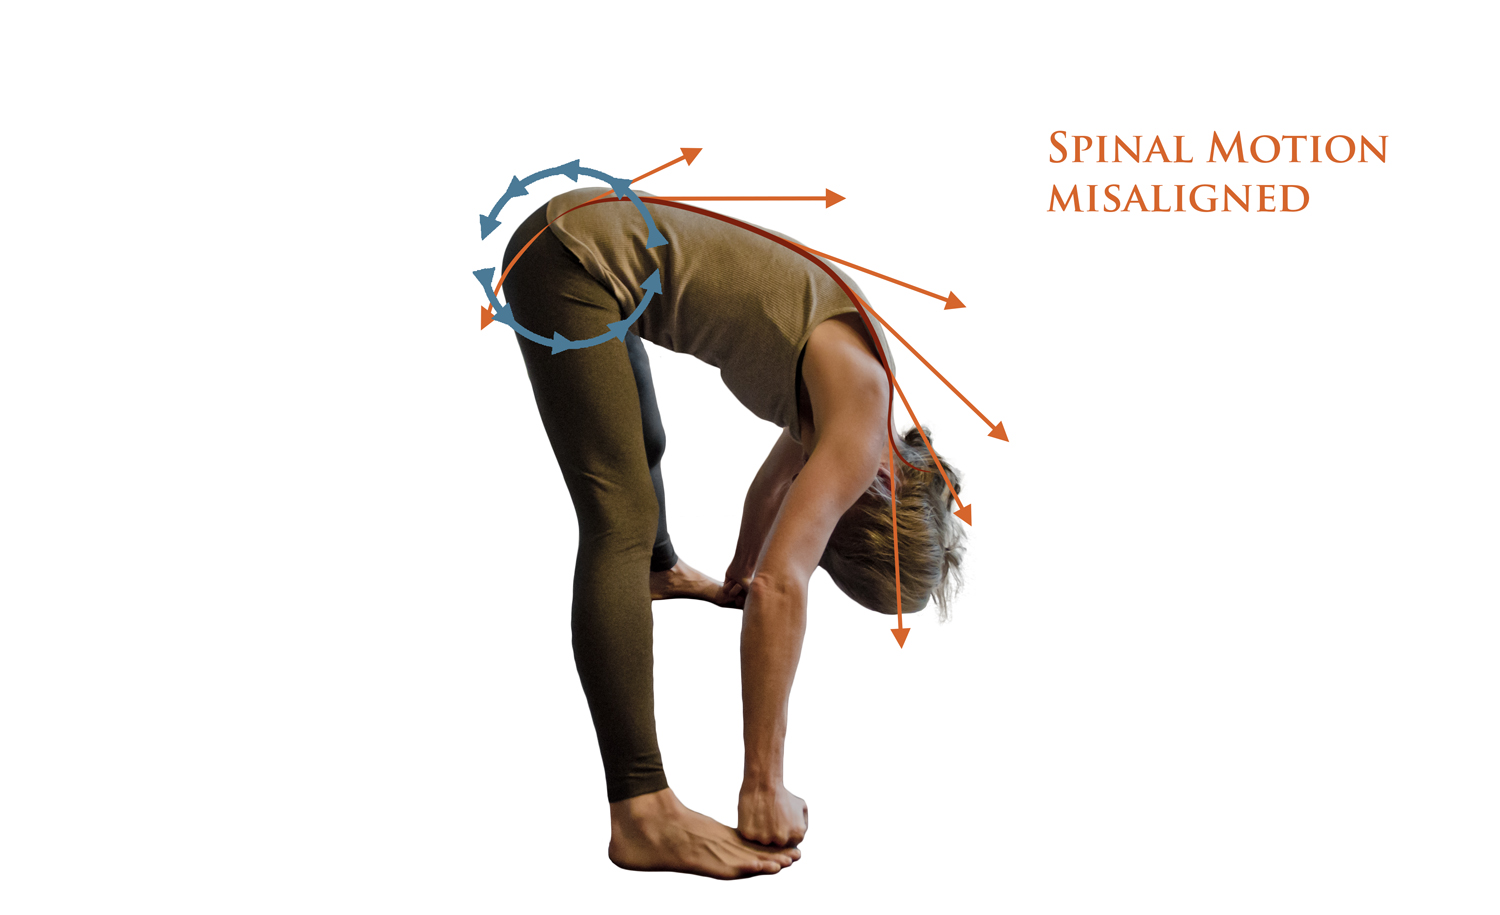
Here, force of motion is scattered in many different sections, and the different parts of the body are working against each other. As illustrated by the arrows, the crown of the head is pressing straight down, but the sacrum is aligned up towards the ceiling. There is no cohesiveness to this movement.
Compare to the same movement created with pelvic rotation:

This photo shows force of motion in variation 1 (hands on shin or thigh), which is aligned. The slight variation of just a few degrees between the various sections of the spine reflects natural curvature, which should not be reduced. This focuses the effort of the stretch into lengthening the hamstrings and spine.
Consider the entire neutral spine a unit; do not move the 4 segments independently of each other. The degree of rotation present in the sacrum and lower back determines the position of the entire spinal column.
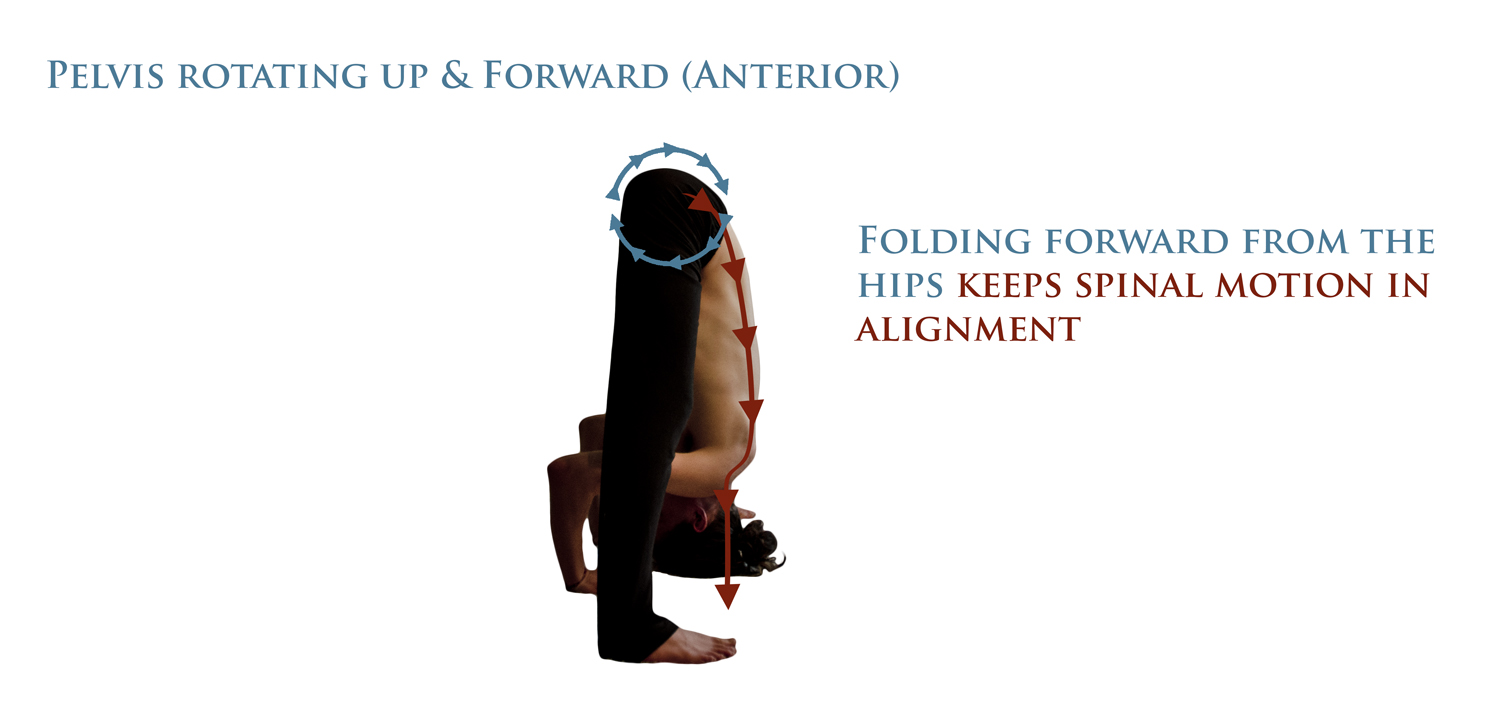
As the hamstrings lengthen, force of motion through the spine can be directed into more and more of a vertical axis until the head reaches the floor:
The above picture is in the case of healthy hamstring flexibility.
working out additions to our teacher training program, i really appreciate your accuracy of execution an description of the asanas….thank you!
Roxi,
I am honored that you would use this as a resource! Best of luck with your teacher training. Send me an email to g@up4yoga.com if you’d like to discuss approaches further.. I always enjoy sharing between teachers 🙂
Griffin
hi………..
I have a sliding sacral and how I will discuss? thanks alot if yours help me ….
Hi,
I’m not sure exactly what you mean. Are you referring to Spondylolisthesis?