Posts by: Griffin

Parsvottanasana

Parsvottanasana

Parsvottanasana both

Note: Touch or hover your mouse over underlined terms for a definition.

The following is a discussion of the position on the right side, as pictured. As an asymmetrical posture, it must be repeated on the left side.

  • Parsva: Side
  • Uttana: Stretched / Spread out
  • Asana: Position

This is the eighth and final movement of the Ashtanga Standing Series.

Following the symmetrical stretching of the hamstrings in the previous position (prasarita padottanasana), the hamstrings are now lengthened asymmetrically. The elements of backbending essential to all forward folds (the lifting and broadening of the front body, especially the arc of the collarbones) is encouraged by the positioning of the hands between the shoulder blades. The essential aspect of this pose is, like all forward folds, a lengthening of the hamstring muscles and rotation of the pelvis. The entire back side of the body, from the heels to the hips, down the spine to the neck, lengthens and relaxes while the front side of the body takes the effort of balancing.

Contraindications: Any injury in the spine should be treated with great caution. Lumbar injury, especially, may be exacerbated by performing this position incorrectly. Rounding of the spine (see: ‘Common Mistakes’, below) can place a great deal of stress on the vertebrae. If you’re practicing with an injury, seek the guidance of an instructor to ensure that this position is performed healthfully. If you have a condition that affects your heart or blood pressure, be careful with bringing the head lower than the heart, which may induce dizziness. The placement of the hands may exacerbate injuries to any of the 4 joints of the shoulder. 


Stage 1 Variation

From Samasthiti, step the right foot back, pivot on both feet to face the rear of your mat. Take a relatively short stance, 2-3 feet. The left foot is angled 45° towards the left. Ensure that the right big toe is straight forward, and not angling towards the right.

Wrap the left hip around towards the right thigh, turning the pelvis fully. Grasp opposite elbows behind your back. Squeeze the shoulder blades together and towards the hips (the action of the rhomboid muscles) to encourage the broadening of the front of the rib cage. Do not allow the shoulders to droop around the neck.

Parsvottanasana alt grip


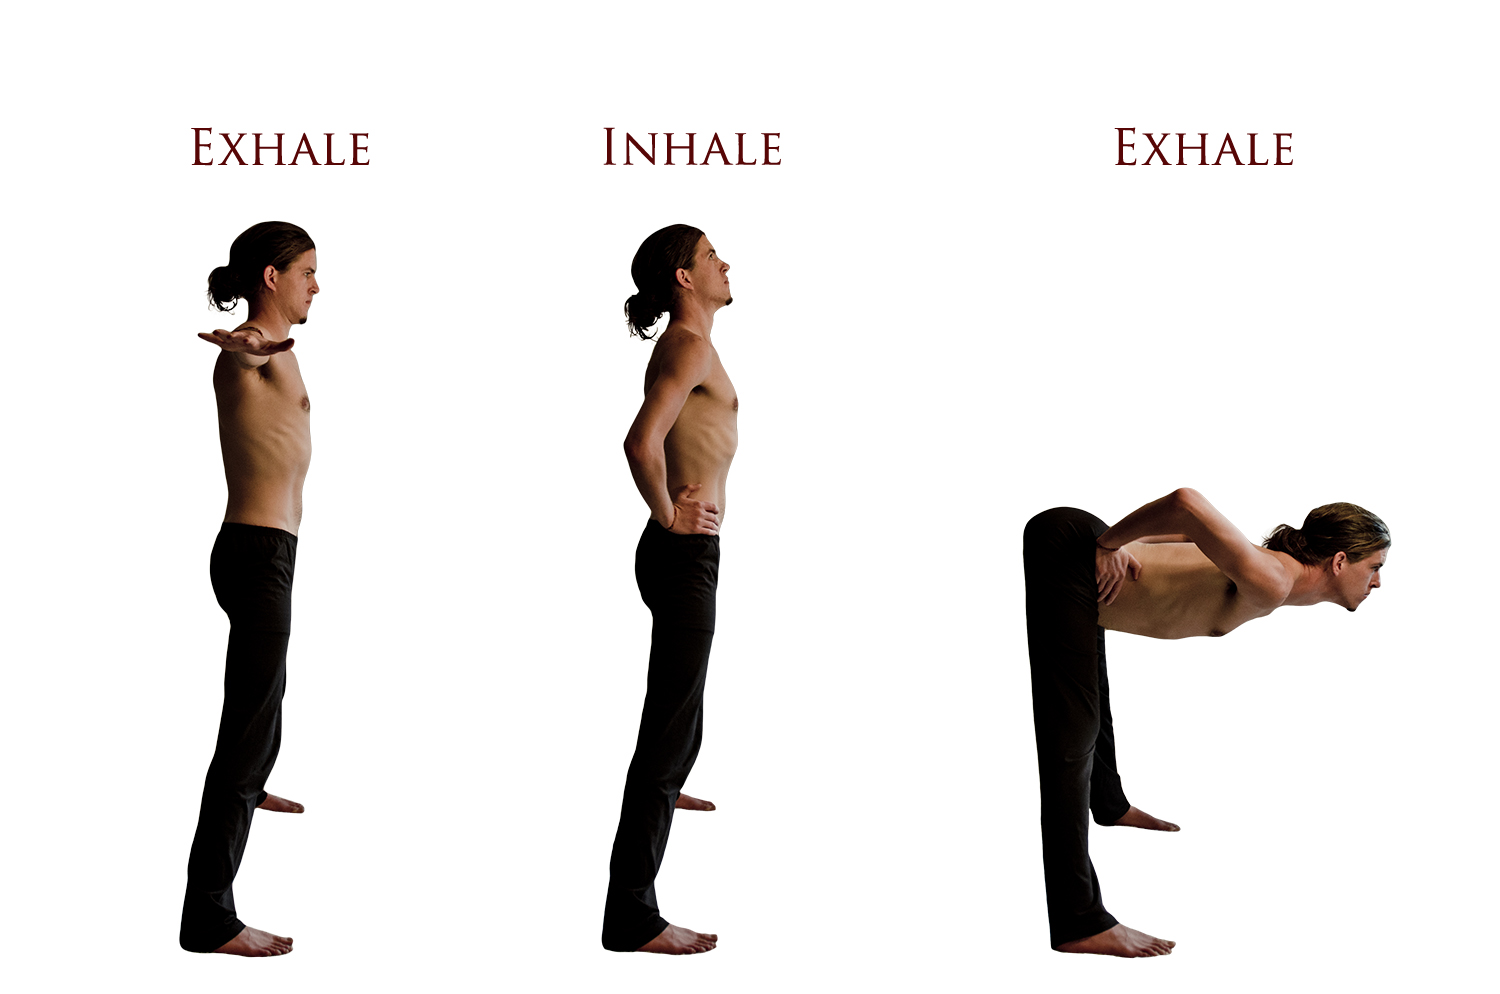
Inhale and arch the spine, looking upwards (pictured below) and lifting the rib cage and head vertically towards the ceiling to elongate the lower back. Keep this length as you fold forward, deepening the right hip crease. Be careful to only create this motion by the rotation of the pelvis — the upper body stays broad and active, resisting the movement by lifting towards the ceiling. Stop shy of the point where the back begins to round or curve.

Parsvottanasana j side m


Stay here for 5 breaths, then inhale to standing. Exhale, pivot to face the front, repeat on the left side for 5 breaths. Inhale to standing, exhale to Samasthiti.


Parsvottanasana 

From Samasthiti, step the right foot back, pivot on both feet to face the rear of your mat. Take a relatively short stance, 2-3 feet. The left foot is angled 45° towards the left. Ensure that the right big toe is straight forward, and not angling towards the right. Keep the pelvis square — don’t allow the left hip to fall back. Press the palms together behind the back, between the shoulder blades.

Inhale and arch the spine, looking upwards (pictured below) and lifting the rib cage and head vertically towards the ceiling to elongate the lower back.

Parsvottanasana Prep

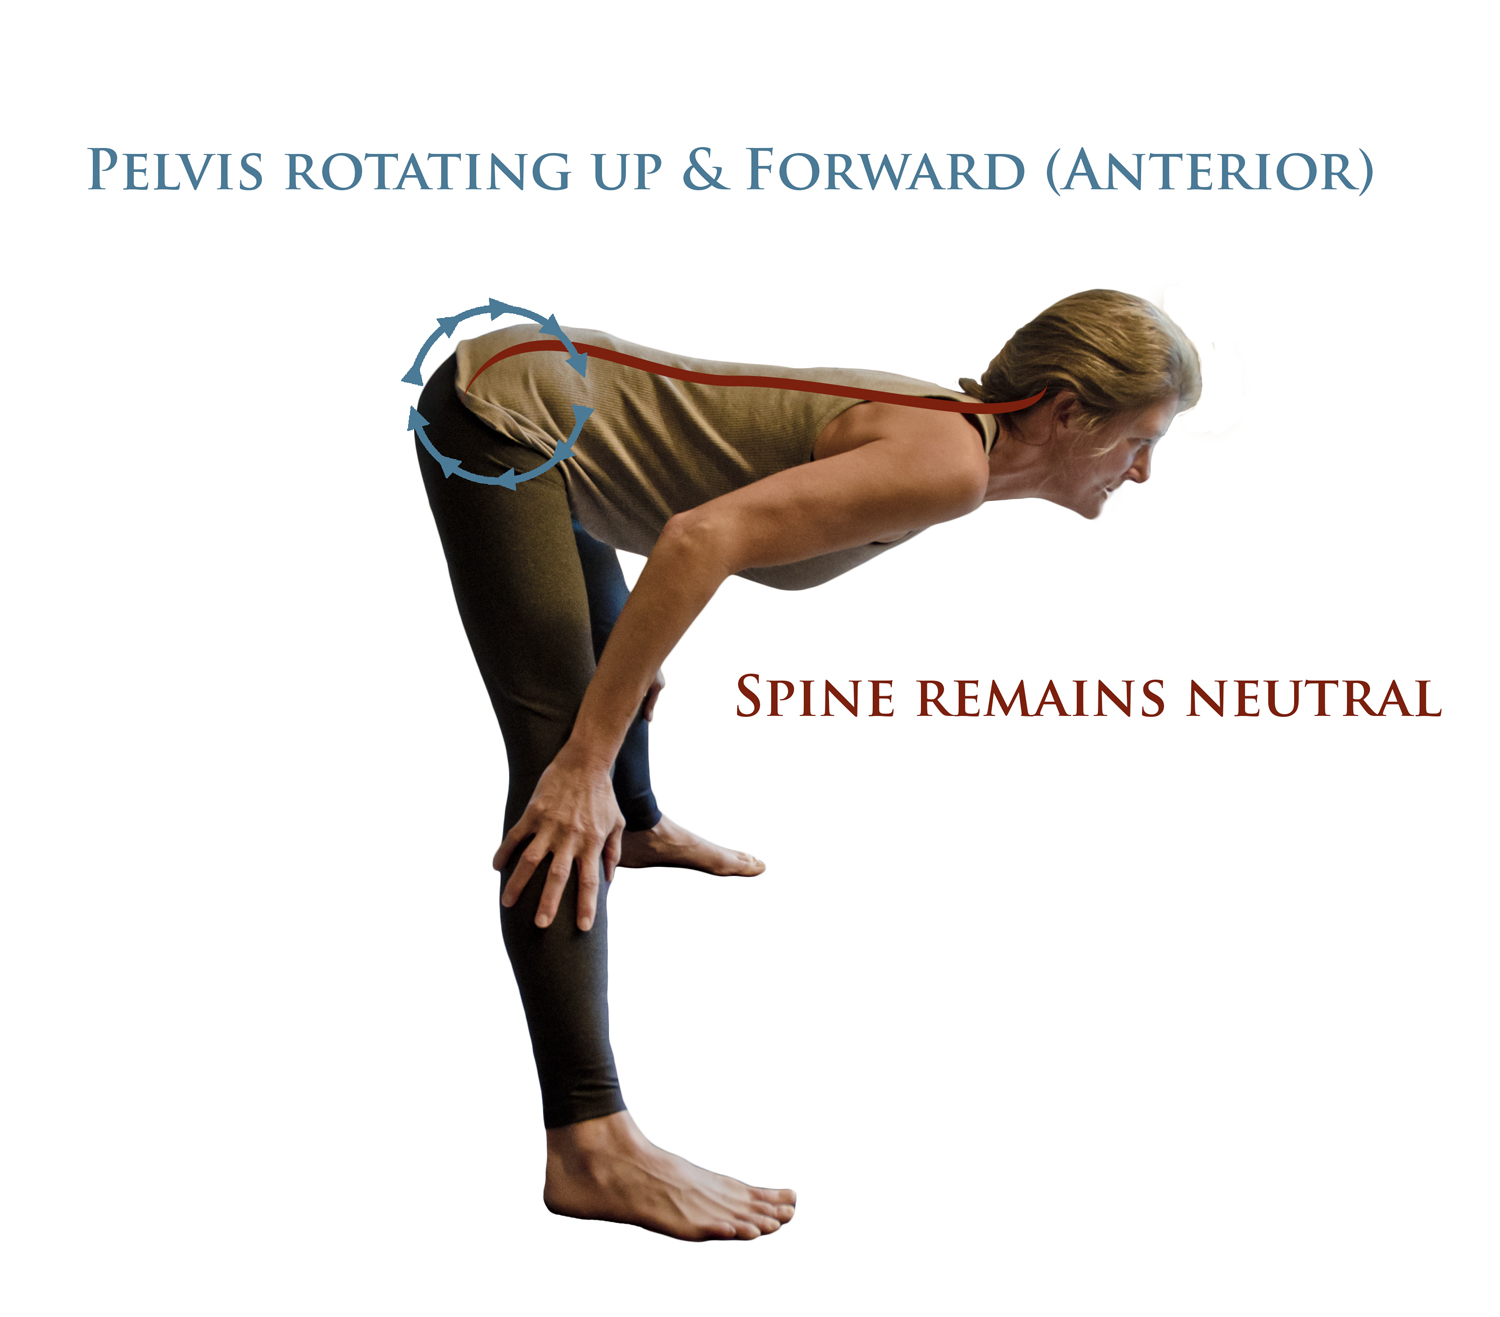
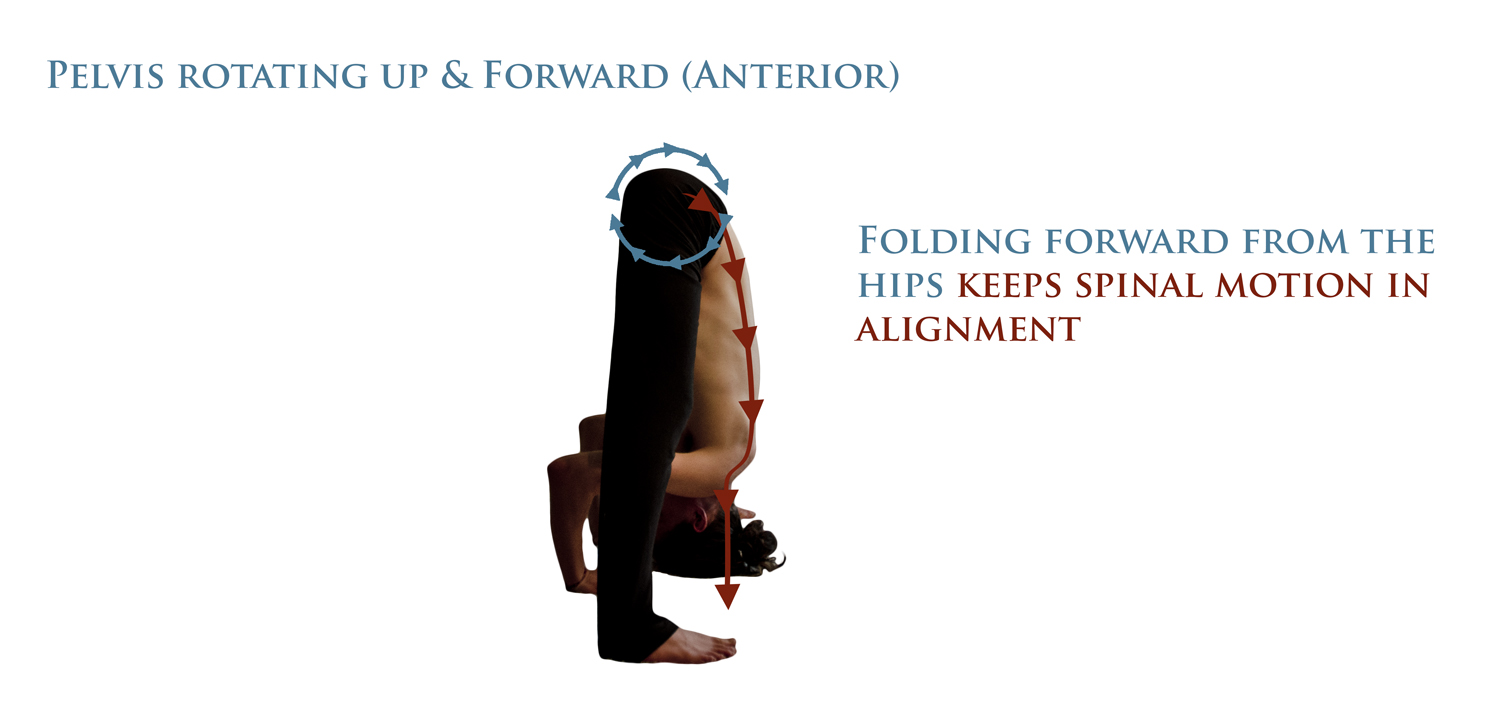
Keep this length as you fold forward, deepening the right hip crease. Be careful to only create this motion by the rotation of the pelvis — the upper body stays broad and active, resisting the movement by lifting towards the ceiling. Stop shy of the point where the back begins to round or curve, or the shoulders begin to draw together in front of the chest.

Keep both thighs rolling gently inwards, pressing the inner arch of the foot and the big toe mound into the ground. Do not allow weight to rest into the outer edge of the right foot, or the big to begin to turn out towards the right side. This serves to keep the hips moving towards square and prevents the asymmetrical stretching of the knee, which over time could create instability or pain. If the toes are turned out to the right, the tibia is typically rotating more than the femur, a difference made up for by a twisting of the knee joint itself (which is not well suited to rotation).

Lift the elbows towards the ceiling, away from the torso, to support the rotation of the head of the arm bone away from the sternum (external rotation of the humerus).

Parsvottanasana Side m


Lengthen the spine along the leg towards the toes.

The action of the bandhas is essential here to allow the elongation of the spine while maintaining balance.

Weight has a tendency to shift into the front foot. This will bring the hips out of alignment (see common mistakes below), and consequently, the entire spine will rotate. Counteract this by pressing down firmly through the left (rear) foot, shifting your weight backwards. You will feel the quadriceps engage, especially as a feeling of stability around the knee. This serves the dual function of stabilizing the leg and tipping the pelvis forward (anteversion) to bring the sacrum forward into alignment with the length of the spine.

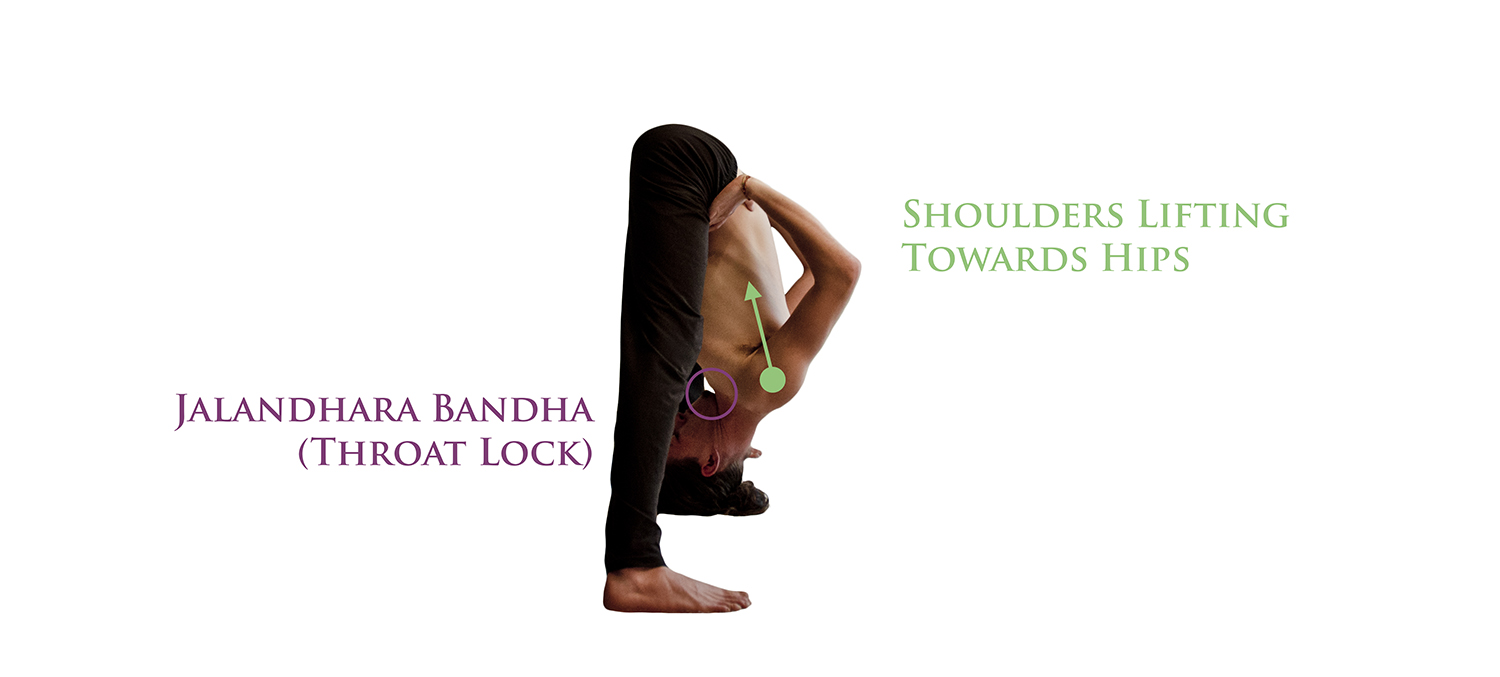
Keeping the neck in extension (looking towards toes as pictured above) should only be attempted if the cervical spine is competent. If the neck is not functioning properly, the vertebrae collapse as the head tilts back and compresses the back of the neck. A healthy extension of the neck demands action from all the cervical vertebrae and the musculature of the front of the throat. Gently press the forehead towards the foot and focus on Jalandhara Bandha at the throat – it should be assisting in creating a steady Ujjayi breath and engaging the muscles that stabilize the vertebrae. If you have any neck injury, feel like the back of your neck is shrinking or pulling into the shoulders, or that the skull is simply tipping back loosely atop the spine, instead look towards the toes of the rear foot. This will keep the neck in alignment with the rest of the spine, where it is more protected.

Press the palms together firmly to keep the arms active, encouraging the opening of the rib cage and the broadening of the area around the collarbones.

Parsvottanasana m


Stay here for 5 breaths, then inhale to standing. Exhale, pivot to face the front, repeat on the left side for 5 breaths. Inhale to standing, exhale to Samasthiti.


Common Mistakes

The most common misalignment in this position is, as mentioned above, improper positioning of the hips. Weight coming forward into the right (front) foot will tend to elevate the right hip and depress the left. This will cause the entire spine to rotate or bend laterally to compensate and maintain balance.

Parsvottanasana mistake 2Parsvottanasana mistake 1 m

This misalignment can also be seen with the opposite motion in the hips – right lip dropping, left hip lifting high. It may lead to the same position of the shoulders as an overcompensation.

Correct either by lifting to standing, and keep your weight rooted firmly into the rear foot. Focus on keeping the hips level vertically, lifting the left hip towards the ceiling. The action of mulhabandha (root lock) will help create the lift in the hips.

This is another common position:

Parsvottanasana mistake 3

Here, the stance is too short, bringing the weight almost entirely into the front leg. The pelvis gets “stuck” and rotates backwards, pulled by the right hamstrings.  This causes or exacerbates kyphosis of the spine, putting extra pressure on the lower back and allowing the upper body to droop downwards. This is an unhealthy position for the right knee, right hip, and lower back. It also tends to emphasize the rounding of back (kyphosis) already common in many practitioners.

For a more in depth analysis of the biomechanical action of forward folding, refer to Prasarita Padottanasana (Wide-Leg Forward Fold) or Understanding Pelvic Tilt, where the topic has been explored extensively.

Parsvottanasana Parsvottanasana Side

Into the looking glass

When you hear the word Yoga, what image pops into your head? For many, it’s vaguely synonymous with “relaxing,” “stretching,” or “calm.”

My idea is a bit different. But then, I practice Ashtanga Vinyasa.

Ashtanga Vinyasa Yoga is a therapeutic system designed to create alignment in body and mind with an emphasis on tapas. In Spain that’s a nice appetizer, but in India it’s a word that means something along the lines of “effort” or “burnishing.” Those first three adjectives (the image of sitting cross legged in perfect bliss) may describe the result, but they sure don’t do the journey justice! Ashtanga Vinyasa is a very active and energetic process, an alchemy of movement, breath, and one-pointed concentration that results in lightness, grace, and balance of body and mind. And boy, is it hard work.

The goal is nothing less than to dramatically and permanently improve your quality of experience in your own body and mind. Usually that comes as a combination of eliminating pain and discomforts, inspiring confidence and ease, and increasing self-awareness.

Many forms of exercise target specific muscles to strengthen or stretch. If you go the gym, there’s one machine for your shoulders, one for your chest, one for your quads, and so on.

Ashtanga Vinyasa is a bit different. I like to say that we’re trying to use all our muscles, all the time, just in different relationships and positions. Every movement you do affects your whole body, and in Ashtanga Vinyasa we use that to our advantage. Muscles (and bodies) benefit from being used in as many different combinations, lengths, and positions as possible.

So what do I mean by “creating alignment”?

Physically, there’s an optimal position that allows your body to be steady, stable, and comfortable, working effectively in its environment: the gravity of Earth.

Bringing the body into alignment with gravity and your activities creates space and ease in the body. We’re literally stretching ourselves out: growing taller, creating spaciousness in joints that are typically subjected to compressive forces. Most pains in muscles and joints come from misalignment or compression, often caused by injury, illness, or habitual movement patterns. The body is wonderfully adaptive and responsive to stimuli. Unfortunately that means it can pick up bad habits quickly; if you’re often using a computer or have a job that requires repetitive motion, your body will adapt to that pattern and allow the muscles and movements not used to wither away. But the upside is that by changing how the body moves, we can change how it develops (yes-your body is still developing) and effectively influence it for the better.

Muscles aren’t just used for getting you around or playing your favorite sport. They’re essential for many processes of the body, including circulation (cellular nutrition), toxin removal (lymph system), digestion, etc. They pulse and contract, pumping fluids throughout the body and preventing this flow from becoming stagnant. Unfortunately for most of us, our daily lives and routines don’t require us to use most of our muscles. Through disuse or injury (even small hurts – “oh it was nothing!” – can have an effect), areas of muscle stop functioning properly, becoming atrophied or “glued” together. They can no longer effectively perform their job of supporting the body and aiding the circulation of fluids. Percentage wise, the average person uses very little of their musculature, and most of that is the superficial layers closest the skin that span multiple joints. The smaller, deeper muscles become dormant and often, these muscles have remained in disuse for so long that they are no longer under conscious control.

Many people practice yoga for its cleansing aspect, “sweating it out.” Maybe that’s you.

If so, good news: activating these dormant areas of muscle is a powerful detox, but just as importantly, it brings fresh blood and nutrients to those cells. Sweating, alone (from heat, for example), won’t do much. Healthy muscle tone allows waste to be removed from tissue (then it can be sweated out) and replaced by fresh nutrients to create a healthy vibrancy.

The deep muscular engagement that we would benefit most from is in small, deep layers of muscle and fascia that require precise alignment to be activated. But if these muscles are atrophied, how can we access them?

This is the magic of the breath. Ashtanga Vinyasa is a breath-centered practice. Many of those deep layers of muscle aid or are involved in the process of breathing. By learning to direct the breath, we can begin to reinnervate those muscles much more easily. I think it’s amazing: we can actually use Yoga to rebuild and shape the nervous system (and it works!).

I love hearing people comment that they’re feeling sensation in a place that they didn’t know existed. That’s the delightful process of reawakening and increasing self-awareness.

Getting the maximum benefit from Ashtanga Vinyasa means constantly challenging yourself. One of the many things that I deeply appreciate in this system is that the challenge shifts and changes, but never disappears. It’s my constant companion and guide, pointing out those areas of my body or mind that need to be nourished and developed. It’s always pushing me higher, my motivation and muse. Sometimes I’ve resented it because I feel so completely seen and exposed – to the process, to myself – and let me tell you, it’s not been enjoyable for my attention to be drawn to the areas where I’m weak, where I’m deficient, or where I’m cheating myself. But that’s the Ashtanga Vinyasa process: mercilessly nurturing. It won’t let me ignore those places I don’t want to look. And I’m so grateful for it – when I don’t have the strength to take a good hard look at myself, well, bam. In your face. Deal with it. And through this process, I’ve transformed for the better in every way I experience my existence.

That challenge, that boundary, will meet you wherever you are. It will nourish you. It will push you. If you’re willing to invest your time and effort, it will pay you back a thousand fold.

If that’s a journey you’re willing to take, allow me to offer my sincere respect. It’s not a path for everyone. Not everyone is willing to go to that place of I-will-do-whatever-it-takes. But if that’s you – unroll your mat and stay awhile. We have work to do.

Prasarita Padottanasana

Prasarita Padottanasana

Prasarita Padottanasana Both

Note: Touch or hover your mouse over underlined terms for a definition.

  • Prasarita: Spread
  • Pada: Feet
  • Uttana: Stretched / Spread out
  • Asana: Pose

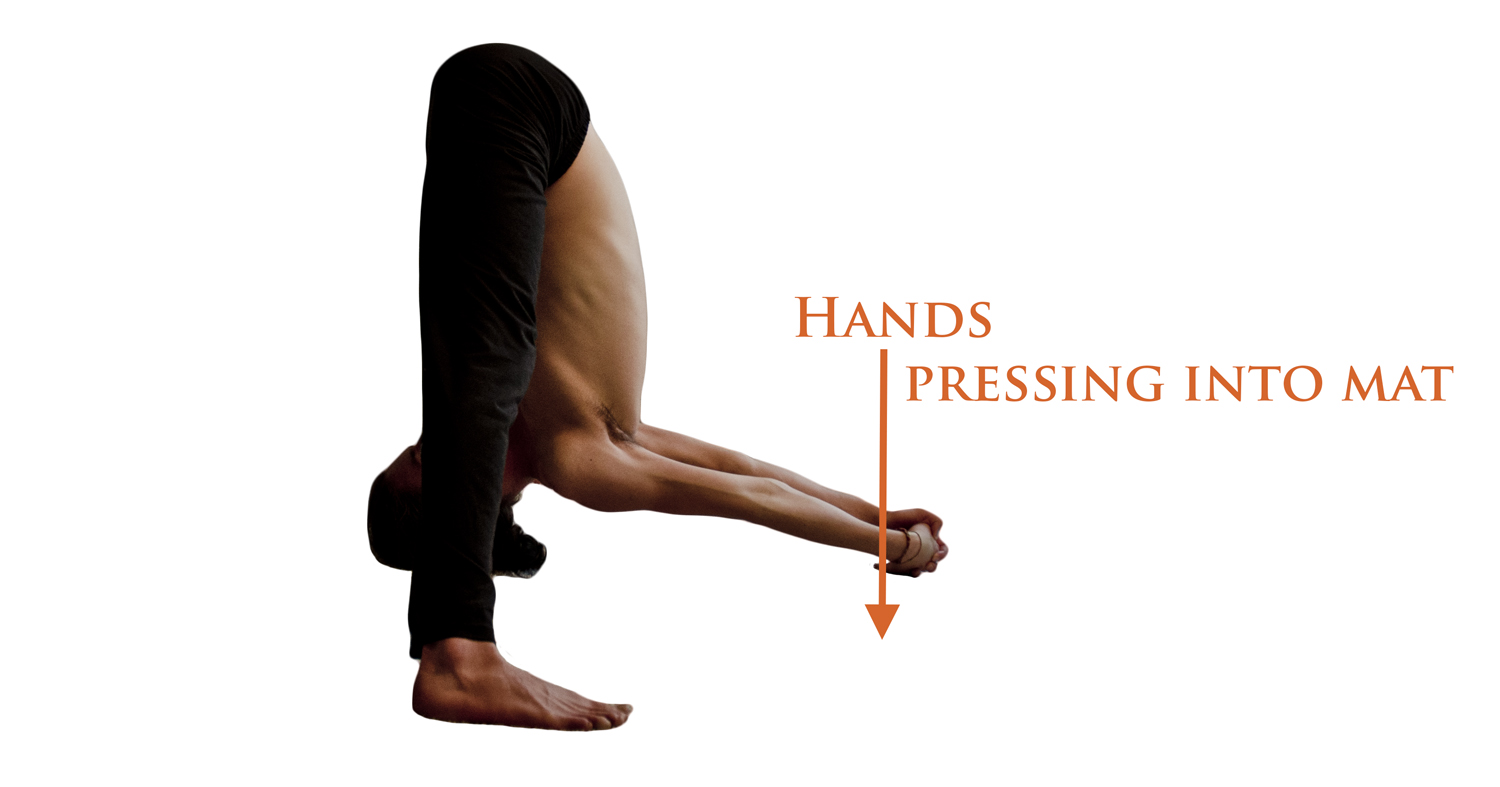
This is the seventh position of the Ashtanga Standing Series. It consists of four movements, Prasarita Padottanasana A, B, C, & D. (Pictured above: D)

The essential aspect of this pose is, like all forward folds, a lengthening of the hamstring muscles and rotation of the pelvis. The entire back side of the body, from the heels to the hips, down the spine to the neck, lengthens and relaxes while the front side of the body takes the effort of balancing.

Contraindications: Any injury in the spine should be treated with great caution. Lumbar injury, especially, may be exacerbated by performing this position incorrectly. Rounding of the spine (see: ‘Common Mistakes’, below) can place a great deal of stress on the vertebrae. If you’re practicing with an injury, seek the guidance of an instructor to ensure that this position is performed healthfully. If you have a condition that affects your heart or blood pressure, be careful with bringing the head lower than the heart, which may induce dizziness.

Vinyasa to Enter Prasarita Padottanasana:

Prasarita Padottanasana Vinyasa

From Samasthiti, inhale and step your right foot back 3-4′ and pivot the entire body 90° to face the side. Bring the toes in slightly, so that the edges of the feet are parallel to the edges of the mat.

Exhale, reach the hands to the sides, parallel to the mat with fingers spread wide.

Inhale, Press the palms into the waist and look slightly upwards.

Exhale, rotate the hips forward, guiding with the hands if you find it helpful. Allow the upper body to be dragged along by the motion of the pelvis with the head coming down last. Proceed to Prasarita Padottanasana Variation, A, B, C, or D during the exhalation.


Stage 1 Variation:

Prasarita Padottanasana J


This variation can replace any or all of the 4 positions. As such, it should be repeated 4 times, with Vinyasa between each 5 breaths.

It is essential that the spine be kept in a relatively neutral position. As seen in the photo above, the natural curvature of the spine is reduced somewhat, but all 4 spinal curves remain visible. If your hamstrings are tight, you may be tempted to round the spine to reach the hands to the mat or lower on the legs. Instead, take this variation, keeping the hands as high up on the legs as you need to isolate the movement of this asana in the hips and sacrum. Keep the shoulders and gaze lifted to prevent rounding (flexion) of the spine.

Moving from the hips will fold the body in a wave-like motion: first the sacrum and hips, next the abdomen, then the rib cage, and finally the head.

As the hamstrings lengthen, integrate the advanced variations, but be mindful that the spine remains neutral.

Take 5 deep exhalations and return to neutral by:

Exhale, hands to waist.

Inhale, lift to standing

Repeat Vinyasa as described above for next 5 breaths.

Prasarita Padottanasana A:

Note: for all the advanced variations, a point on the head called the ‘bindu’ (Sanskrit for ‘dot’ or ‘point’) presses into the mat. This is a point about one hand-width back from the crown of the head, where the skull begins to round. If the head does yet not reach the mat, continue to look forward and attempt to arch the back as you rotate from the pelvis.

Prasarita Padottanasana A


From Vinyasa, continue to exhale as you place the hands on the mat between or slightly behind the feet.

Inhale, look forward. Straighten the arms and press the sternum down towards the mat, lifting and rotating the hips anteriorly to lengthen the hamstrings, as if trying to arch the back.

Exhale, fold forward fully, pressing the palms down into the mat to use the muscles of the chest and shoulders to fold. Tuck the chin into the throat (jalandhara bandha – see variation B for clearer view) and press the bindu into the mat. Keep the shoulders lifting towards the hips, palms pressing into the mat.

Take 5 deep exhalations.

Inhale, keep the hands on the mat as you lift halfway, looking forward.

Exhale, palms to waist.

Inhale, lift to standing.

Repeat Vinyasa to enter the next variation.

Prasarita Padottanasana B:

Prasarita Padottanasana B

From Vinyasa, continue to fold forward as you exhale, until the bindu comes into contact with the mat. Press the hands into the waist, keeping the shoulders active, lifting through the elbows. Press the head down into the mat.

Take 5 exhalations.

Inhale, lift all the way to standing.

Prasarita Padottanasana C:

Prasarita Padottanasana C

In the second step of Vinyasa, interlock the hands behind the back as you inhale and look upwards.

Exhale all the way down, bringing the hands overhead.

Press the bindu into the mat, and press the hands down, if possible touching the hands to the floor. Be mindful that the shoulders are lifting towards the hips, rather than allowing gravity to pull the shoulders down towards the neck.

Hold for 5 exhalations.

Inhale, lift to neutral, keeping the hands interlocked until you’re standing upright.

Take Vinyasa to the next variation.

Prasarita Padottanasana D:

Prasarita Padottanasana D

As you exhale from Vinyasa, grasp the edges edges of the feet, sliding the fingers beneath the soles of the feet.

Inhale, keep the arms straight as you look forward. Press the sternum down to the mat and lift the hips, as if arching the back.

Exhale, use the strength of the shoulders to fold forward fully, reaching and lifting the elbows. Press the bindu into the mat.

Take 5 exhalations.

Inhale, keep the fingers beneath the feet as you lift halfway, straightening the arms and looking forward.

Exhale, hands float to waist.

Inhale to standing.

Exhale, reach the hands to the sides, turning the left foot to face the front of the mat. Step forward to Samasthiti.


Analysis:

Breathing: Be sure to inhale fully as you lift to standing. Take your time; don’t rush to a standing posture. You may feel dizzy if you lift too quickly. In inversions, when the head is below the heart, the veins carrying blood to the head relax their pumping action and dilate, since gravity is providing most of the force. If you lift too quickly, the veins will not be able to constrict quickly enough to match the movement. The dizziness is a symptom of vasogenic shock – a medical term which means that blood pressure in the veins is momentarily too low to pump blood against gravity to the brain. If you notice feelings of dizziness, take a few moments extra lifted halfway with the head at the level of the heart to allow the veins to constrict. Inhalation during is essential because inhalation not only supports the spine as it lifts the bodyweight, but increases heart rate. The increase in heart rate will help support blood flow more effectively than exhalation, in which heart rate is reduced.

Picking your stance:

Stance width is determined by the length of the spine relative to the length of the legs. Ideally, the pelvis will be at a height equal to the length of the upper body. The distance from the pelvis to the floor is modulated by the distance between the feet.  3-4′ will typically be sufficient.

Prasarita Padottanasana A Front

With a total body height of 6’2″, a stance of just less than 4′ is effective.

Taking a stance that is too wide may be tempting if you’re focusing on bringing the head to the ground rather than maintaining posture. If the pelvis is too low, there will not be enough room between the pelvis and the floor to accommodate the length of the upper body. This forces a rounding of the back, and thus is to be avoided. A proper stance distance may feel a bit too short at first, but you’ll ‘grow into it’ as the hamstrings lengthen.

Be mindful also of the ankles. If the ankle joint is weak it may ‘roll’ to the outside. This can be seen visibly in the feet as a lift of the inside edge of the foot up from the mat and an increased pressure on the outer toes. The skin around the toes or outside edge of the foot may become white as it is compressed by the body’s weight. Correct this by pressing down through the big toe mounds, inside of the heel, and pressing the inside of the ankle towards the mat. To find a stable balance on the feet, spread the toes and sole as wide as you can, increasing the surface area of the foot on the mat. Lift the toes to strengthen the arch. Avoid gripping with the toes.

Ensure that the outside edges of the feet are parallel to the edges of the mat. It may be tempting to turn the toes diagonally outwards to increase the sense of balance or to stabilize the ankles. This movement is created by rotation of the thigh in the hip socket, which may torque the knees, increase compression in the lower back, and shift the muscular emphasis of the asana.

 Common Mistakes:

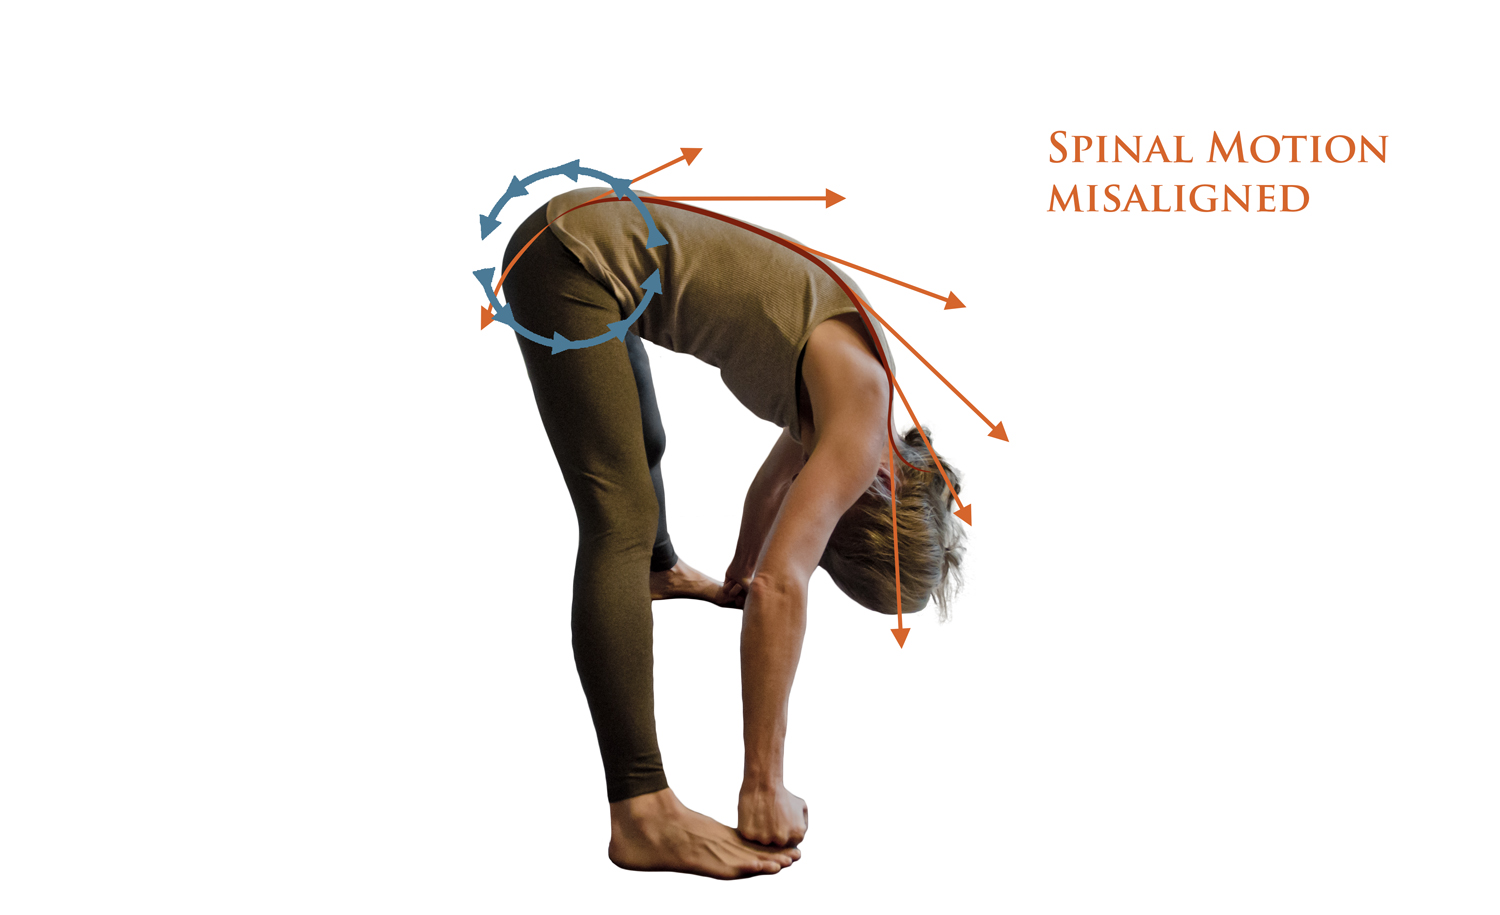
The typical mistake here is a rounding of the back, leading with the head rather than the pelvis. This is evidenced by a pronounced rounding of the lower spine and a posterior rotation of the pelvis.

Prasarita Padottanasana Mistake


Since this position emphasizes hamstring flexibility, we need to look at pelvic movement – the degree of anterior rotation of the pelvis is an indicator of hamstring flexibility. If the pelvis is in posterior tilt, the hamstrings are quite tight. Switching to variation 1 will help train the pelvic rotation necessary to produce the posture. Without awareness of pelvic tilt, or if the pelvis is ‘frozen’, the body will compensate to produce the ‘look’ of the asana by moving from the spine and upper body rather than the pelvis. This will serve only to reinforce this pattern of movement of bending from the waist rather than the hips, which is most likely a habitual movement outside of Yoga practice as well (kyphotic curvature). Creating this movement entirely from pelvic tilt will increase awareness of the area and loosen the muscles and ligaments of the back side of the core – hamstrings, glutes, lower back, etc – which is essential for the health of the spine and pelvis. Creating the movement from movement of the head or spine is ineffective in the sense it reinforces a kyphotic curvature to the spine (already predominant in many who use chairs, cars and computers) and does not address pelvic tightness.

In addition to being ineffective, this movement places stress on the vertebrae of the lower back and encourages bulging of the discs. It is typically the result of either lack of awareness in the spine, or an overeagerness to complete the full posture. To correct this posture in the case of lack of flexibility, lift to variation 1 and focus on rotating the hips. If flexibility is present, practice the Vinyasa and focus on creating the movement with the pelvis.

As with many Yoga positions, correct posture can be determined partly by looking at forces of motion within the body. We want to force of motion aligned in the spine, beginning with the sacrum.

Prasarita Padottanasana Mistake 2

Here, force of motion is scattered in many different sections, and the different parts of the body are working against each other. As illustrated by the arrows, the crown of the head is pressing straight down, but the sacrum is aligned up towards the ceiling. There is no cohesiveness to this movement.

Compare to the same movement created with pelvic rotation:

Prasarita Padottanasana J force

This photo shows force of motion in variation 1 (hands on shin or thigh), which is aligned. The slight variation of just a few degrees between the various sections of the spine reflects natural curvature, which should not be reduced. This focuses the effort of the stretch into lengthening the hamstrings and spine.

Consider the entire neutral spine a unit; do not move the 4 segments independently of each other. The degree of rotation present in the sacrum and lower back determines the position of the entire spinal column.

As the hamstrings lengthen, force of motion through the spine can be directed into more and more of a vertical axis until the head reaches the floor:

Prasarita Padottanasana A

The above picture is in the case of healthy hamstring flexibility.


Parivrtta Parsvakonasana

Parivrtta Parsvakonasana

Note: Touch or hover your mouse over underlined terms for a definition.

The following is a discussion of the position on the right side, as pictured. As an asymmetrical posture, it must be repeated on the left side.

  • Parivrtta: Revolved / Twisted
  • Parsva: Side
  • Kona: Angle

This is the sixth position in the Ashtanga Standing Series.

The essential aspect of this position is a twist of the spine from sacrum to atlas (pictured above left). With practice, additional layers are added, working more deeply in the shoulders, and then finally the hips, until the body twists in a spiral from the outside edge of the left foot, through the thigh, spine, and all the way up the right arm to the fingertips (pictured above right).

In the earlier stages, effort is focused on gaining rotational mobility in the spinal column. The legs and arms remain a relatively passive support and do not fully activate. A number of muscles in the core work synergistically to rotate the spine, including the oblique abdominals, the psoas major, quadratus lumborum, intercostals, and the rotatores.

As flexibility is gained through these spinal support muscles, the movement deepens and effort should be concentrated on relaxing these muscles and creating the force of the twist by leveraging the left shoulder and elbow against the right knee, which allows the spinal muscles to relax and lengthen while the more powerful hip abductor and pectoralis major muscles contract paradoxically. Because both the knee and the arm are immobilized, force is transmitted to the back side of the body, creating torque in the spine.

Contraindications: Any injury in the spine should be treated with great caution. Spinal twists can greatly exacerbate any injury, especially if the back curves (spinal flexion). Neck pain or cervical spine injury: Look forward, do not look up. If you have an injury in the knee or shoulder, modify by slightly bending the joint or finding a comfortable position. If placing the knee on the mat causes pain, it can be eased by placing a towel or blanket beneath the knee or moving the knee backwards and straightening it slightly (extension), increasing the angle between the upper and lower leg.


Stage 1:


parivritta parsvakonasana j markup


From Samasthiti, inhale and step your right foot back ~3′ and pivot the body 180°, bringing the hips fully square towards the rear of your mat — press the left hip forward and the right hip back. Place the left knee on the mat, keeping the toes tucked and the ball of the foot on the mat. Lift the left elbow high. Exhale fully as you twist, hooking the left elbow as low as you can on the right leg, bringing the armpit and rib cage as close to the knee as possible.

Press the palms together firmly and twist the torso to the side. Look up towards the ceiling.

Press the upper arm and knee together firmly, moving the knee towards the side of the mat, to deepen the twist.

Take 5 deep exhalations, then, in two separate movements*, slowly untwist then lift to a standing position. Pivot to face the front and repeat these steps on the left side.

Note: This position can also be entered directly from the previous asana, Utthita Parsvakonasana, without returning to Samasthiti.

*Lifting the weight of the upper body to an upright position while still twisted places the lumbar spine in a vulnerable weight-bearing position.


Stage 2:

As described in Stage 1, but straighten the left leg, lifting the knee off the mat. Keep the left toes pointing forward, reaching back through the heel.


Stage 3:


Parvrtta Parsvakonasana

From Utthita Parsvakonasana, lift to neutral and pivot to face the rear of the mat. Keep the left foot facing out at a 45° degree angle, with the sole of the foot pressing firmly into the mat. Both heels are in line. Square the hips, then exhale as you bring the left palm down to the mat on the outside of the right foot. Raise the right hand towards the ceiling and straighten the elbow fully. Turn the palm to face the mat and extend the arm overhead. Press the right knee into the left shoulder to create the force of movement to twist the spine. Gaze up to the right fingers.parivritta parsvakonasana m

If reaching to the ground is too much, you may place your hand on a block. Be wary of relying on props, and reduce the height of your support regularly.

Take 5 deep exhalations, then inhale to a standing position. Pivot to face the front and repeat these steps on the left side.


Analysis

As discussed above, the main focus of this asana is a twist of the spine. Stage 1 is a distillation of this essential movement. Stage 2 challenges balance and works to strengthen the legs. When progressing to Stage 3, the entire body becomes involved with the twist. Try twisting a washcloth, as if to wring water out. To create force in the center of the cloth, you will twist the ends in opposite directions. Similarly, the left leg and right arm rotate in opposite directions to intensify the twist in the torso. The left foot is turned out 45°, creating an anchor for the twist through the leg. The hips are square, ensuring that we are working between the left leg and the left hip (challenging the quadriceps and hip adductors), rather than twisting the left hip relative to the right hip.  One of the main aspects of progression here is the position of the left foot. The right foot stays in the same position for all 3 stages.

  • Stage 1: Left knee on the ground, ball of the foot pressing into the mat.
  • Stage 2: Left knee lifted, ball of the foot pressing into the mat, heel lifted and pressing back.
  • Stage 3: Left leg rotates 45°, bringing the sole of the foot and the heel down to the mat. This rotation of the foot brings both heels in line.

Picking Your Stance

In advanced stages of practice, Virabhadrasana II (Warrior II), Utthita Parsvakonasana (Extended Side Angle), and Parivrtta Parsvakonasana (Revolved Side Angle), all share the same stance. The exact foot placement depends on leg length, but will typically be quite wide, between 3-5 feet. A 3 foot stance would be appropriate for someone 4-5′ tall, while someone 6′ or over would require a 5′ distance between the feet.

A couple rules of thumb apply to all practitioners:

  • If the knee begins to reach in front of the ankle or over the toes (less than 90° angle in the knee), the stance is much too short.
  • If the hips are lifting up above the level of the head, the stance is much too short.
  • If your back knee is on the mat, walk the knee back as far as you can into a ‘lunge’ position.
  • If you feel wobbly, spread the legs to hip distance or more width-wise on the mat.


Spinal Alignment

In the pelvis, the spinal twist begins with the sacrum. In advanced practice, the spine may rotate a full 180°. Ideally, the sacrum will have a few degrees of rotation at most. In many practitioners, this area may be ‘frozen’ by severely tightened pelvic ligaments and a chronically overcontracted piriformis.

parivritta parsvakonasana back markup

The twist continues up the spine, with a few degrees of rotation at most from each lumbar vertebrae. It is best to focus on lengthening, rather than rotating, the lumbar spine as it is not well suited to twisting. A much larger amount of rotation comes from the rib cage, and finally the cervical spine twists to allow the gaze to move upwards.

As with any spinal twist, it is important that the spine be kept neutral in all planes of movement except rotation. This applies to both Stage 1 & 2. Tightness through the hamstrings and lower back will manifest here, as with any forward fold. These compensations can commonly be observed in those who bend at the waist rather than the hips.

The most common accessory movement here is flexion of the spine, with the back rounding or curving forward. This is a very dangerous combination, as the combination of flexion and twisting is the most vulnerable position of the lumbar spine. Flexion is typically a compensation for tightness in the hamstrings or a pelvis frozen in posterior rotation, and shows that the lower parts of the spine – the lumbar and sacral – are not working in conjunction with the two upper sections of the spine.  This movement can be corrected by focusing on rolling the hips up and forward (into anterior rotation) and beginning the twist from as low in the spine as possible. Ensure that there is no gap between the navel and thigh.

A second common accessory movement is lateral flexion from the thoracic spine – bending from the waist to the side, a compensation to bring the shoulders lower. Lifting from the bottom of the rib cage will lower the top edge (the collarbone & shoulers), allowing an extra few inches of reach through the arm. This movement masks tightness in the lower spine and pelvis. A common symptom of this compensation is feeling as if you’re only breathing into the right (top) side of the lungs and the left (bottom) side is compressed. Correct this by pressing the bottom left ‘wing’ of the rib cage down into the thigh and focus on breathing into and expanding the left lung.

Shoulders & Arms

parivritta parsvakonasana side markup

Engaging the muscles of the back will serve to compress, rather than lengthen and twist, the spine. This explains the importance of the hand position. By stabilizing through the shoulders and upper arm, the force of the twist can be generated by pressing the knee firmly against the upper arm. If the palms are pressing together, the effort is focused mostly into rotation of the rib cage. If the hands are extended as pictured, the muscles around the shoulders and neck are being addressed at a deeper level; placing the hand near the foot also requires a large degree of rotation from the thoracic spine. By lengthening the arms (straightening the elbows), the muscles in the shoulder are more fully engaged because they are being stretched from both ends while contracting. Keeping the arms bent and the palms together allows the muscles of the shoulders to relax more.

The fingertips of the left hand are aligned with the right toes to balance two opposing alignments in the body: keeping the shoulder and arm aligned at 90°, and keeping the knee and shoulder together. Bringing the hand farther back towards the heel would hook the shoulder more deeply over the knee, but would create a potentially damaging angle in the wrist joint. Putting the wrist at less than a 90° angle in weight bearing positions should be approached very cautiously. If, instead, the hand were moved forward of the toes, the shoulder and knee would no longer be in position to press together to create the force of the twist (unless, of course, the knee were moved forward over the toes–which would be harmful to the knee joint.

Once you feel stable, press down through the left hand and lift up through the right shoulder, broadening the space between the shoulderblades. Ensure that the shoulders stay strong and wide, rather than collapsing in around the neck.

Common Mistakes:

Mistakes are relatively infrequent in this position, and stem mostly from lack of flexibility and will thus be corrected over a period of time as flexibility increases.

The most frequent instability in this posture is flexion of the spine, as described above, which can be improved by focusing on lengthening and folding from the hip.

The knee may attempt to creep towards or over the midline of the body, to balance inflexibility in the shoulders, with the knee moving out over the mat instead of the ankle. Typically, putting weight into the front leg before beginning the twist will stabilize the knee joint, but if you notice this happening, focus on moving the knee to the side, pressing it into the elbow as discussed above, until it is centered above the ankle.

Utthita Parsvakonasana: Extended Side Angle

Utthita Parsvakonasana: Extended Side Angle

Note: Touch or hover your mouse over underlined terms for a definition.

Utthita Parsvakonasana

  • Utthita: Extended
  • Parsva: Side
  • Kona: Angle

This is the fifth posture in the Standing Series.

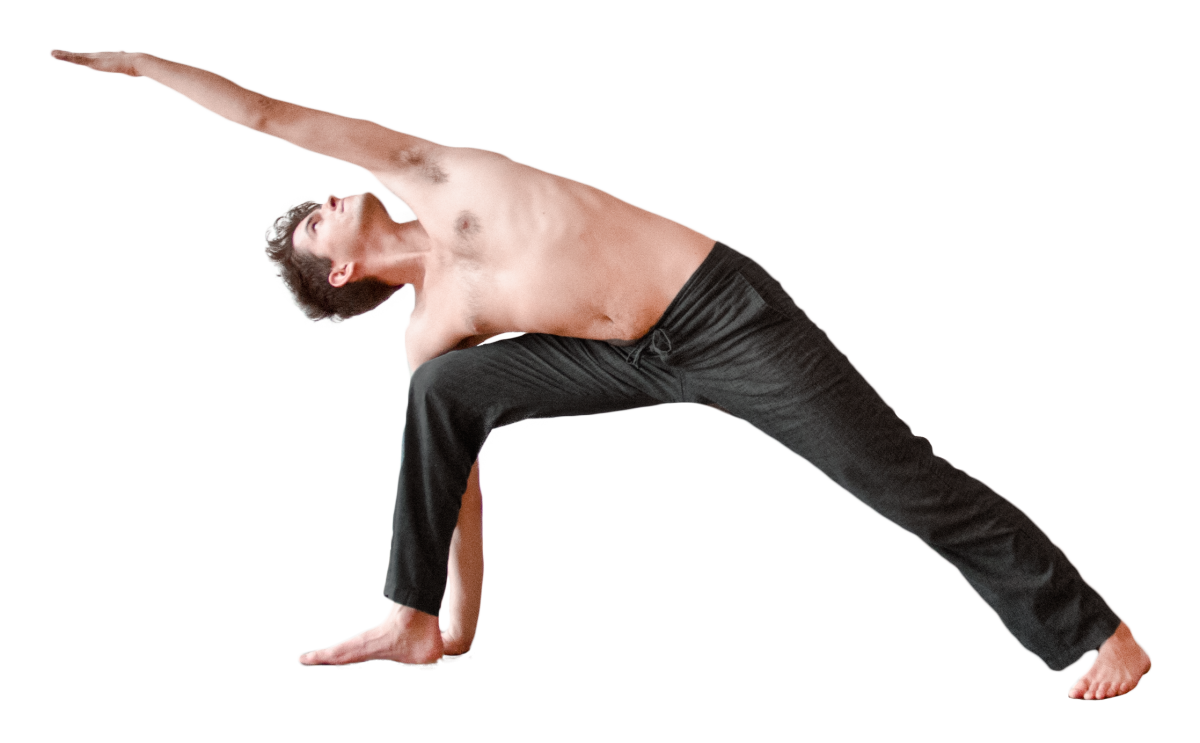
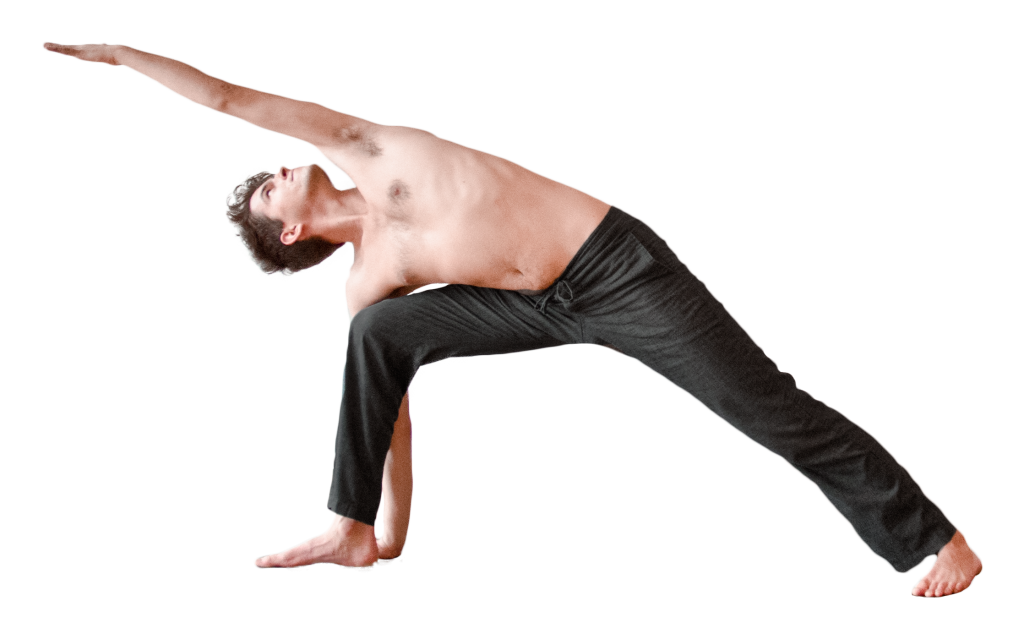
This is a deceptively complicated posture, and practicing it correctly demands great awareness.  It is concerned primarily with the external rotation of the upward side of the body.

The following is a discussion of the position on the right side, as pictured. As an asymmetrical posture, it must be repeated on the left side.

In the legs, this posture focuses on strengthening and opening the pelvic region: the right leg (bent) is strengthening through the quadriceps and abductor muscles while the hip adductors lengthen. In the left (straight) leg, the hamstrings strengthen, hip adductors contract eccentrically while the quadriceps lengthen.

In the core, this position challenges the psoas muscle and presents an opportunity to lengthen and strengthen both the psoas and the lower back by engaging uddiyana bandha.

The spine lengthens, the muscles of the shoulders lifting the rib cage away from the pelvis and keeping the spine in neutral alignment. The right (lower) arm presses down while the left (upper) lifts overhead, rotating the rib cage forward and creating a stretch through the entire left side of the body from outer edge of the foot to the fingertips.

There are two distinctive stages – practice the first as you focus on opening the pelvis, and proceed to the second only after you’ve mastered stage 1.

Contraindications: Neck pain or cervical spine injury: do not look upwards. If you have an injury in the knee or shoulder, modify by slightly bending the joint or finding a comfortable position.

Stage 1:

uttita parsvakonasana 1 markupFrom Samasthiti inhale and step your right foot back ~3′ and pivot the body 90°, bringing the hips square towards the side of the room. Turn the right foot out to the back of the room – not more than 90°, keeping the outside edge of the foot parallel with the edge of your mat. Bring the right heel in line with the ball of the left foot.

Picking your stance: 

  • Right heel to left ball of the foot will give you a little more mobility through the pelvis and help to bring the right hip forward (it has a tendency to fall back behind the midline of the body-see ‘Common Mistakes’ below).
  • Keeping the feet too close together will ‘freeze’ the pelvis in a lifted position.  Try keeping the feet 3-4′ apart depending on your leg length and flexibility. Knee position is a good indicator: if your knee is out over your toes or farther, your stance is much too short. If your knee is way back behind the ankle, your stance is too long. The upper leg should be parallel with the floor, creating a 90° angle at the knee.

Bend the right knee, reaching the fingertips to the sides in a Warrior II stance. Now reach the right fingertips towards the back wall, lengthening the right side of the torso.

Place the forearm on the knee and reach overhead with the left hand, creating a straight line from left foot to left fingers. Keep the muscles of the shoulders engaged to keep the left arm from squeezing towards the neck or ears – make sure there is a gap, and that the arm is strong in the shoulder socket. If the shoulder muscles are relaxed, the arm will tend to pull slightly out of the socket, creating instability in the joint.

Press the forearm and knee together, pressing the knee forward and resisting the movement with the arm. This paradoxical movement will help to open both the right hip and rotate the right shoulder forward into alignment over the knee. Keep both sides of the torso long and straight, and be mindful that the chest doesn’t rotate forward, collapsing towards the ground.

Press the left hip down towards the right foot. You will feel this intensify the stretch of the adductor muscles on the inside of the thigh.

Spread the toes wide and press the inside arch of both feet firmly into the mat. The left foot especially will have a tendency to lift the arch and big toe up off the mat, rolling and compressing the ankle. Be sure you keep the ankle strong by pressing down through the big toe and inside arch of the foot.

Gaze up to the left fingers, or, if your neck has been injured or looking up is painful, look forward (as pictured) and avoid twisting the neck.

Take 5 deep breaths, then lift through the left hand and return to a standing position. Pivot the feet and repeat these steps on the left side.


Stage 2:

Do not proceed to this step until your body feels relaxed and strong in stage 1.

uttita parsvakonasana markupFrom Samasthiti inhale and step your right foot back ~3′ and pivot the body 90°, bringing the hips square towards the side of the room. Turn the right foot out to the back of the room – not more than 90°, keeping the outside edge of the foot parallel with the edge of your mat. Bring the right heel in line with the heel of the left foot.

Bend the right knee, reaching the fingertips to the sides in a Warrior II stance. Now reach the right fingertips towards the back wall, lengthening the right side of the torso.

Place the right palm on the mat or block and reach overhead with the left hand, creating a straight line from left foot to left fingers. Bring the side of your torso, especially the abdomen and lower part of the rib cage, onto the right thigh. Press the arm and lower leg together firmly to create stability and opening through both the hips and shoulders.

Continue to focus on lengthening and straightening the body as described in Stage 1.

Utthita Parsvakonasana

A major decision to make here is whether to place the palm on the inside or outside of the foot. Hand placement will have a surprisingly large impact on the entire posture.

Traditionally, the hand is placed on the outside of the foot (index finger to pinky toe).

Unless you’re an experienced practitioner with very loose muscles through the chest and hips, this hand position will tend to roll the chest forward and down, twisting the spine. It also unhelpfully encourages the tendency to hyperextend through the lower back, reinforcing weakness at the T12/L5 vertebrae. This is evident if the navel is farther forward than the sacrum or shoulders, creating one big ‘arch’ throughout the spine rather than 4 neutral curves. Another indicator of this is if you can feel or see the bottom rib ‘flaring’ up. In a neutral position, the bottom ribs should be covered by the abdominal muscles, and you will be unable to feel the bottom edge of the ribs.

Furthermore, pressing the arm forward and the knee back will contract the muscles of the chest (mostly the pectoralis major) and the hip abductor muscles. This will suck the chest down towards the mat, rotating both shoulders forward and down, plus pull the right hip back farther behind the midline and roll the left hip forward and down. These are all trends that we are trying to reverse through the practice of the posture.

Thus, I typically recommend that the hand be placed on the inside of the foot (pinky finger to big toe):

  • Press the navel back towards the spine (uddiyana bandha) and ‘tuck’ the rib cage down into the abdominals. When you’re doing this correctly, you will feel an intense effort through the abdominal muscles and a lengthening and decompression of the lumbar spine. It is very important that you do this step first. If you proceed to the next step before stabilizing the abdominal area, your lumbar spine will hyperextend and you will receive little benefit from this posture.
  • Press the arm back into the leg & press the knee forward into the arm: this will engage the muscles of the back, pulling the chest open and rotating the shoulders into a vertical position over the knee. It will also contract the hip adductors, which work to move the knee inwards; since the knee can’t move (you’re pressing down into the right foot and the right arm is generating resistance) this force will be transmitted to the hip, pulling the right hip forward towards the midline. Keep this effort up throughout the posture; it is essential for stabilizing the pelvis and opening the chest and hips to the side.

Focus on rolling the entire left side of the body up and back (external rotation). Roll the thigh up and back, roll the left hip itself up and back, and lift and rotate the left shoulder. When in proper alignment, the hips will be ‘stacked’ vertically, and both shoulders will be floating over the knee.

Viewed from the front to show rotation of the shoulders and hips.

utthita parsvakonasana front markupNext, focus on lengthening through the spine, pulling the rib cage and crown of the head up away from the pelvis. Breathe deeply, expanding through the rib cage to create space between the shoulder blades (scapulae) and spine.

After you feel loose and comfortable in this position, play with bringing the hand to the outside of the foot. If your body is sufficiently prepared, moving the hand back will make a slight but important improvement in the alignment of the hips and shoulders over the midline of the body. As you can see in the photo above, the crown of the head and both shoulders are a fraction of an inch in front of the vertical axis of the body (red line); moving the hand to the other side of the foot can help to move the shoulders and head back that small amount. However, as mentioned above, if you try to do this too soon you will more likely hyperextend the spine and collapse through the upper body. Choose your position with great awareness.

 Common Mistakes: 

These two photos show some positions that are very common yet, unfortunately, not very effective. Note that though these photos show the right hand on the mat, these mistakes are equally common with the forearm on the knee. That said, these positions are especially common in someone who is too eager to advance from stage 1 to stage 2 of this posture, and can often be corrected simply by using a block or placing the forearm on the knee.


uttita parsvakonasana mistake markup

In this photo we can observe that the feet are too close together. This is severely limiting the mobility of the pelvis: the only way to lower the hips would be to bring the right knee way out over the toes, which is undesirable. There is little cohesiveness to this posture, and the body is moving in a segmented way: there are distinct forces of motion at work in the lower body, the torso, and the upper body; the crown of the head is falling down towards the ground rather than lifting towards the left hand.

Also of note is that the torso is compressing on the right side. The right side is shorter than the left, and you can even see the ribs lifting up on the left side of the body. This ‘flaring’ is indicative of a lateral bend at the junction of T12/L5.

Viewed from the front, we can see that very little of the body is aligned vertically. There is a very clear relationship between the left hip and shoulder: they tend to move together to create balance. If you’re tight through the upper body and rolling forward, the hip will automatically compensate by moving back to prevent you from falling forward. The same thing will happen if the pelvic area is tight – if the hips move far behind the midline of the body, your upper body will have to move forward to prevent you from falling backwards. The body will compensate for tightness in the side of the pelvis and abdomen by making the movement more of a forward fold than lateral extension, making the posture into a lunge with one hand lifted. Rolling the torso forward allows the body to avoid stretching the tight or weak muscles. Be mindful of this tendency as you practice Utthita Parsvakonasana.uttita parsvakonasana front mistake markupTo correct this posture, lift back to neutral. Don’t worry about going deeply into the posture just yet, it’s much more important to have correct alignment. As you move into the position, focus on making an intense effort to roll the left hip and shoulder up and back to open the side of the body. 


Understanding Pelvic Tilt

Understanding Pelvic Tilt

Note: Touch or hover your mouse over underlined terms for a definition.

The pelvis has three primary skeletal components: the right hip, the left hip, and the sacrum. While these pieces can move independently, they often work together as a unit, and the each piece exerts an influence on the pelvis as a whole. They will be discussed collectively in this article. Pelvic tilt involves a simultaneous movement of both hips, the sacrum, and the lumbar vertebrae.

To understand pelvic tilt, find your ASIS – a small bony projection at the upper front of the hip bones. When this point moves forward and down, the pelvis is in a state of anterior tilt. When the ASIS moves up and back, towards the spine, this is posterior tilt.

ant pelvic tilt

Parivrtta Trikonasana – Revolved Triangle Pose

Parivrtta Trikonasana – Revolved Triangle Pose

parivritta trikonasana 2

Note: Touch or hover your mouse over underlined terms for a definition.

Parivrtta Trikonasana:

  • Parivrtta – Revolved / Twisted
  • Tri -Three
  • Kon – Angle
  • Asana – Pose

This is the fourth position in the Standing Series. It serves as a counterpose to the previous posture, Trikonasana, by twisting the hips in the opposite direction, opening the opposite shoulder, and lengthening the lateral collateral (outside) ligament of the knee.

Latissimus Dorsi

Latissimus Dorsi

Latissimus Dorsi

Note: Touch or hover your mouse over underlined terms for a definition.

The Latissimus Dorsi, commonly known as the ‘Lats’, is a broad muscle group in the back. The lats connect (originate) from the spines that protrude from the back of the vertebrae of the sacrum, lumbar, and lower thoracic spine. They are also attached to the bottom edge of the scapula.

Utthita Trikonasana – Extended Triangle Pose

Utthita Trikonasana – Extended Triangle Pose

Trikonasana


  • utthita – extended;
  • tri – three;
  • kona – angle;
  • asana – pose

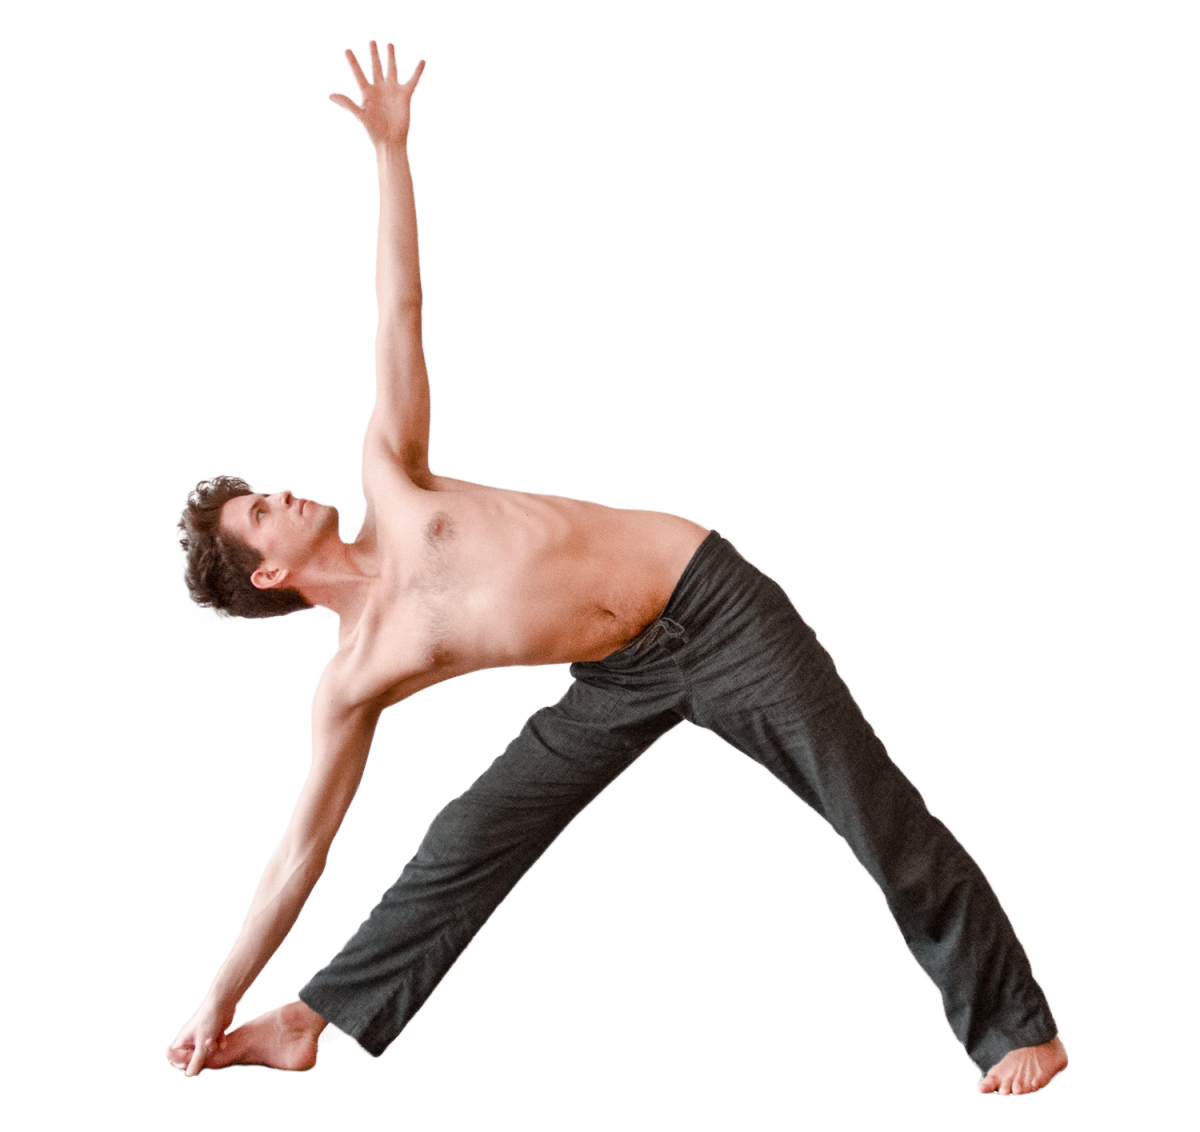
Utthita Trikonasana is the third of the Ashtanga-Vinyasa standing positions. The primary effect of this pose is an increased ability to rotate the forward leg (right pictured) in the hip socket, plus a strengthening of the oblique abdominal muscles. This posture can also be very beneficial for the health of the knee joint, stretching the medial (inside) collateral ligament (the next position, revolved triangle, creates balance by stretching the lateral [outside] collateral ligament).

6 of 7
1234567